Puzzle 006 is Bunny-Hop Swap, the rabbit-jumping puzzle hidden in Ledore Parlor. It's a 20-picarat Solitaire puzzle in Chapter 1, and you find it by tapping the upper part of the tall cabinet on the right of the room. Twelve white toy rabbits sit on a four-by-four board with four empty squares. A rabbit moves only by jumping over other rabbits, and every rabbit it jumps over swaps color, white to brown or brown back to white. Your job is to turn all twelve brown. The hints below open one at a time, and the answer stays hidden until you choose to show it.
This page covers story Puzzle 006 in Professor Layton and the Miracle Mask on Nintendo 3DS, using the North American text, with pictures rebuilt from the game's own art. The UK English version has the same puzzle under the same name, with the same answer. If you're after Daily Puzzle 006 or one of the later rabbit puzzles, see Wrong Puzzle 006? below.
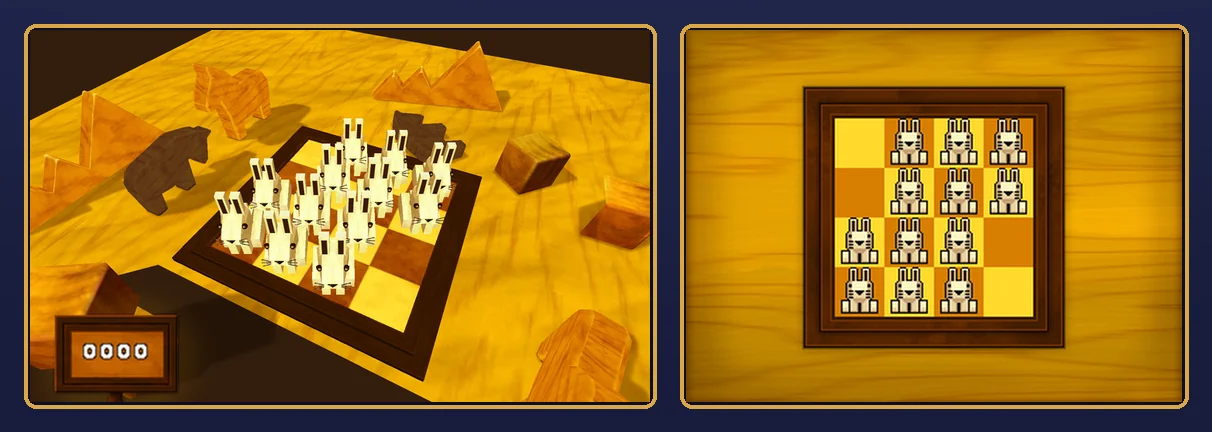
What Puzzle 006 is
| Name | Bunny-Hop Swap (the same in the US and UK English versions) |
|---|---|
| Type | Solitaire |
| Picarats | 20 |
| Location | Ledore Parlor, on the upper part of the tall cabinet on the right |
| Chapter | Chapter 1 |
| Given by | No one: it's a hidden puzzle you find by tapping the cabinet |
| Solved by | Emmy; the Professor is the one who comments on it in the scene |
| Is it mandatory? | No; it's a hidden puzzle |
| Reward | None besides the picarats |
| Hints | Three hints and a Super Hint |
| Previous / next puzzle | 005 Robot Factory (Knickknack Alley) / 007 A Toasty Toast (Carnival Arcade) |
The puzzle gives you three rules. A rabbit can only move by jumping horizontally, vertically or diagonally over other rabbits. It can jump over any number of rabbits at once. And a white rabbit turns brown when it's jumped over, and the other way round. A jump has to go over an unbroken line of rabbits and land on the first empty square right after them, and only the rabbits that get jumped over change color. The rabbit doing the jumping keeps its color.
A wooden sign on the upper display counts your jumps. There's an Undo button that takes back your last jump (the counter goes back down by one) and a Restart button that puts every rabbit back where it started, so you can experiment freely.
Bunny-Hop Swap in other languages
The US and UK English versions both call it Bunny-Hop Swap, and the puzzle text differs only in small details of wording. The Japanese title is 白黒ウサギ (Shirokuro Usagi, "black and white rabbits"). The North American release also carries an internal Japanese label for it, 猫のオセロ ("cat Othello"), which differs from the released title.
Wrong Puzzle 006?
- Daily Puzzle 006 in Miracle Mask is a separate puzzle: it's the level called Rabbit 01 in the Food Chain set, and it's unrelated to Bunny-Hop Swap.
- Bunny-Hop Swap 2 and 3 are later hidden puzzles with the same goal, "Turn all the rabbits brown!", on different boards: 028 Bunny-Hop Swap 2 in Layton's Room (30 picarats) and 074 Bunny-Hop Swap 3 at the Racetrack (40 picarats).
- Kitty Solitaire, such as Puzzle 122: Kitty Solitaire 3, is a different puzzle with different rules.
- Puzzle 6 in another Layton game is a different puzzle. If yours has no white and brown rabbits, you're in the wrong game.
Where you get it
Puzzle 006 is in Ledore Parlor in Chapter 1. Nobody hands it to you: it's a hidden puzzle, and you find it by tapping the upper part of the tall wooden cabinet on the right side of the room. It's worth checking just before you leave the parlor. Layton's reaction when you find it is "We've stumbled upon a hidden puzzle here."
If you back out, Layton says "I'll just make a note of its location and leave it for later." That means you can come back to it, though the hidden spot may not stay there for the rest of the game.
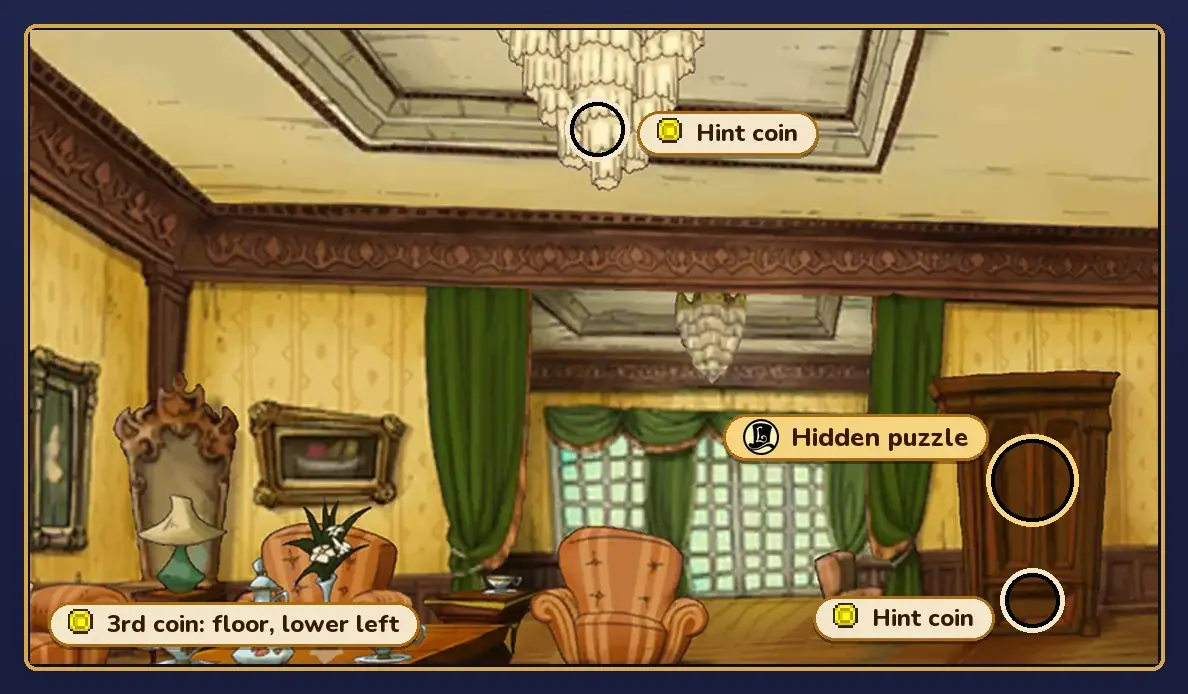
Hint coins in Ledore Parlor. The room has three hint coins, and all three are in the normal view (the parlor has no zoomed-in view): one on the floor at the lower left, one on the lower part of the cabinet on the right, just below the puzzle, and one on the chandelier. Three coins aren't enough to open all four of this puzzle's hints, which cost five in total.
Square numbers used on this page
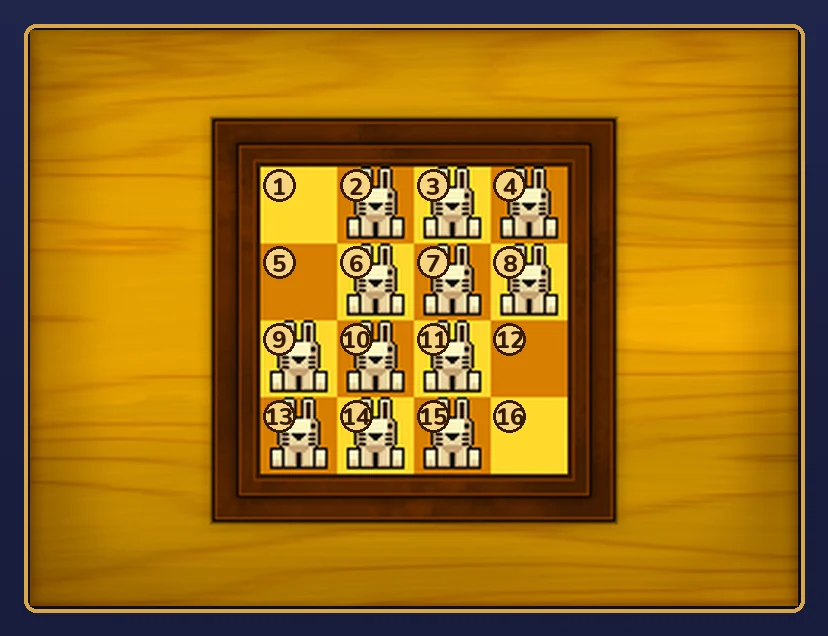
The hints and the answer number the squares of the touch-screen board from 1 to 16, left to right and top to bottom: 1 is the top-left corner, 4 the top-right, 13 the bottom-left and 16 the bottom-right. At the start, squares 1, 5, 12 and 16 are empty and the other twelve hold white rabbits.
Hints, one at a time
These follow the game's own hints, in the same order, with a little more explanation. Open only the next one you need. In the game, Hints 1 to 3 cost one hint coin each and the Super Hint costs two.
Hint 1: the first jump
Start with the rabbit in the top-right corner, on square 4, and have it jump straight down. It goes over the rabbit on square 8 and lands on the empty square 12.
That turns one rabbit brown and opens up the top-right corner, which you'll need for the next jump.
Hint 2: one rabbit does the work
Now take the white rabbit in the bottom-left corner, on square 13. First jump it up the diagonal into the top-right corner you just opened, then jump it along the top row into the top-left corner.
Each of those jumps clears two rabbits at once, so watch how many turn brown.
Hint 3: round the corners
Keep using the same rabbit. From the top-left corner, jump it down the long diagonal to the bottom-right corner, then along the bottom row to the bottom-left corner.
The game's hint says the solution should be getting clearer by now. Notice how each jump into or out of a corner lets one rabbit flip two others at once.
Super Hint: one white rabbit on each side
After Hint 3, the rabbit you've been moving is back in the bottom-left corner. Move it up by one jump. That leaves just one white rabbit on each side of the board: one on the left edge and one on the right edge.
Now think about which brown rabbit can jump over each of them into an empty corner.
Answer and full solution
The answer below lists every jump, with a picture of each move and of the finished board. Open it when you're ready.
Show the answer
The answer takes eight jumps: 4 to 12, 13 to 4, 4 to 1, 1 to 16, 16 to 13, 13 to 5, then 9 to 1 and 8 to 16. After the last jump, all twelve rabbits are brown.
| Jump | From | To | Jumps over (these flip) |
|---|---|---|---|
| 1 | 4 | 12 | 8 |
| 2 | 13 | 4 | 10, 7 |
| 3 | 4 | 1 | 3, 2 |
| 4 | 1 | 16 | 6, 11 |
| 5 | 16 | 13 | 15, 14 |
| 6 | 13 | 5 | 9 |
| 7 | 9 | 1 | 5 |
| 8 | 8 | 16 | 12 |
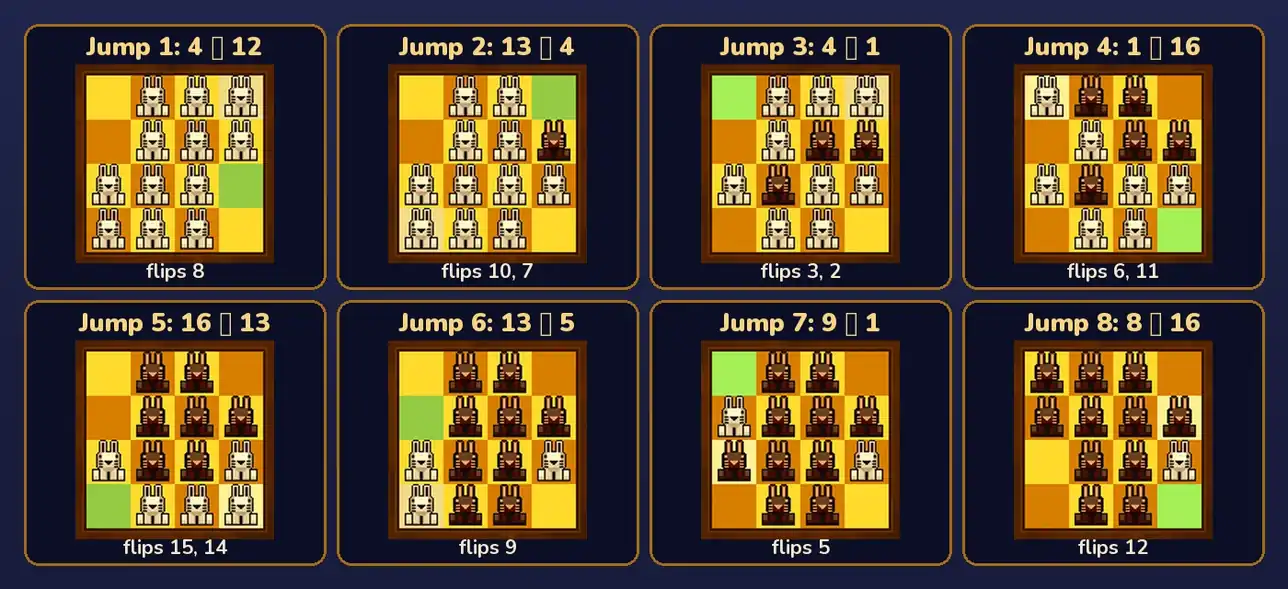
Step by step:
- 4 to 12. The top-right rabbit jumps down over square 8, which turns brown.
- 13 to 4. The bottom-left rabbit jumps up the diagonal over 10 and 7 into the top-right corner. Both turn brown.
- 4 to 1. The same rabbit jumps left along the top row over 3 and 2 into the top-left corner.
- 1 to 16. It jumps down the long diagonal over 6 and 11 into the bottom-right corner.
- 16 to 13. It jumps left along the bottom row over 15 and 14 into the bottom-left corner.
- 13 to 5. It jumps up over 9 to square 5. This rabbit has stayed white the whole time, and now there's one white rabbit on each side: on 5 and on 12.
- 9 to 1. The brown rabbit on 9 jumps up over the white rabbit on 5 into the empty top-left corner. Square 5 turns brown.
- 8 to 16. The brown rabbit on 8 jumps down over the white rabbit on 12 into the empty bottom-right corner. Square 12 turns brown, and every rabbit is now brown. The last two jumps work in either order.
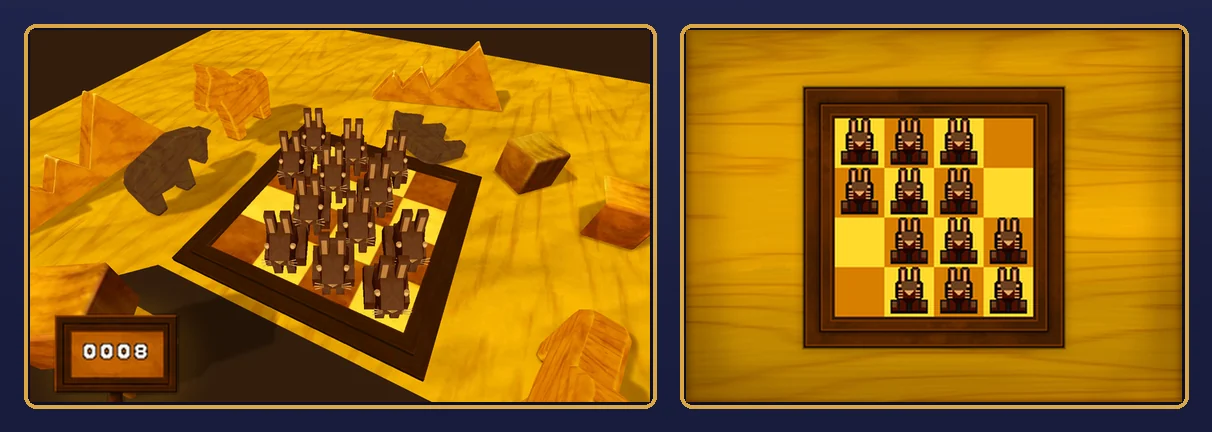
Other routes work too. No solution is shorter than eight jumps, but there are hundreds of different eight-jump orders. One neat one goes 4 to 1, 8 to 5, 9 to 12, 13 to 16, 1 to 9, 5 to 13, 16 to 8 and 12 to 4, and ends with the rabbits back on their starting squares, all brown. The route above is the one the game's own hints point to.
If your answer keeps failing:
- The jumping rabbit doesn't change color. Only the rabbits it jumps over flip, so the rabbit that makes jumps 2 to 6 stays white until another rabbit jumps over it.
- A rabbit lands on the first empty square. It can't stop on a rabbit, and it can't fly past an empty square to a farther one, so check that the squares between the start and the landing square are all occupied.
- A rabbit flipped twice. Jumping over a brown rabbit turns it white again. If one of your rabbits went back to white, undo the last jump rather than restarting.
- Your squares are numbered differently. This page counts from the top-left corner, row by row, on the touch screen, so square 4 is the top-right corner and 13 is the bottom-left.
Picarats, hints and hint coins
Bunny-Hop Swap is worth 20 picarats. Hints cost hint coins, not picarats: each of the first three hints costs one coin and the Super Hint costs two, so opening all four costs five coins. Wrong answers usually lower a puzzle's picarats, but all three of this puzzle's values are 20, so it may stay at 20 even after a miss.
Ledore Parlor's own three coins don't cover all four hints, so you'll need coins from elsewhere if you want the Super Hint in the game. If you're out of coins, the hints on this page are free.
Versions and systems
- Nintendo 3DS, 3DS XL, 2DS and New 3DS: the puzzle's solution is the same on every 3DS model. It's played on the touch screen, with no motion controls.
- US and UK English versions: same board, same rules, same answer, and the puzzle is called Bunny-Hop Swap in both. The UK text differs only in small wording details.
- Other systems: Miracle Mask was released on Nintendo 3DS, and this page covers that version.
The scene around the puzzle (minor spoiler)
Minor spoiler: this section quotes the short scene around the puzzle. There's no character attached to Bunny-Hop Swap: the toy rabbits are simply sitting in the cabinet in Ledore Parlor. When you tap the spot, Layton announces "We've stumbled upon a hidden puzzle here." If you come back to it after quitting, he says "Right. Let's have another crack at this hidden puzzle, shall we?", and once it's solved he sums it up with "It proved challenging, to be sure." The puzzle's own solved message adds that "all it took was a few big leaps from our brave, bouncing bunnies!"
FAQ
Where is the answer to Puzzle 006?
It's in the Answer and full solution section above, hidden until you open it. If you only want a push, open the hints one at a time first.
What is Puzzle 006 called?
Bunny-Hop Swap, in both the US and UK English versions. In Japanese it's 白黒ウサギ.
Where is Puzzle 006 in Ledore Parlor?
On the upper part of the tall wooden cabinet on the right side of the room. It's a hidden puzzle, so nobody points it out; tap the cabinet to find it. There's also a hint coin on the lower part of the same cabinet.
Can you come back to Puzzle 006 later?
Yes. If you quit, Layton says he'll make a note of its location and leave it for later. The hidden spot may not stay there for the rest of the game, though, so don't put it off too long.
Does the jumping rabbit change color?
No. Only the rabbits that get jumped over flip between white and brown. The rabbit doing the jumping keeps its color.
How many picarats is Puzzle 006 worth?
20 picarats. Wrong answers usually lower the value, but this puzzle may stay at 20 even after a miss.
How many hint coins are in Ledore Parlor?
Three, all in the normal view: on the floor at the lower left, on the lower part of the cabinet on the right, and on the chandelier.
Is Daily Puzzle 006 the same as Puzzle 006?
No. Daily Puzzle 006 is the level Rabbit 01 in the Food Chain set, a separate puzzle.
More Miracle Mask puzzles
- Puzzle 001: Stumble's Balloons
- Puzzle 002: Where's Mother?
- Puzzle 003: Stumble's Banners
- Puzzle 004: Bumper Perspective
- Puzzle 005: Robot Factory
- Puzzle 007: A Toasty Toast
- Puzzle 008: Carnival Colors
- Puzzle 009: Stamp Stumper
- Puzzle 010: The Place to Be!
- Puzzle 011: Backstage Blunder
- Puzzle 012: Sharing the Burden
- Puzzle 013: Ancient Arti-facts
- Puzzle 014: Bite of Bygone Days
- Puzzle 015: Fix the Fossil
- Puzzle 60: Dangerous Holes
- Puzzle 100: Gate to the Ruins!
- Puzzle 113: Chip Champions
- Puzzle 118: Evenly Matched 3
- Puzzle 122: Kitty Solitaire 3
For the rest of the game's puzzles, see the Miracle Mask puzzle index.