
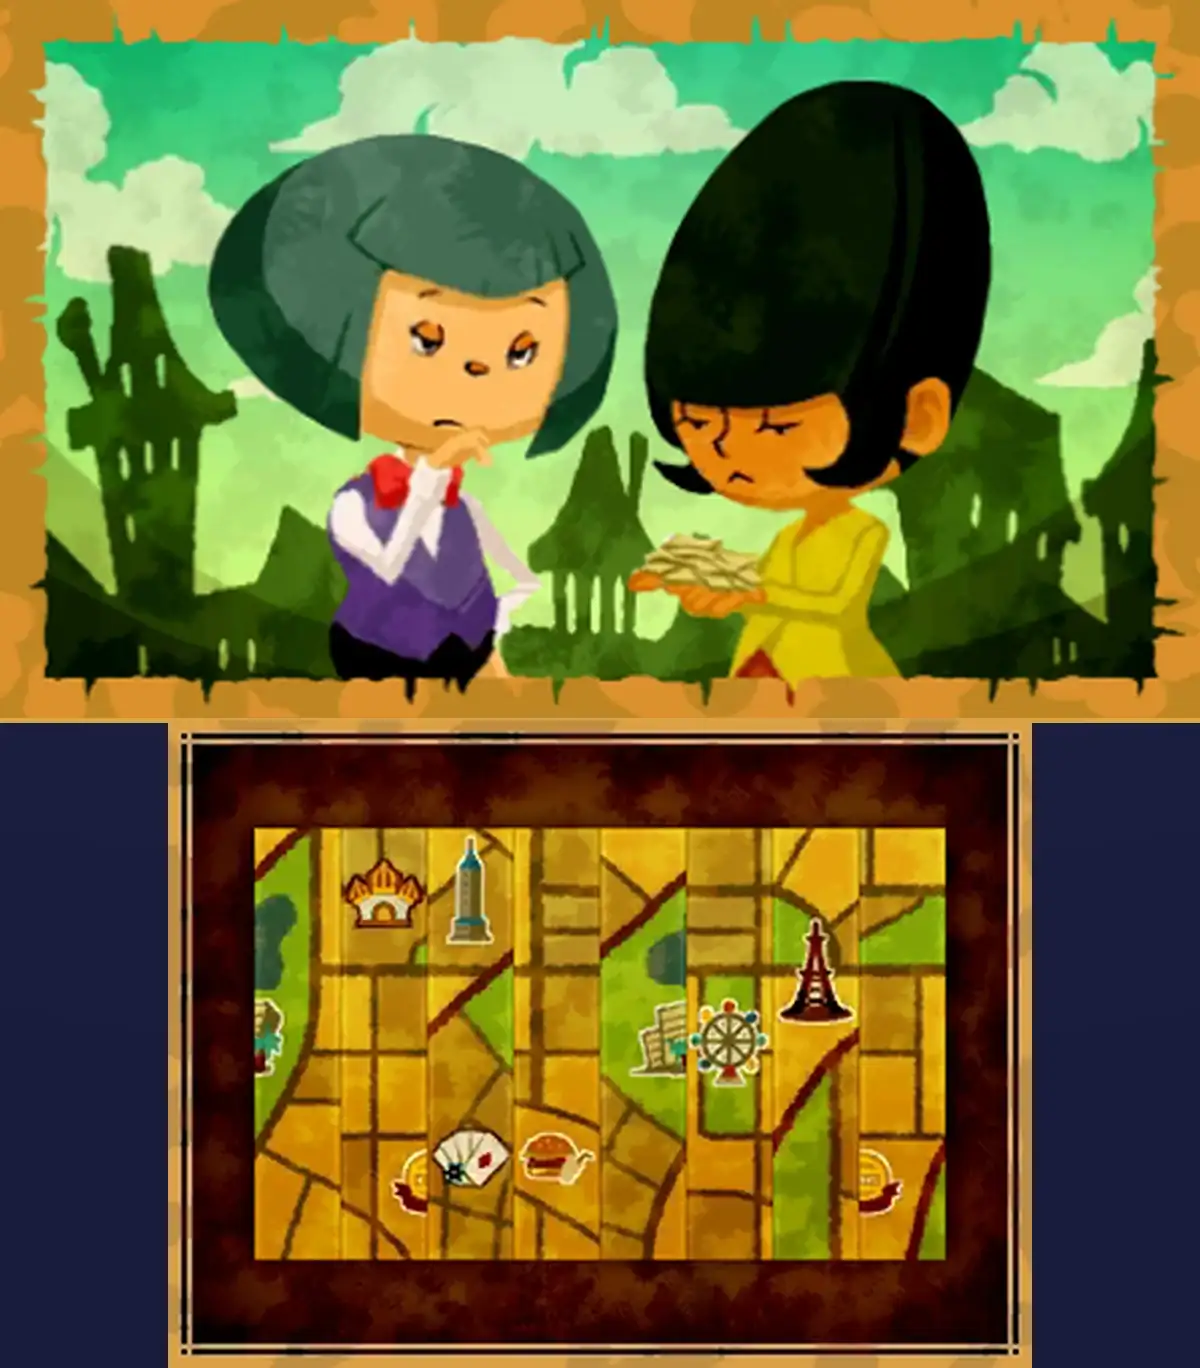
Puzzle 077 is Mishmash Map, a 40-picarat Arrange puzzle on Knickknack Alley in Monte d'Or, at night during Chapter 5. Firth, a visitor with a huge gray beard who is new in town, gives it to Professor Layton. Two tourists are lost, and their well-used tourist map has fallen apart along the fold lines into eight upright strips. You swap the strips around on the touch screen until the map is whole again. You have to solve it to carry on with the story, and it gives you a new play for your rabbit.
This page covers story Puzzle 077 in Professor Layton and the Miracle Mask on Nintendo 3DS (US and UK English), using the North American text. If you're after Daily Puzzle 077 or Puzzle 77 from another Layton game, see Wrong Puzzle 077? below.
What Puzzle 077 is
| Name | Mishmash Map |
|---|---|
| Type | Arrange (swap the strips) |
| Picarats | 40 |
| Location | Knickknack Alley, Monte d'Or (at night) |
| Chapter | Chapter 5 |
| Given by | Firth |
| Solved by | Professor Layton |
| When it's there | While your objective reads "Follow the Officer to Carnival Square!" |
| Required | Yes, the story doesn't go on until it's solved |
| Reward | Rabbit play "A Bit of Courage" |
| Previous puzzle number | Puzzle 076, Painstaking Packing (Oasis Street) |
| Next puzzle number | Puzzle 078, Three Clowns (Merchant District) |
The question reads: "These two tourists have lost their way while sightseeing. Fortunately, they brought a tourist map with them, but it's been so well used that it appears to have fallen apart along the fold lines." Then it asks, "Can you restore the map to its original condition?" The objective bar at the top of the touch screen says "Piece the map together!"
Reading the picture
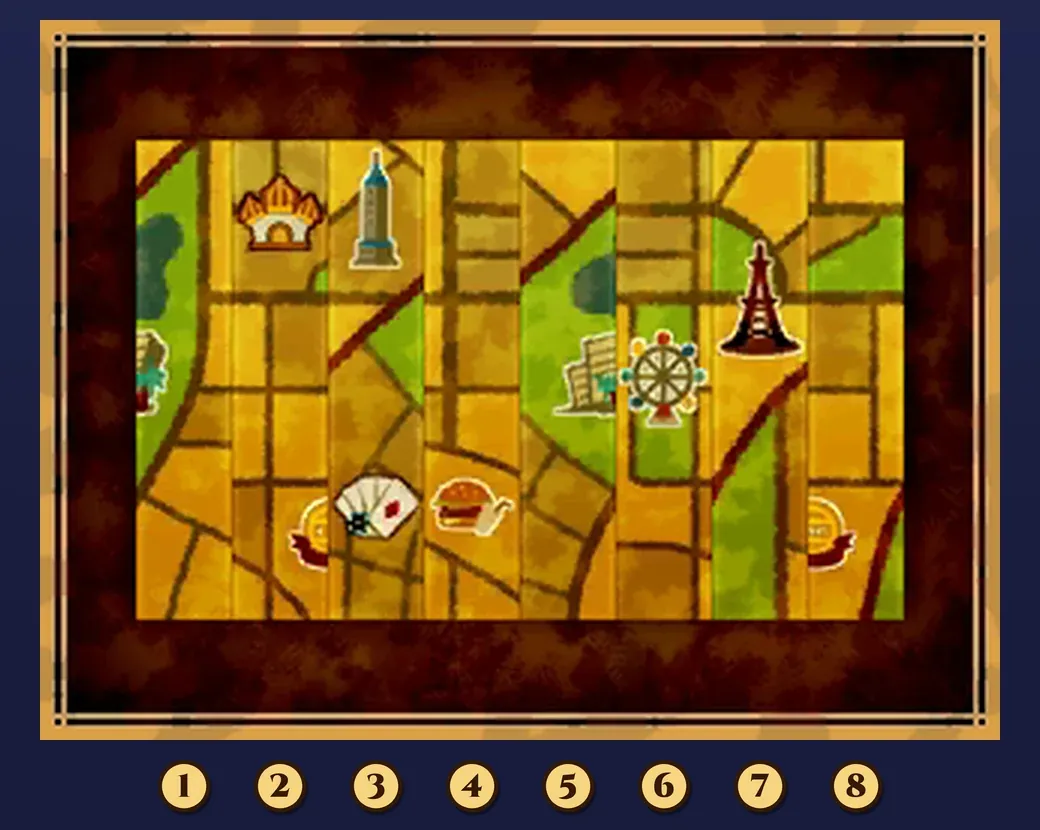
- The eight strips. The map is cut into eight tall strips of the same size, standing side by side. Each strip shows a slice of the map: roads, blocks of buildings, parts of a big green park and a few landmark icons.
- The landmarks. You can spot a Ferris wheel, a golden domed building, a tall gray tower, a dark red tower, a fan of playing cards, a burger shop, a pond in the park, buildings with a palm tree and a round yellow sign with a red ribbon. Some of them are cut in two where the map tore.
- Moving strips. Drag a strip onto another strip to swap the two. The strips never turn or flip; only their order changes.
- Finishing. When you think the map is whole, touch Submit. There's no limit on how many swaps you make.
Puzzle names
| Version | Puzzle name |
|---|---|
| North America | Mishmash Map |
| UK | Mishmash Map |
| Japanese | 裂けた地図 (Saketa Chizu, "the torn map") |
The name is Mishmash Map in both English versions. The UK text is worded differently in several places: the question opens with "Whenever new tourists arrive in town, they are given a map to help them with their sightseeing.", the hints have small changes in wording and spelling ("centre", "colours"), and the messages for right and wrong answers end differently. The strips and the answer are the same in the US and UK English versions.
Wrong Puzzle 077?
- Daily Puzzle 077 is Dinosaurs 01, from the St. Bronto's set.
- Puzzle 033, Chained Circle, is an earlier puzzle on the same street, from Guy at the toy stall in Chapter 3. If your puzzle is about a chain of lettered links, that's the one.
- Puzzle 77 in another Layton game is a different puzzle. If yours isn't about a torn tourist map, you're in the wrong game.
Where you get it
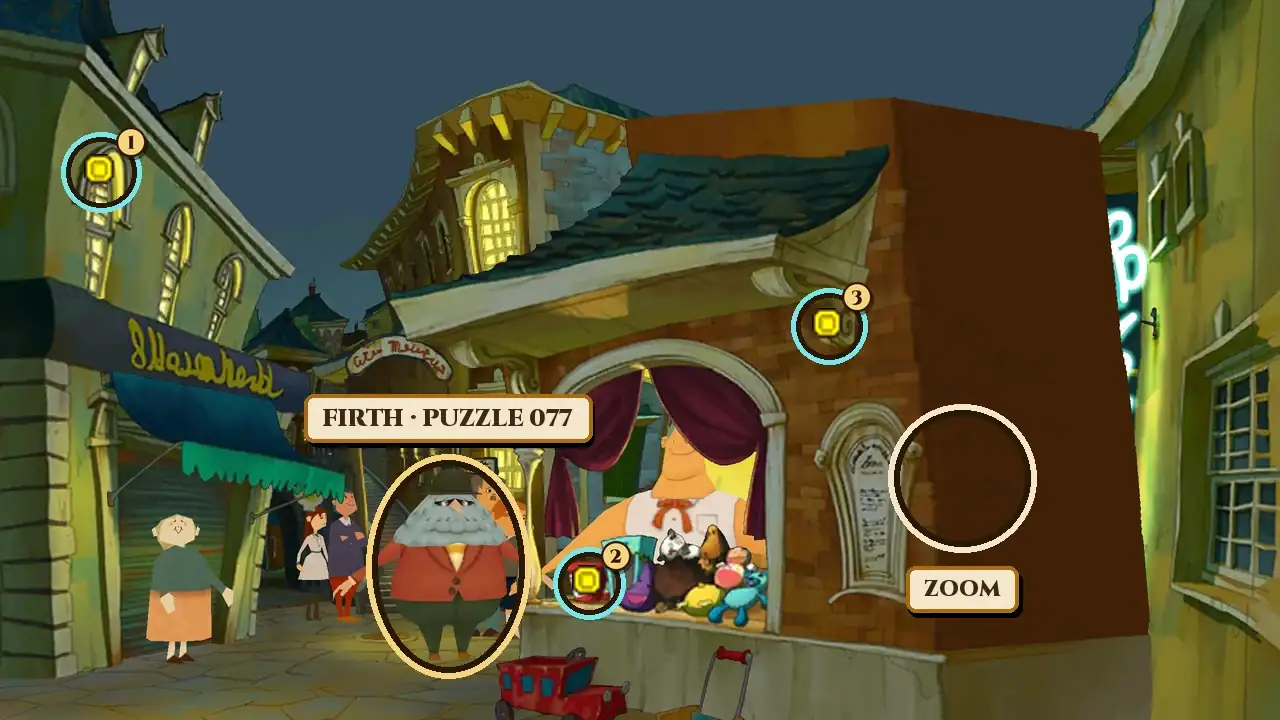
Later in Chapter 5, night falls on Monte d'Or. Once your objective reads "Follow the Officer to Carnival Square!", Firth is standing in the middle of Knickknack Alley, to the left of Guy's toy stall. Talk to him. The Officer says, "Wait. I smell something... It's a citizen in distress!" Firth grumbles, "This city's too darn big... How can anyone find anything here?!" Layton offers to help, and Firth says, "Lotsa things! My feet hurt, and my face is sweaty. But maybe you can help me with this map. It makes absolutely no sense!"
You can't skip it. If you try to walk on from Knickknack Alley before it's solved, the Officer stops you: "Professor, that gentleman over there looks like he may be in need of help." Then he adds, "Or is that a tree wearing a hat...?" The story doesn't go on until you've fixed the map.
Knickknack Alley has six hint coins. Three are in the normal view: at the top of an arched window on the upper left, in the red bucket on the toy stall's counter and on the curled decoration under the stall's roof. The other three are in the zoomed-in view: tap the right side of the toy stall, at the white ring, to zoom in on the street behind it.
- At the top of an arched window on the upper left (normal view).
- In the red bucket on the toy stall's counter (normal view).
- On the curled decoration under the toy stall's roof (normal view).
- In the window at the top center (zoomed-in view).
- In a container (zoomed-in view).
- On the neon sign (zoomed-in view).
Six coins are enough for all four hints, as long as you didn't collect them on an earlier visit. Each coin can be collected only once.
When the answer comes back wrong
- "Too bad." The game's message for a wrong answer adds, "It's not too far to go, but they still need a proper map."
- Roads don't line up. Look at where each road leaves the edge of a strip. On the finished map, every road carries straight on into the strip next to it.
- A landmark is cut in half. If one half of a picture sits on one strip, the other half has to be on the strip right next to it.
- You can't find Firth. He's on Knickknack Alley at night in Chapter 5, while your objective reads "Follow the Officer to Carnival Square!"
Hints, one at a time
These are the game's own hints, word for word from the North American version and in the same order. Open only the next one you need. In the game, Hints 1 to 3 cost one hint coin each and the Super Hint costs two.
Hint 1
Find the biggest feature on the map, and start from there.
How about that park with a pond?
Hint 2
There's a yellow symbol that's been split in two. If you reassemble it, you're well on your way to restoring the whole map.
Hint 3
The towers are actually very close to each other on the finished map. As symbols of the town, they lie at its center.
Super Hint
The Ferris wheel is at the leftmost edge of the map, and the burger shop is at the rightmost edge.
If you just pay attention to the different road colors, you'll have it.
Answer and full solution
The answer below covers every step, with a swap-by-swap diagram and a picture of the solved puzzle. Open it when you're ready.
Show the answer
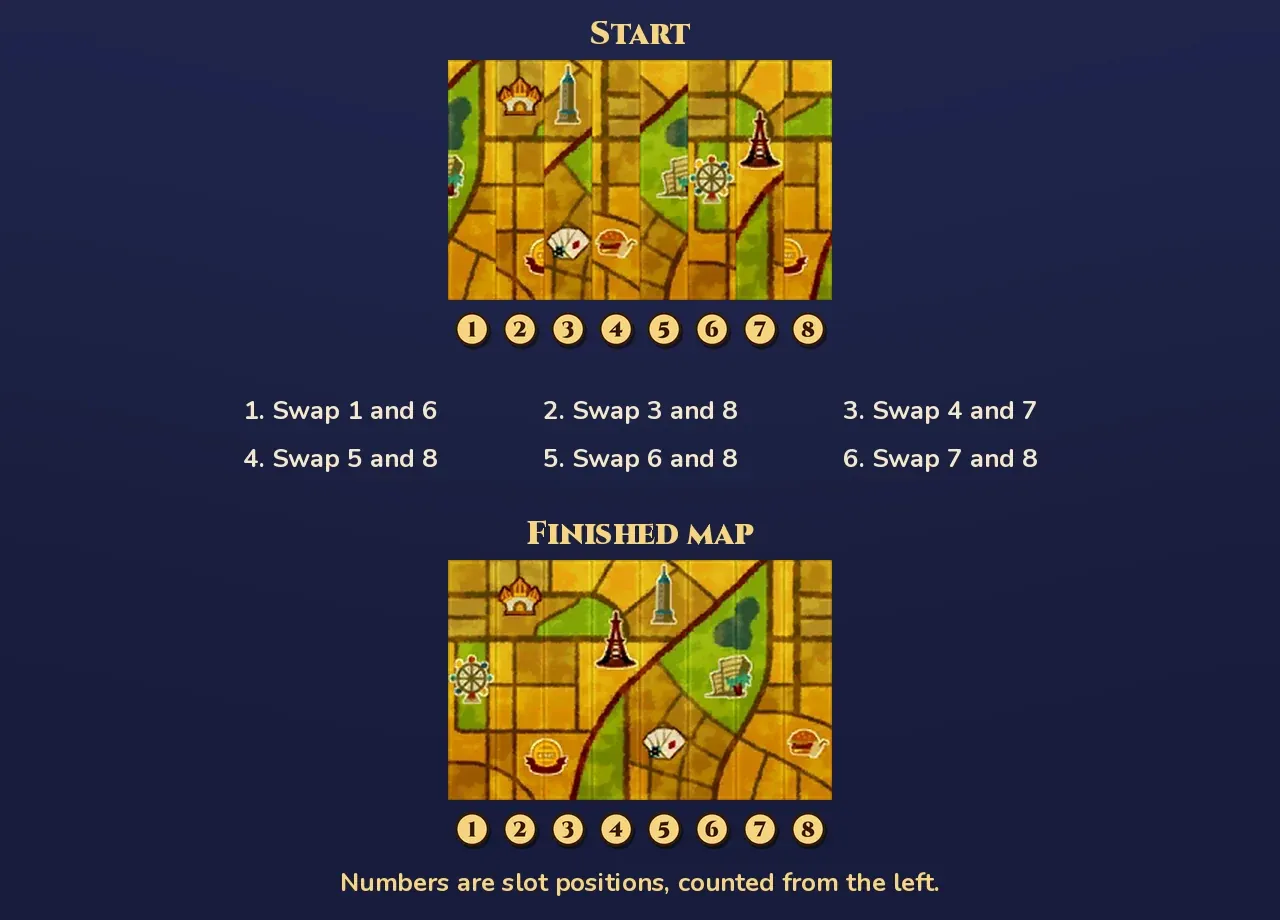
The answer: from left to right, the finished map goes Ferris wheel strip, domed building strip, yellow-sign strip, dark red tower strip, gray tower and cards strip, the two park-and-pond strips, and the burger shop strip on the far right. The strip in slot 2 is already in the right place, so six swaps are enough: swap slots 1 and 6, 3 and 8, 4 and 7, 5 and 8, 6 and 8, then 7 and 8, and touch Submit.
What starts where (slots numbered 1 to 8 from the left):
- Slot 1: the right part of the park, with the edge of the pond and part of the buildings with the palm tree.
- Slot 2: the golden domed building and most of the round yellow sign. This strip is already in place.
- Slot 3: the tall gray tower and the playing cards.
- Slot 4: the burger shop.
- Slot 5: the left part of the park, with most of the pond and the rest of the buildings.
- Slot 6: the Ferris wheel.
- Slot 7: the dark red tower.
- Slot 8: the last piece of the round yellow sign.
Step by step:
- Swap slots 1 and 6. The Ferris wheel goes to the far left edge, as the Super Hint says.
- Swap slots 3 and 8. The last piece of the round yellow sign now sits next to the rest of it in slot 2, so the yellow symbol from Hint 2 is whole again.
- Swap slots 4 and 7. The dark red tower moves into slot 4, in the middle of the map.
- Swap slots 5 and 8. The tall gray tower and the playing cards move into slot 5, right beside the dark red tower. As Hint 3 says, the two towers stand close together at the center.
- Swap slots 6 and 8. The left part of the park and the pond moves into slot 6.
- Swap slots 7 and 8. The right part of the park moves into slot 7, joining the pond from Hint 1, and the burger shop ends up at the far right edge. Touch Submit.
Every strip except the one in slot 2 starts in the wrong place, and they're all mixed up in a single loop, so six swaps is the fewest you can do it in. Do the swaps in the order listed. Doing them in a different order can leave the strips in the wrong places.
The game confirms it: "Well done!" It goes on, "Now they can get where they're going."
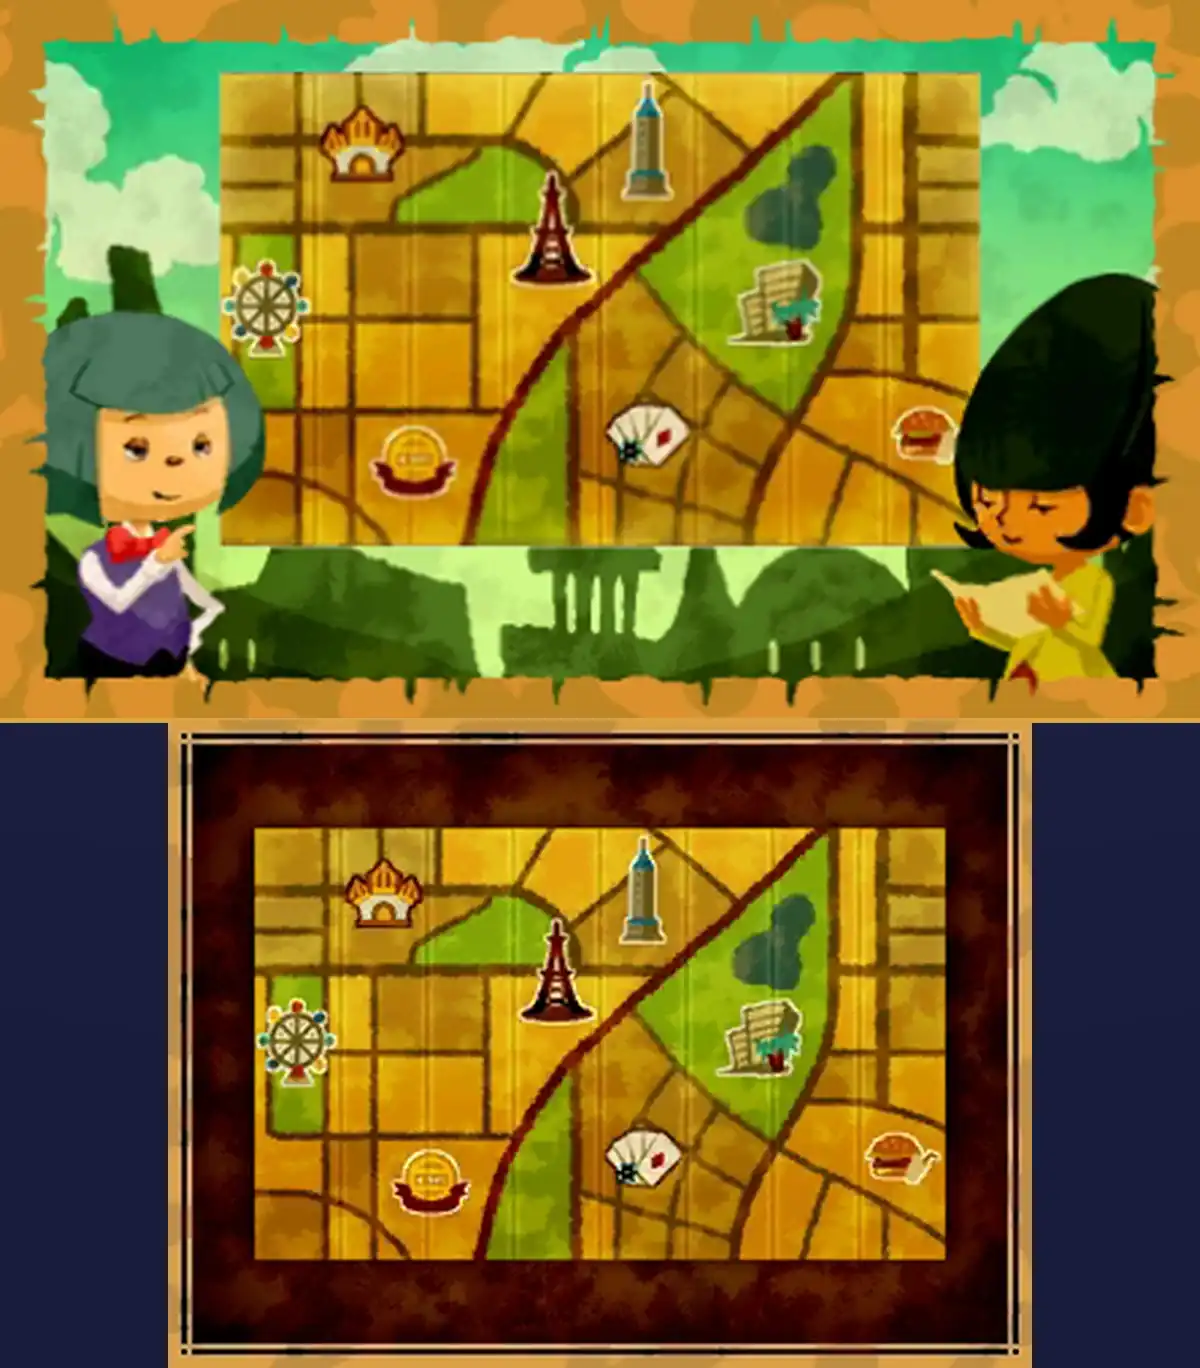
If your answer keeps failing:
- The two park strips are the wrong way round. The strip with most of the pond goes in slot 6 and the strip with the pond's edge goes in slot 7. Check that the pond and the buildings join up.
- The yellow sign is still split. Its last piece has to be in slot 3, right after the domed building strip.
- The towers are apart. The dark red tower goes in slot 4 and the tall gray tower in slot 5.
Picarats, hints and hint coins
Mishmash Map shows 40 picarats when it starts. The puzzle can award 40, 35 or 30 picarats. Wrong answers may reduce the picarat value. If you back out of the puzzle, Firth says, "How'm I s'posed to get to that pumpkin patch if my map is all... Ah, forget it!" Talk to him again and he says, "Can't you just, y'know, scrunch the thing together?" before the puzzle starts again.
Hints cost hint coins, not picarats. Hints 1 to 3 cost one hint coin each and the Super Hint costs two, five in total. Knickknack Alley's six coins cover that if they're still there. Or use the free hints on this page and save your coins.
Does it unlock anything?
Yes. Solving it gives you a new play for your rabbit, A Bit of Courage. The game announces, "You got a new play for your rabbit: "A Bit of Courage"!" Its description says, "A hunter enters the forest... Not good news for Bunny." Solving it also lets the story carry on toward Carnival Square.
Versions
- Nintendo 3DS family: this page covers the 3DS game. You drag the strips with the stylus on the touch screen.
- US and UK English versions: same name, the same strips and the same answer. The UK question, hints and answer messages are worded differently in places, as described under Puzzle names.
The scene around the puzzle
Layton introduces himself: "Pardon me, sir. My name is Hershel Layton. Might I be of some service?" Firth answers, "Not 'less you're some sort of puzzle-solvin' genius or sumthin'! Name's Firth. New here." Layton asks, "What seems to be the trouble?" and Firth shows him the map.
When it's solved, Firth says, "That'll do, then. Thanks for the help!" The Officer is delighted: "Wow! I saw the great Professor Layton solve a puzzle! Professor, my brain salutes you!" Firth tells them, "There was a young fella in my village who was pretty sharp with a puzzle or two." He goes on, "He could solve a slide puzzle with his eyes closed! That boy was like a son to me, but he up and vanished a couple months back." and "I think he might be here in town, but...how can you find anyone in this place?!"
Layton tells him, "Ah...yes. Good luck, sir. I also suggest you speak with someone at the police station. Perhaps someone not in a uniform." After Firth leaves, the Officer says, "Anyway, let's get back to it! I'm sure you'll have the case of the Masked Gentleman solved in no time, Professor!" Layton replies, "I will do my utmost to justify your faith in my abilities, Officer."
FAQ
Where is the answer to Puzzle 077?
It's in the Answer and full solution section above, hidden until you open it. If you only want a push, open the hints one at a time first.
What is Puzzle 077 called?
Mishmash Map, in both the North American and UK English versions. In Japanese it's 裂けた地図.
Where is Puzzle 077?
On Knickknack Alley in Monte d'Or, at night in Chapter 5. Talk to Firth, to the left of Guy's toy stall, while your objective reads "Follow the Officer to Carnival Square!"
Do I have to solve Puzzle 077?
Yes. The Officer stops you from walking on from Knickknack Alley until you've helped Firth, so the story doesn't go on until it's solved. It also gives you the rabbit play A Bit of Courage.
How many picarats is Puzzle 077 worth?
It shows 40 picarats when it starts. The puzzle can award 40, 35 or 30 picarats. Wrong answers may reduce the picarat value.
Is Daily Puzzle 077 the same as Puzzle 077?
No. It's a different puzzle, listed under Wrong Puzzle 077?.
More Miracle Mask puzzles
- Puzzle 078: Three Clowns
- Puzzle 076: Painstaking Packing
- Puzzle 075: Grand Horse Race
- Puzzle 074: Bunny-Hop Swap 3
- Puzzle 072: A Cup of Tiles
- Puzzle 062: Shattered Sign
- Puzzle 061: Padlocked Fence
- Puzzle 033: Chained Circle
- Puzzle 60: Dangerous Holes
- Puzzle 100: Gate to the Ruins!
- Puzzle 113: Chip Champions
- Puzzle 118: Evenly Matched 3
- Puzzle 122: Kitty Solitaire 3
For the rest of the game's puzzles, see the Miracle Mask puzzle index.