
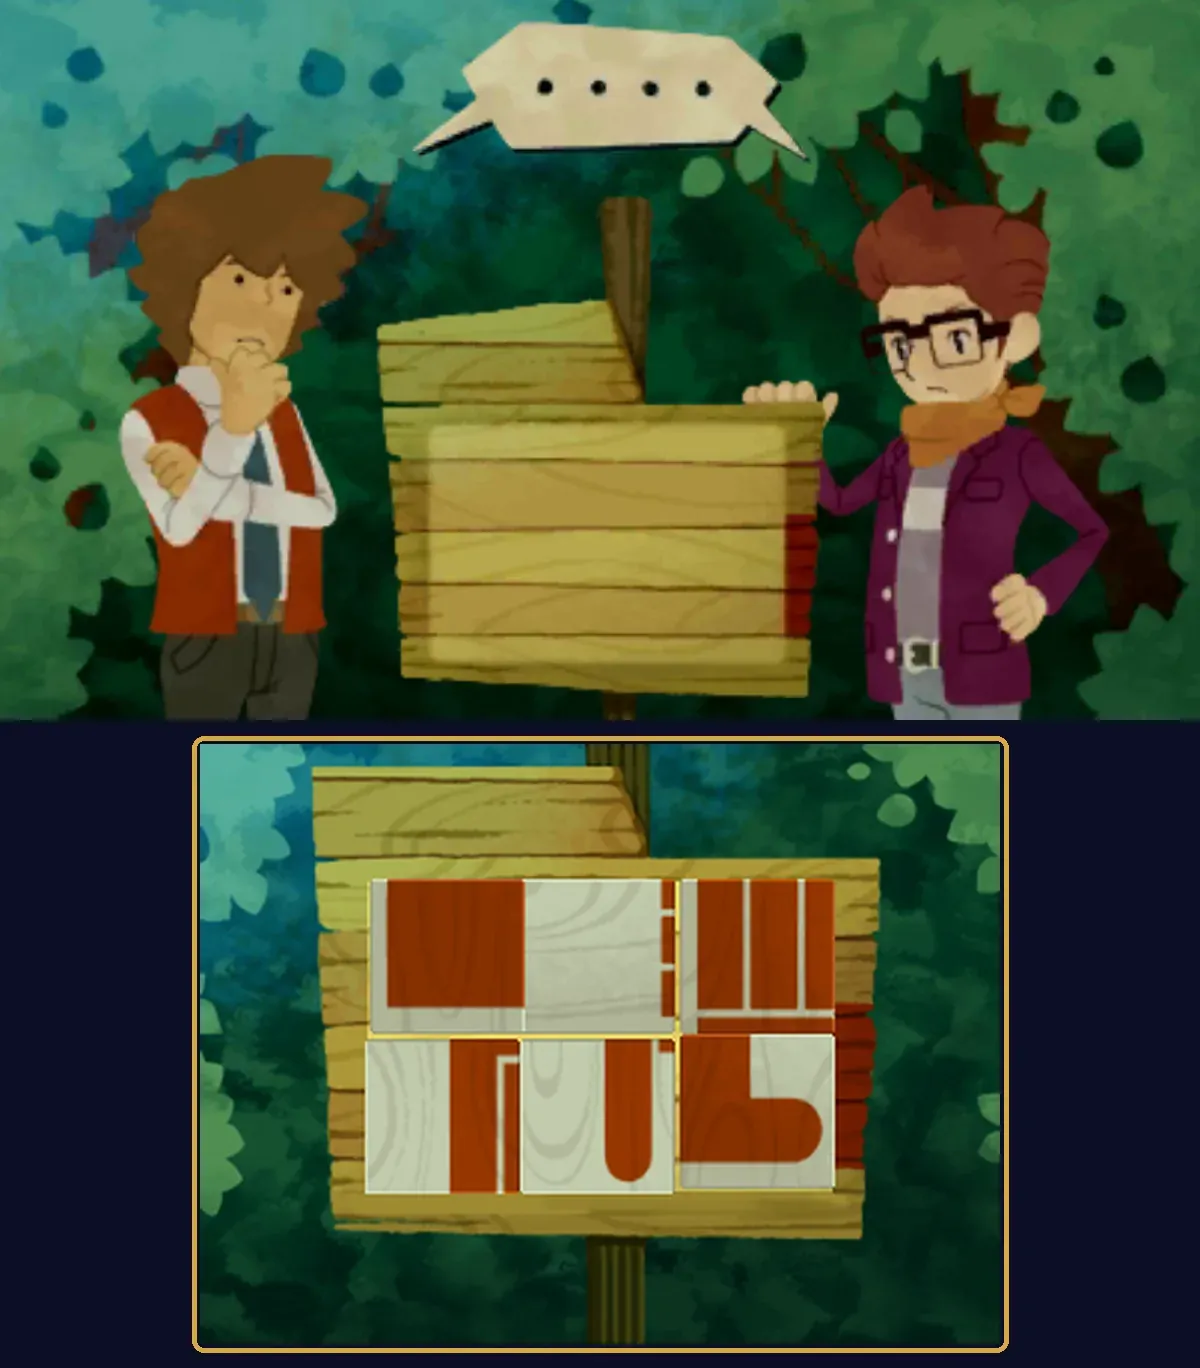
Puzzle 062 is Shattered Sign, a 35-picarat Arrange puzzle at the Signpost on the forest path to Norwell, during the Chapter 4 flashback to Hershel Layton's school days. Young Hershel, Randall and Angela find a signpost whose tiles have all fallen off. Six square tiles sit on the sign in two rows of three, mixed up and turned the wrong way. You move them and turn them until the sign shows its picture again, then tap Submit.
This page covers story Puzzle 062 in Professor Layton and the Miracle Mask on Nintendo 3DS. The tiles and the answer are the same in the US and UK English versions; the UK wording of the question and one hint differs slightly. Quotes use the North American text. If you're after Daily Puzzle 062 or Puzzle 62 from another Layton game, see Wrong Puzzle 062? below.
What Puzzle 062 is
| Name | Shattered Sign |
|---|---|
| Type | Arrange (move and turn six tiles) |
| Picarats | 35 |
| Location | Signpost, on the forest path to Norwell |
| Chapter | Chapter 4 |
| Given by | The broken signpost (Randall spots it) |
| Required for the story? | No (see Where you find it) |
| Previous puzzle number | Puzzle 061, Padlocked Fence (Edge of Town) |
| Next puzzle number | Puzzle 063, A Muddy Mess (Winding Road) |
The question reads: "All the tiles on this signpost fell off, and Hershel and his friends need to put the sign back to the way it was. Help them out by moving and rotating the tiles to fix the sign." The objective bar sums it up as "Fix the sign!"
How the tiles work
The touch screen shows the wooden sign up close, with six square tiles in two rows of three. Each tile carries part of a red-brown picture on a pale background. This page names the six spots top left, top middle, top right, bottom left, bottom middle and bottom right.
- Move a tile by touching it in the middle and dragging it to another spot. All six spots are always filled, so the two tiles trade places.
- Turn a tile by touching it near an edge and sliding the stylus around. Tiles turn a quarter turn at a time and can't be flipped over.
- Every tile counts. The game accepts the sign only when every tile is in its own spot and turned the right way, including the tile that looks almost blank.
- Tap Submit when you think the sign is fixed. If anything is off, you get "Too bad."
The faint wood grain on the tiles isn't part of the picture, so go by the red-brown shapes.
Puzzle names
| Version | Puzzle name |
|---|---|
| North America | Shattered Sign |
| UK | Shattered Sign |
| Japanese | 壊れた案内板 (Kowareta Annaiban, roughly "the broken signboard") |
There doesn't seem to be a separate UK name. The UK question probably ends its first sentence with "won't continue without fixing it" instead of "need to put the sign back to the way it was," and one sentence of Hint 3 is worded differently. The tiles and the answer are the same in the US and UK English versions.
Wrong Puzzle 062?
- Daily Puzzle 062 in Miracle Mask is a different puzzle: Mural 06, from the Vault of the Ancients set. There's no signpost in it.
- Puzzle 061, Padlocked Fence, is the puzzle just before this one, at the gate at the Edge of Town, and Puzzle 063, A Muddy Mess, is the next one, further along the path on the Winding Road.
- Puzzle 62 in another Layton game is a different puzzle. If yours doesn't have six tiles on a wooden signpost, you're in the wrong game.
Where you find it
In the Chapter 4 flashback, once the gate at the Edge of Town is open, your objective is "Head to Norwell!" Walk on to the Signpost. When the group arrives, Randall says, "The Norwell wall is just up this path." Hershel says, "We should have brought flashlights," and Angela answers, "I agree...which is why I mentioned it before we left." Randall goes on: "Come on! It's fine. Just follow the path. See? There's even a sign over there!" Hershel's verdict: "That sign has seen better days." Tap the broken sign on the right of the path to start the puzzle.
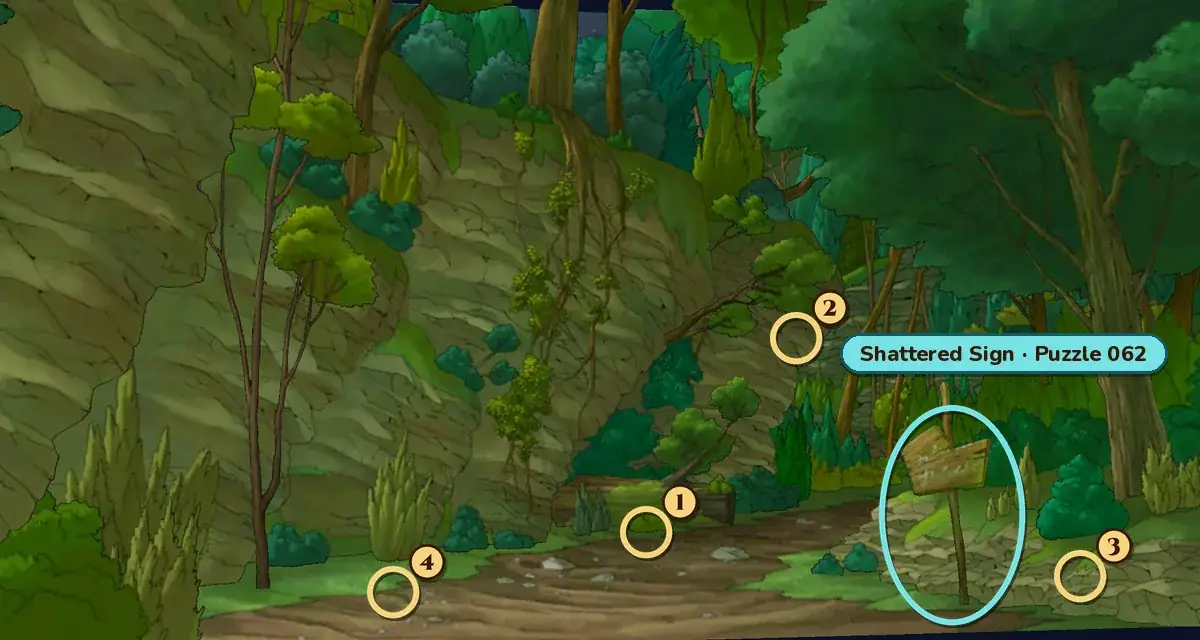
The Signpost has four hint coins, all in the normal view. They're on the fallen log in the middle of the path (1), in the trees above the far end of the path (2), on the rocks at the foot of the big tree on the right (3) and by the grass at the left edge of the path (4). Each coin can be collected only once.
The way on to the Winding Road opens as soon as the group arrives and spots the sign, so you can walk on without fixing the sign. It's simplest to fix the sign while you're there.
When you're stuck
- You can't tell what the picture is. Ignore the wood grain and look only at the red-brown shapes. Signs like this usually tell you which way to go.
- A tile won't turn. Touch it near an edge, not in the middle. Touching the middle picks the tile up to move it.
- Everything looks right but Submit says "Too bad." Check the almost-blank tile too. It has to be turned the right way like all the others.
- You can't find the puzzle. Tap the tilted sign on the right of the path at the Signpost once your objective is "Head to Norwell!".
Hints, one at a time
These are the game's own hints, word for word from the North American version and in the same order. Open only the next one you need. In the game, Hints 1 to 3 cost one hint coin each and the Super Hint costs two.
Hint 1: what the sign might show
First, try to think about what the sign might be depicting. You usually see signs like these at forks in roads, so it's likely to indicate "left" or "right" somehow. However, it doesn't look as if it could be an arrow...
Hint 2: two corner tiles
Have you worked out what shape is depicted on the sign? Either way, here's a clue about how to move the tiles. One tile is almost completely white. Put this in the bottom left-hand corner. There's also a tile mostly taken up by a square. Put this in the bottom-right corner and rotate it so that the white area is on the bottom right.
Hint 3: the picture
This next hint should be very handy: the picture on the sign is actually a hand pointing in the direction you should walk. Point with your hand and see if you can arrange the remaining tiles to match that. By now, it shouldn't be too hard to work out which direction the hand is pointing.
Super Hint: the last tiles
Normally you would point with your index finger. When you do that, what positions would your other fingers be in? Chances are, your thumb will be sticking straight up. Could that be the tile with the L shape? The remaining three fingers will be closed tightly. That must be the tile with the four rectangles. The right direction should be clear now!
Answer and full solution
The answer below covers every move, with a table of where each tile goes, the moves in pictures and a picture of the fixed sign. Open it when you're ready.
Show the answer
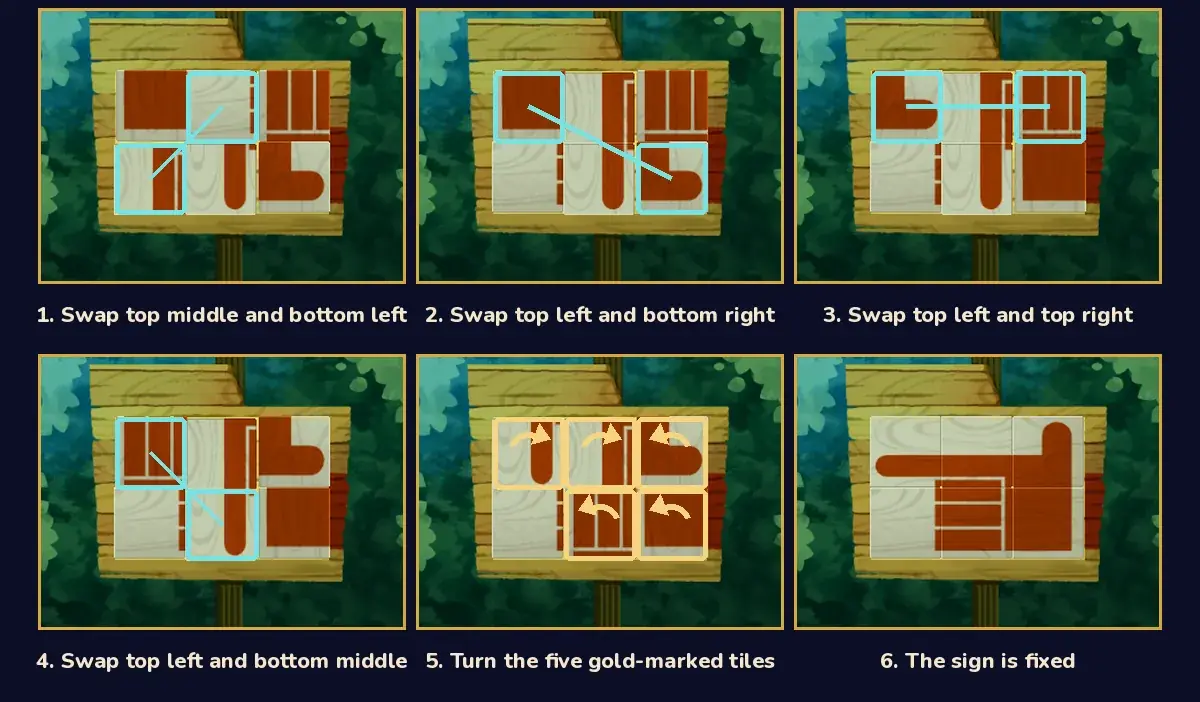
Answer: a hand pointing left. The index finger runs across the top row from the left, the thumb sticks up on the top right, the three folded fingers fill the bottom middle and the palm fills the bottom right. The almost-white tile goes in the bottom left.
| Spot | Tile | Where it starts | Turn it |
|---|---|---|---|
| Top left | Bar with a rounded end (the fingertip) | Bottom middle, rounded end down | A quarter turn clockwise |
| Top middle | Wide bar with a thin line under it | Bottom left, standing upright | A quarter turn clockwise |
| Top right | L shape (the thumb) | Bottom right, lying on its side | A quarter turn counterclockwise |
| Bottom left | Almost-white tile | Top middle, already the right way round | No turn |
| Bottom middle | Four rectangles (the folded fingers) | Top right, bars standing upright | A quarter turn counterclockwise |
| Bottom right | Square (the palm) | Top left | A quarter turn counterclockwise |
Step by step:
- Swap top middle and bottom left. The almost-white tile goes to the bottom left and the wide bar comes up to the top middle.
- Swap top left and bottom right. The square goes to the bottom right and the L shape comes to the top left.
- Swap top left and top right. The L shape goes to the top right and the four rectangles come to the top left.
- Swap top left and bottom middle. The four rectangles go to the bottom middle and the fingertip comes to the top left. Every tile is now in its spot.
- Turn five tiles. Turn the fingertip (top left) and the wide bar (top middle) a quarter turn clockwise, and the L shape (top right), the four rectangles (bottom middle) and the square (bottom right) a quarter turn counterclockwise. Three quarter turns the other way do the same job. Leave the almost-white tile as it is.
- Tap Submit.
Four swaps is the fewest that puts all six tiles in place, and you can turn each tile before or after moving it.
The game confirms it: "Give yourself a big hand! So left is the right way to go. Right?"
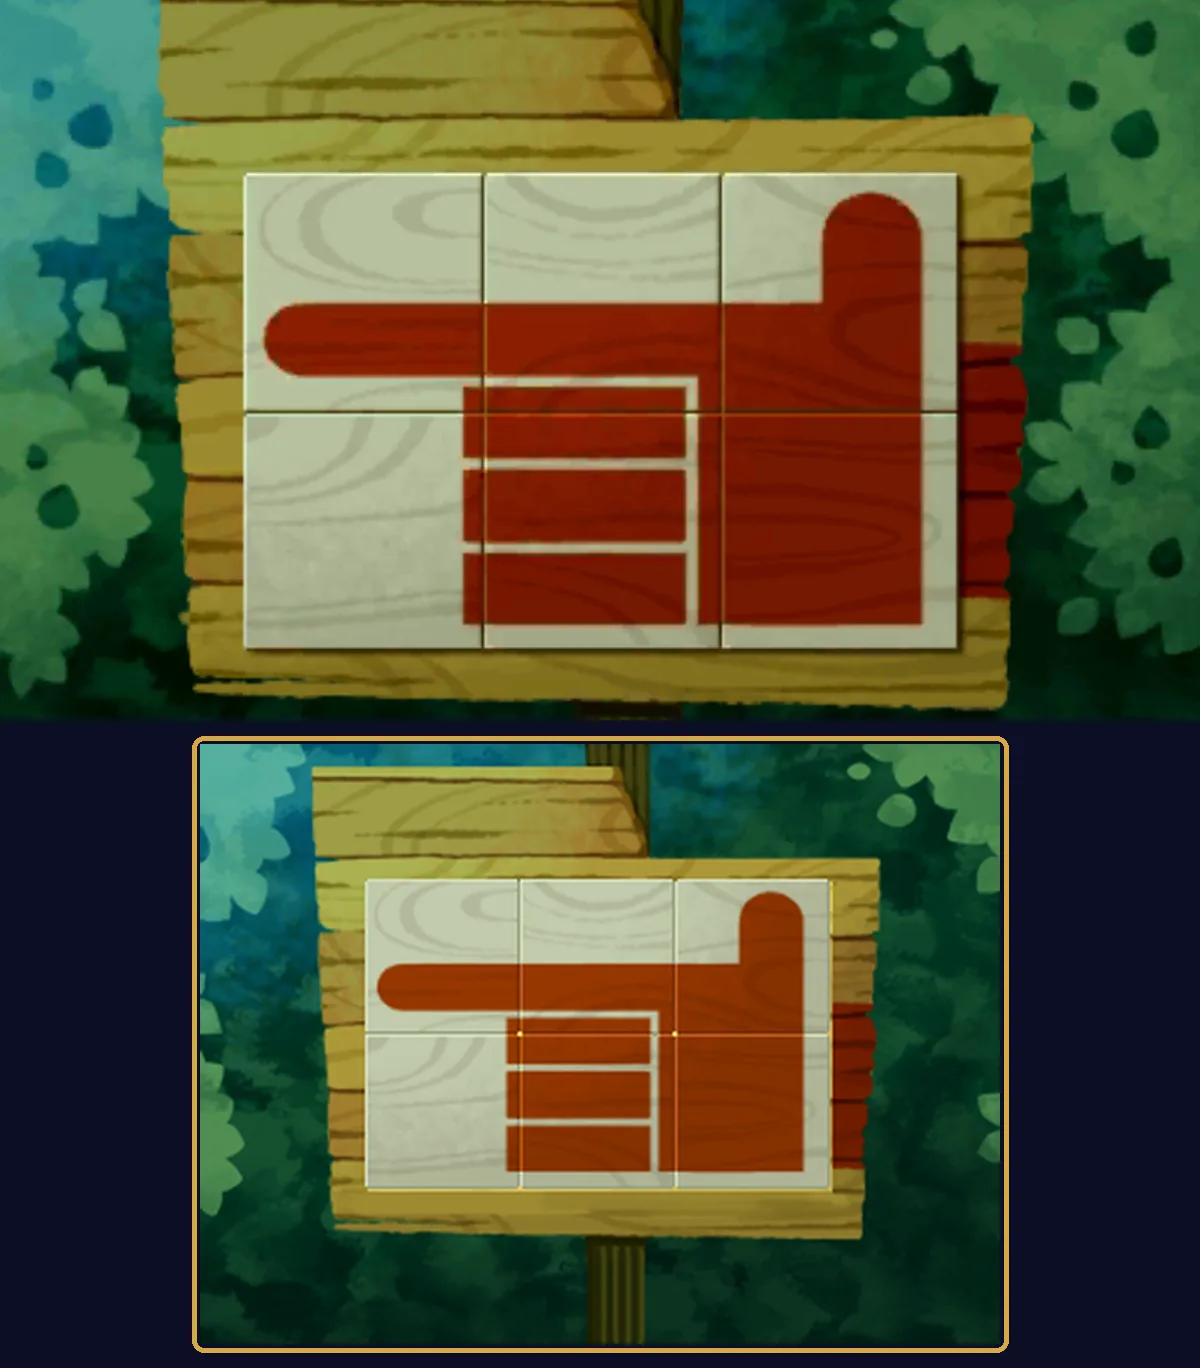
If it still doesn't finish:
- The almost-white tile is turned. Its small red-brown marks belong on its right edge, where they meet the folded fingers.
- The square is the wrong way round. As Hint 2 says, its white strips go on the bottom and the right.
- The thumb and the fingertip are mixed up. The bar with the rounded end lies flat in the top left; the L shape points up in the top right.
Picarats, hints and hint coins
Shattered Sign shows 35 picarats when it starts. The puzzle can award 35, 32 or 28 picarats. Wrong answers may reduce the picarat value. If you quit, Hershel says, "If we leave the sign like this, people may get lost here." When you come back to try again, Angela says, "Let's put our heads together and have another try at fixing this sign."
Hints cost hint coins, not picarats. The costs are one coin each for the first three hints and two for the Super Hint, five in total. The Signpost's four coins cover Hints 1 to 3 but not the Super Hint, so you need one more coin from elsewhere, or you can use the free hints on this page.
Does it unlock anything?
No. Puzzle 062 gives no item, no rabbit play and no new location; the Winding Road is already open by the time you fix the sign. You get the picarats, the puzzle counts toward your total, and the sign at the Signpost stays fixed afterwards.
Versions
- Nintendo 3DS family: this page covers the 3DS game. You move and turn the tiles on the touch screen, and the top screen shows the scene.
- US and UK English versions: the tiles and the answer are the same, and so is the name. The UK question probably words its first sentence differently and one sentence of Hint 3 differs.
The scene around the puzzle
At the sign, Randall says, "Hmm. This sign needs some work." Angela adds, "Even if any tourists got this far, they wouldn't know where to go from here." Hershel suggests, "Let's fix the sign for the next group that comes by. What do you say?"
When it's fixed, Randall cheers, "There we go!" Hershel wonders, "Why was it in pieces like that? The wood is still rather sturdy." Randall admits, "Well, uh...I might have knocked it over in my excitement last time I was here..." and Angela sighs, "You are the clumsiest archaeologist I've ever seen, Randall!"
FAQ
Where is the answer to Puzzle 062?
It's in the Answer and full solution section above, hidden until you open it. If you only want a push, open the hints one at a time first.
What is Puzzle 062 called?
Shattered Sign, in both the North American and the UK version. The official Japanese title is 壊れた案内板.
Where is Puzzle 062?
At the Signpost in Chapter 4, just past the gate at the Edge of Town. Tap the broken sign on the right of the path once your objective is "Head to Norwell!".
How do I turn a tile?
Touch the tile near one of its edges and slide the stylus around. Touching the middle of a tile moves it instead.
Do I have to solve Puzzle 062?
No. The path to the Winding Road opens when you arrive, before you touch the sign. It's easiest to solve it while you're there.
How many picarats is Puzzle 062 worth?
It shows 35 picarats when it starts. The puzzle can award 35, 32 or 28 picarats.
Is Daily Puzzle 062 the same as Puzzle 062?
No. Daily Puzzle 062 is Mural 06, from the Vault of the Ancients set. Story Puzzle 062 is the signpost puzzle at the Signpost.
More Miracle Mask puzzles
- Puzzle 061: Padlocked Fence
- Puzzle 063: A Muddy Mess
- Puzzle 60: Dangerous Holes
- Puzzle 064: Norwell's Secret
- Puzzle 059: Flowery Footpath
- Puzzle 065: Kitty Solitaire 2
- Puzzle 058: Sorting Blocks
- Puzzle 066: A Trip to the Hospital
- Puzzle 057: Stitching Squares
- Puzzle 056: Clear-Cut Contrasts
- Puzzle 001: Stumble's Balloons
- Puzzle 002: Where's Mother?
- Puzzle 003: Stumble's Banners
- Puzzle 004: Bumper Perspective
- Puzzle 005: Robot Factory
- Puzzle 006: Bunny-Hop Swap
- Puzzle 007: A Toasty Toast
- Puzzle 008: Carnival Colors
- Puzzle 009: Stamp Stumper
- Puzzle 010: The Place to Be!
- Puzzle 011: Backstage Blunder
- Puzzle 012: Sharing the Burden
- Puzzle 013: Ancient Arti-facts
- Puzzle 014: Bite of Bygone Days
- Puzzle 015: Fix the Fossil
- Puzzle 016: Wandering Watches
- Puzzle 017: Busted Umbrella
- Puzzle 018: That's Juicy!
- Puzzle 019: Spinning Maize
- Puzzle 020: Nine Red Bricks
- Puzzle 021: A Lick of Paint
- Puzzle 022: Poke 'Em Totems
- Puzzle 023: Fairway Fibber
- Puzzle 024: Patterned Apron
- Puzzle 025: Brave the Caves
- Puzzle 026: Mangled Math
- Puzzle 027: That Rings a Bell
- Puzzle 028: Bunny-Hop Swap 2
- Puzzle 029: Tenth-Round Ace
- Puzzle 030: Big Cake, Little Cake
- Puzzle 031: Emperor's Throne
- Puzzle 032: Target Practice
- Puzzle 033: Chained Circle
- Puzzle 034: The Cat's Trophy
- Puzzle 035: Guess Stars
- Puzzle 036: Going Dough-Nuts!
- Puzzle 037: Spin Shenanigans
- Puzzle 038: Pattern Pending
- Puzzle 039: A Hat of Tiles
- Puzzle 040: Crossed Connections
- Puzzle 041: From the Sidelines
- Puzzle 042: Couple at the Café
- Puzzle 043: Evenly Matched
- Puzzle 044: Suit Crates
- Puzzle 045: From Left to Right
- Puzzle 046: Toppings Up!
- Puzzle 047: Trial by Tennis
- Puzzle 048: Lighting Action
- Puzzle 049: Floor Seats
- Puzzle 050: Kitty Solitaire
- Puzzle 051: Dandy Bears
- Puzzle 052: Spectacular Views
- Puzzle 053: Poke 'Em Totems 2
- Puzzle 054: Archaeological Feet
- Puzzle 055: Spinning Maize 2
- Puzzle 100: Gate to the Ruins!
- Puzzle 113: Chip Champions
- Puzzle 118: Evenly Matched 3
- Puzzle 122: Kitty Solitaire 3
For the rest of the game's puzzles, see the Miracle Mask puzzle index.