
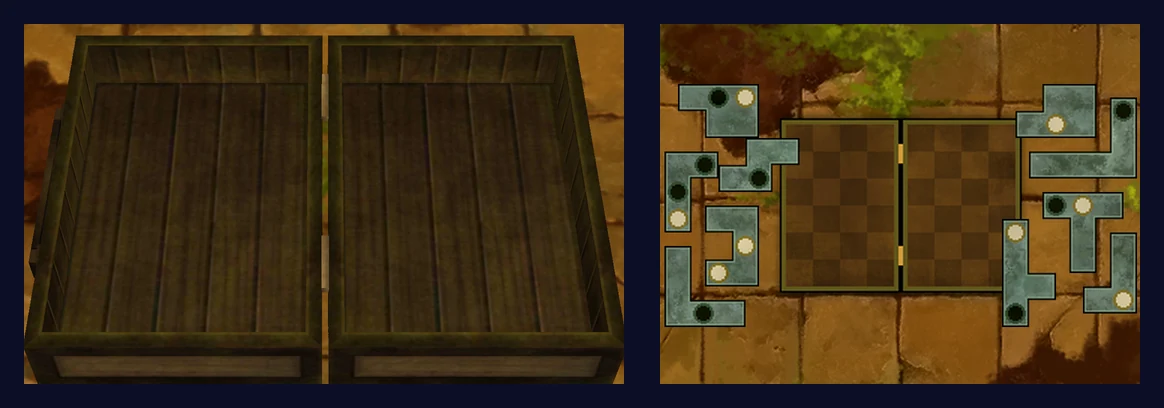
Puzzle 137 is Cursed Case 2, a 70-picarat Arrange puzzle in The Toymaker's House, one of Layton's Challenges. Ten stone blocks lie around an open case, and you have to pack every one of them back in. The blocks have white studs and black holes, and when the case closes, every stud on one side has to slot into a hole on the other. Unlike the first cursed case, some of these blocks have to be turned.
This page covers bonus Puzzle 137 in Professor Layton and the Miracle Mask, the 3DS game (US and UK English). The blocks and the answer are the same in the US and UK English versions; quotes use the North American text. If you're after Daily Puzzle 137, the first Cursed Case, or Puzzle 137 from another Layton game, see Wrong Puzzle 137? below.
What Puzzle 137 is
| Name | Cursed Case 2 (the same in the US and UK English versions) |
|---|---|
| Type | Arrange (move and turn blocks, then touch Submit) |
| Picarats | 70 |
| Location | Layton's Challenges, The Toymaker's House (Bonuses menu) |
| Chapter | None. It's a bonus puzzle outside the story |
| How you open it | Finish all the main Toy Robot stages |
| Required? | No, it's optional |
| Reward | None besides the picarats |
| Previous puzzle number | Puzzle 136, A Pattern of Tiles (The Toymaker's House) |
| Next puzzle number | Puzzle 138, Poke 'Em Totems 3 (The Toymaker's House) |
The puzzle reads: "Oh no! Another cursed case! It's up to you to get all the cursed stone blocks back into the case and close it tight if you don't want to unleash terrible things upon the world! To be safe, you'll have to pack every block neatly into the case. To complicate matters, the blocks are dotted with holes and protruding studs, so you'll need to make sure the studs on one side slot into the holes on the other side, or you won't be able to close the case. Good luck!" The objective bar says, "Close the cursed case!"
Each half of the case is four squares wide and six squares tall, and the ten blocks fill both halves exactly, with no gaps. Touch the middle of a block to move it, and touch its edges to turn it. The case closes like a book, with the left half folding over onto the right, so a square in the left half ends up on top of the matching square in the right half, mirrored left to right. When every block is in, touch Submit.
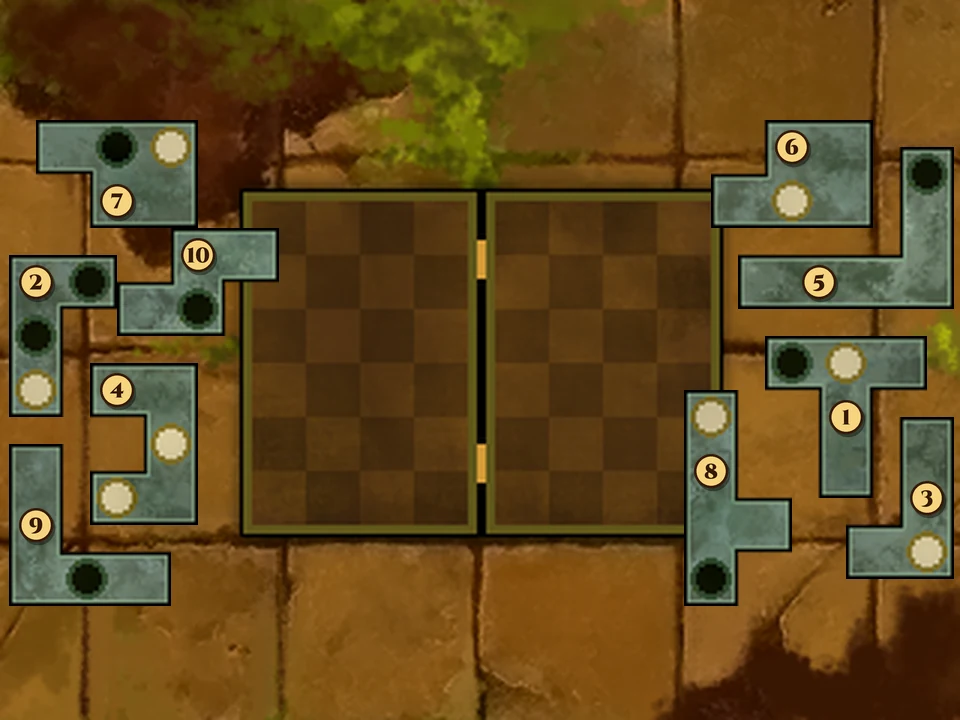
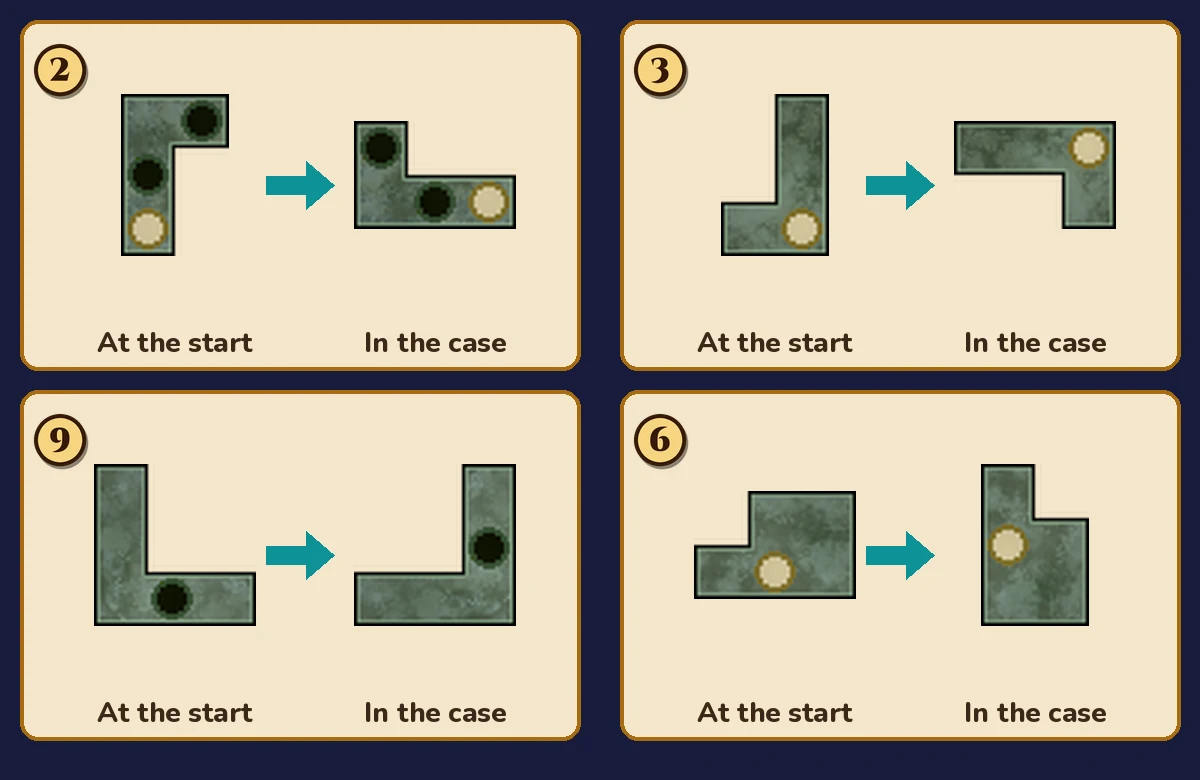
The numbers in the picture above match these shapes: 1 is the T, 2 is the small L with two holes and a stud, 3 is the small L with just a stud, 4 is the U on its side, 5 is the long L with one hole, 6 is the chunky block with one stud, 7 has a hole and a stud side by side, 8 is the tall block with a stud at one end and a hole at the other, 9 is the corner block with one hole, and 10 is the S-shaped block with one hole.
Puzzle names
| Version | Puzzle name |
|---|---|
| North America | Cursed Case 2 |
| UK English | Cursed Case 2 |
| Japanese | トランクの中身2 (Toranku no Nakami 2, "what's inside the trunk 2") |
The name is the same in the US and UK English versions. The UK question opens with "Oh no! You've stumbled across a cursed case!", UK Hint 1 says "Of all the cursed cases that are rumoured to exist, this has got to be one of the nastier ones," and the UK correct message starts "You've saved the day!" The blocks and the answer are the same in the US and UK English versions. In Japanese it's トランクの中身2.
Wrong Puzzle 137?
- Daily Puzzle 137 is Train 07, from the Trains and Train Spotters set.
- Puzzle 094, Cursed Case, is the first cursed case, dug up by young Hershel and Randall on Ruins B5 in Chapter 6. It has eight stone blocks, and none of them need turning.
- Puzzle 136, A Pattern of Tiles, and Puzzle 138, Poke 'Em Totems 3, are the other two puzzles in The Toymaker's House.
- Puzzle 137 in another Layton game is a different puzzle. If yours doesn't show stone blocks and an open case, you're in the wrong game.
Where you find it
Puzzle 137 is one of the fifteen bonus puzzles in Layton's Challenges, which you open from the Bonuses section. The challenges are split into five houses of three puzzles each, and The Toymaker's House holds Puzzles 136, 137 and 138. Cursed Case 2 is the second puzzle in that house.
The Toymaker's House opens when you finish the Toy Robot, the wind-up robot minigame in the Professor's trunk. Clear its main stages and the game says, "Congratulations! You've mastered all of the main stages available for your toy robot!" and adds the house to Layton's Challenges. The Miracle Mask minigames page has help with the robot's stages.
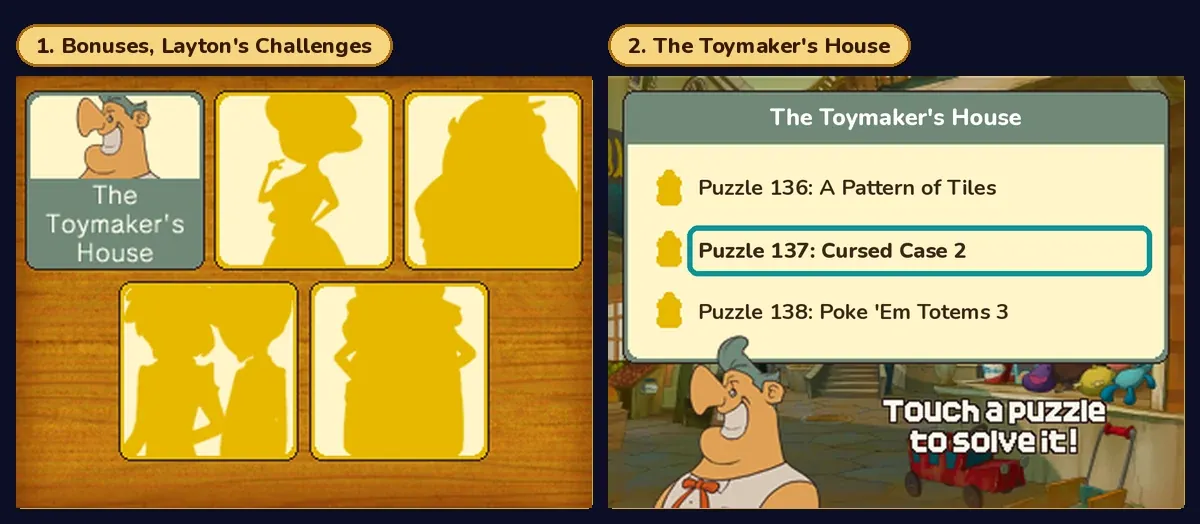
When you pick the puzzle, Layton says, "Let's see how you fare with this puzzle."
When the case won't close
- "Too bad. The blocks may all be in the case, but are the studs and holes aligned properly? You have to close that case before it's too late!" That's the game's message for a wrong answer. Every block is in, but at least one stud doesn't meet a hole.
- You can't make the blocks fit at all. Some blocks have to be turned, as Hint 1 says. Touch a block's edges to turn it.
- Everything fits, but the answer is still wrong. There's a second way to fill both halves that looks right, but not every stud lands on a hole when the case closes. Check each stud against the mirror-image square in the other half.
- Checking a stud. The left half's first column meets the right half's last column, the second meets the third, and so on, on the same row. A stud has to land on a hole, and a hole has to have a stud landing on it.
Hints, one at a time
These are the game's own hints, word for word from the North American version and in the same order. Open only the next one you need. In the game, Hints 1 to 3 cost one hint coin each and the Super Hint costs two.
Hint 1: A nastier case
Having trouble fitting shapes, holes, and studs together nicely? Sorry, but this cursed case is rather nastier than the last one. You can't just move blocks as they are--you'll have to rotate them too if you want to fit them all into the case.
Hint 2: The T
Let's get started then. See the block that's shaped like a letter T? That goes in the top-right corner of the right half of the case. You don't need to rotate it--it'll remain a perfect T until it's shut up in the case.
Hint 3: The two L-shaped blocks
Can you see an L-shaped block that has two holes and one stud? Now look for another block that's exactly the same shape but only has a stud. These two L-shaped blocks can be put together to form a rectangle that will fit into the bottom in the right-hand side of the case. You'll have to decide which way to put them by looking at the position of the studs and holes.
Super Hint: The U
Next, look for a block shaped like a letter U on its side. Move that block, without rotating it, into the bottom-right corner of the left-hand side of the case. You should now know which way around to put those two L-shaped blocks from Hint 3. You can work out the rest using the positions of the holes and studs in the right half!
Answer and full solution
The answer below places every block, with pictures of the finished puzzle. Open it when you're ready.
Show the answer
Turn four blocks (2, 3, 6 and 9) and leave the other six as they start. In the right half, the T (1) goes in the top-right corner, the long L (5) across the fourth row and up the right edge, the chunky block (6) in the top-left corner, and the two small Ls (2 and 3) make a rectangle along the bottom. In the left half, the U (4) goes in the bottom-right corner, block 7 in the top-left corner, the tall block (8) down the left edge, the corner block (9) in the top right, and the S-shaped block (10) in the bottom left. Then touch Submit.
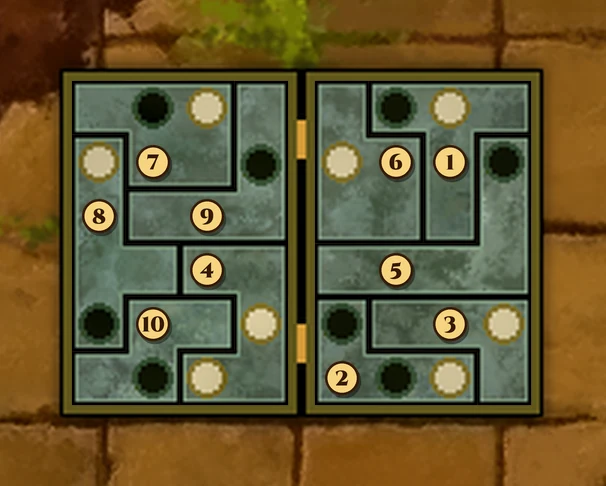
| Block | Half | Squares it covers | Turned? |
|---|---|---|---|
| 1, the T | Right | Row 1, columns 2 to 4; column 3, rows 2 and 3 | No |
| 2, small L with two holes | Right | Column 1, rows 5 and 6; row 6, columns 2 and 3 | Yes, a quarter turn counterclockwise |
| 3, small L with a stud | Right | Row 5, columns 2 to 4; column 4, row 6 | Yes, a quarter turn counterclockwise |
| 4, the U | Left | Rows 4 to 6, columns 3 and 4, open to the left | No |
| 5, the long L | Right | Row 4, all four columns; column 4, rows 2 and 3 | No |
| 6, the chunky block | Right | Column 1, rows 1 to 3; column 2, rows 2 and 3 | Yes, a quarter turn clockwise |
| 7 | Left | Row 1, columns 1 to 3; row 2, columns 2 and 3 | No |
| 8, the tall block | Left | Column 1, rows 2 to 5; column 2, row 4 | No |
| 9, the corner block | Left | Column 4, rows 1 to 3; row 3, columns 2 and 3 | Yes, a quarter turn counterclockwise |
| 10, the S-shaped block | Left | Row 5, columns 2 and 3; row 6, columns 1 and 2 | No |
Step by step:
- The T (1). Slide it, unturned, into the top-right corner of the right half: across the top row from column 2 to column 4, with its stem down column 3.
- The two small Ls (2 and 3). Turn each one a quarter turn counterclockwise. Put block 3 across row 5 of the right half from column 2 to column 4, with its stud in the far right square and its tail dropping into the bottom-right corner. Put block 2 in the bottom-left corner, with its hole in row 5 and its bottom row running from column 1 to column 3. Together they make a rectangle two rows deep.
- The U (4). Slide it, unturned, into the bottom-right corner of the left half, rows 4 to 6, open to the left.
- The long L (5). Leave it as it is and put it across row 4 of the right half, with its upright part running up column 4 to row 2. Its hole sits in row 2, column 4.
- The chunky block (6). Turn it a quarter turn clockwise so it stands three squares tall, and put it in the top-left corner of the right half, stud in row 2, column 1. The right half is now full.
- Block 7. Put it, unturned, in the top-left corner of the left half, with its hole and stud in row 1, columns 2 and 3.
- The tall block (8). Put it, unturned, down the left edge of the left half from row 2 to row 5, stud at the top and hole at the bottom.
- The corner block (9). Turn it a quarter turn counterclockwise and put it in the top-right corner of the left half, running down column 4 and along row 3.
- The S-shaped block (10). It fills the last gap, in the bottom-left corner of the left half, unturned. Touch Submit.
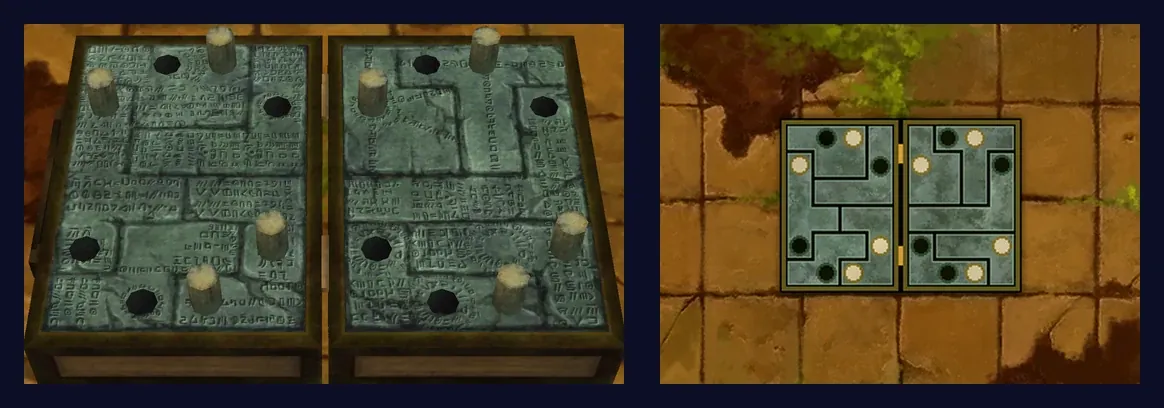
The game says, "Well done! You've saved the day again! You do wonder what kind of "terrible things" could be "unleashed" if you left the case alone, though..."
The order you place the blocks in doesn't matter. Only where each one ends up and which way it faces count.
If your answer keeps failing:
- Check row 1 of each half. Both should read, from the left: plain, hole, stud, plain.
- Check rows 5 and 6. In each half, row 5 should read hole, plain, plain, stud and row 6 plain, hole, stud, plain.
- Check row 2. Both halves should read stud, plain, plain, hole. If any of these rows is off, one of the turned blocks is facing the wrong way.
Picarats, hints and hint coins
Cursed Case 2 shows 70 picarats when it starts. The puzzle can award 70, 63 or 56 picarats. Wrong answers may reduce the picarat value.
Hints cost hint coins, not picarats. Hints 1 to 3 cost one hint coin each and the Super Hint costs two, five in total. Or use the free hints on this page and save your coins.
Does it unlock anything?
No. It doesn't give you an item. You get the picarats, and it counts toward the fifteen Layton's Challenges. Solve all fifteen and the game congratulates you: "Congratulations! You solved all 15 of Layton's Challenges!"
Versions
- Nintendo 3DS family: this page covers the 3DS game. The case is shown in 3D on the top screen, and you move and turn the blocks with the stylus on the touch screen.
- US and UK English versions: same name, same blocks, same answer. The UK question, Hint 1 and correct message are worded a little differently.
Layton's lines
Layton hosts every puzzle in Layton's Challenges. When you start this one, he says, "Let's see how you fare with this puzzle." If you quit, he says, "Mull it over. Come back when you're ready." and when you come back to try again, "Are you ready to have another go?"
When it's solved, he says, "Brilliant! I can't fault you on this one." Pick it again later and he asks, "Back to solve this puzzle again?"
FAQ
Where is the answer to Puzzle 137?
It's in the Answer and full solution section above, hidden until you open it. If you only want a push, open the hints one at a time first.
What is Puzzle 137 called?
Cursed Case 2, in both the North American and UK versions. In Japanese it's トランクの中身2.
Where is Puzzle 137?
In Layton's Challenges, in the Bonuses section. It's the second puzzle in The Toymaker's House, which opens once you've finished the main Toy Robot stages.
Do I have to solve Puzzle 137?
No. It's a bonus puzzle, so it has nothing to do with finishing the story.
How many picarats is Puzzle 137 worth?
It shows 70 picarats when it starts. The puzzle can award 70, 63 or 56 picarats. Wrong answers may reduce the picarat value.
Is Daily Puzzle 137 the same as Puzzle 137?
No. Daily Puzzle 137 is Train 07, from the Trains and Train Spotters set. Bonus Puzzle 137 is the stone-block case in The Toymaker's House.
More Miracle Mask puzzles
- Puzzle 136: A Pattern of Tiles
- Puzzle 138: Poke 'Em Totems 3
- Puzzle 094: Cursed Case
- Puzzle 141: Fix the Fossil 2
- Puzzle 146: Tilt to Traverse 2
- Miracle Mask minigames
For the rest of the game's puzzles, see the Miracle Mask puzzle index.