
Puzzle 091 is Totem Tumbler, a 40-picarat Arrange puzzle on Ruins B2 in Chapter 6. Young Hershel digs it up from a glowing spot in the Akbadain ruins, and it's an optional puzzle. Fourteen stone totem blocks are piled up in a cave, four of them with faces, and the picture in the top right shows how they should stand: four columns, like a staircase. You move a mallet on the top screen by sliding the stylus on the touch screen, and you may hit only once.
This page covers story Puzzle 091 in Professor Layton and the Miracle Mask, the 3DS game (US and UK English). The blocks and the answer are the same in the US and UK English versions; quotes use the North American text. If you're after Daily Puzzle 091, the other totem puzzles, or Puzzle 91 from another Layton game, see Wrong Puzzle 091? below.
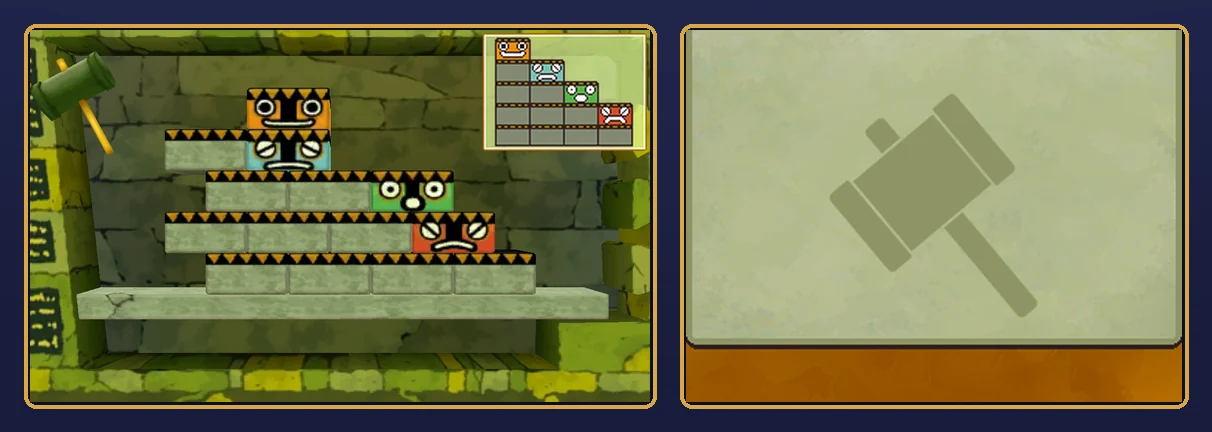
What Puzzle 091 is
| Name | Totem Tumbler (US and UK) |
|---|---|
| Type | Arrange |
| Picarats | 40 |
| Location | Ruins B2, in the Akbadain ruins |
| Chapter | Chapter 6 |
| When | Young Hershel and Randall |
| How you start it | Dig up the left glowing spot in the room at the top of the Ruins B2 map |
| Required? | No, it's optional |
| If you leave it | It goes to Nanna Grams (known as Elizabeth in the UK version) at the start of Chapter 7 |
| Previous puzzle number | Puzzle 090, Loose Connection (Pumpkin Spinners) |
| Next puzzle number | Puzzle 092, Ancient Artistry (Ruins B3) |
The puzzle reads: "This time, our blocks are piled up in a cave. There should be four columns here, arranged as in the picture in the top right, like a staircase. Can you put the columns back in order again?" It goes on: "There is, however, one crucial condition this time: you may only use the mallet once. Take your time and make one well-placed hit!" The objective bar says "Arrange the totem blocks!"
The top screen shows five rows of blocks on a long stone base. From the top, the rows hold one, two, three, four and four blocks. The orange face block sits alone on the top row, and the blue, green and red face blocks sit at the right ends of the next three rows. The bottom row is four plain blocks. The picture in the top right shows the goal: four columns, five, four, three and two blocks tall, with the orange face on the tallest and the blue, green and red faces one step lower each time.
Slide the stylus on the touch screen to move the mallet on the top screen, then let it swing. If your one hit doesn't do it, the blocks tumble; tap the touch screen and they're set up again, so you can try as often as you like. This puzzle can't be failed.
Puzzle names
| Version | Puzzle name |
|---|---|
| North America | Totem Tumbler |
| UK | Totem Tumbler |
| Japanese | 洞窟の石像 (Dōkutsu no Sekizō, "the stone statues in the cave") |
The name is the same in the US and UK versions. The UK text differs in wording in a few places: its question starts "The totem pranksters have piled up these blocks in a cave...", Hint 1 says "just have a go at hitting somewhere", and Hint 2 says "doesn't look as if". The blocks and the answer are the same in the US and UK English versions.
Wrong Puzzle 091?
- Daily Puzzle 091 is Police 02, from The Barking Beat set.
- Puzzle 090, Loose Connection, is the puzzle before this one, started from the Ferris wheel at Pumpkin Spinners. If yours is about a cable, that's the one you've got.
- Puzzle 092, Ancient Artistry, is the next puzzle, dug up on Ruins B3. If yours asks you to count bulls in a cave painting, that's the one you've got.
- Puzzle 022, Poke 'Em Totems, and Puzzle 053, Poke 'Em Totems 2, are the other story puzzles with totem blocks and a mallet, found in Hershel's Room and Randall's Room. In those you can hit more than once.
- Puzzle 138, Poke 'Em Totems 3, is a Layton's Challenge with totem blocks, not a story puzzle.
- Puzzle 91 in another Layton game is a different puzzle. If yours doesn't show totem blocks in a cave and a one-hit mallet, you're in the wrong game.
Where you find it
Chapter 6 is the long flashback in the Akbadain ruins, where you play as young Hershel exploring with Randall. On Ruins B2, go to the square room at the top of the floor map, the one with the red arrow to the next level. There are two glowing spots in that room. Face the left one and touch the Dig Hole icon, or press the A Button. Randall says, "There is a puzzle in there!" Hershel answers, "Strange. There really are all sorts of things buried in here." Randall says, "You dug it up--you solve it!" and Hershel replies, "Oh, well... thanks a lot, partner." Then the puzzle starts.
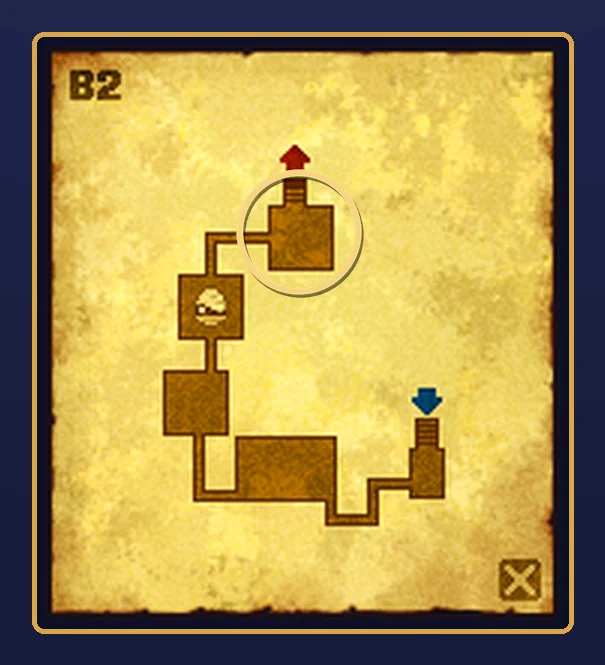
Ruins B2 has three hint coins, all buried in glowing dig spots: two in the long room in the middle of the map, and one in the puzzle's own room, in the right-hand glowing spot. Each coin can be collected only once.
You don't have to solve it to move on. If you quit the puzzle, Hershel says, "Maybe this was buried so no one could solve it. I'll just put it back for now." When you come back to it, he says, "Maybe I can give it one more go..." If you leave Puzzle 091 unsolved, it goes to Nanna Grams at the start of Chapter 7.
When the blocks won't line up
- Your hit knocked the blocks over. Tap the touch screen and the blocks are set up again, exactly as they started. Nothing is lost.
- No single block you hit gets everything into place. That's what Hint 2 is about. Open the hints below one at a time.
- The mallet won't go where you want. Slide the stylus slowly on the touch screen; the mallet follows it on the top screen.
- You can't find the puzzle. It's in the room at the top of the Ruins B2 map, in Chapter 6: dig up the left glowing spot.
Hints, one at a time
These are the game's own hints, word for word from the North American version and in the same order. Open only the next one you need. In the game, Hints 1 to 3 cost one hint coin each and the Super Hint costs two.
Hint 1: one hit
You can only make one hit with the mallet. If you're finding yourself at a loss, just try hitting somewhere and see what happens.
Hint 2: the blocks
Whatever you try, it doesn't look like you'll be able to get all the blocks in the right place with just one hit. So what can the solution be here?
Hint 3: the whole scene
Look carefully over the whole scene on the top screen. Is there anywhere that looks as if it might break?
Super Hint: where to hit
The blocks are all standing on a stone base. If you look at the left end of that base, you'll notice a little crack. Try giving that a whack!
Answer and full solution
The answer below shows where to hit, what happens next, and the finished puzzle. Open it when you're ready.
Show the answer
Answer: don't hit any of the blocks. Hit the small crack at the left end of the stone base, once.
Every row then slides to the left until it lines up with the left end of the base. The blocks end up in four columns, five, four, three and two blocks tall, with the orange, blue, green and red faces on top, exactly like the picture.
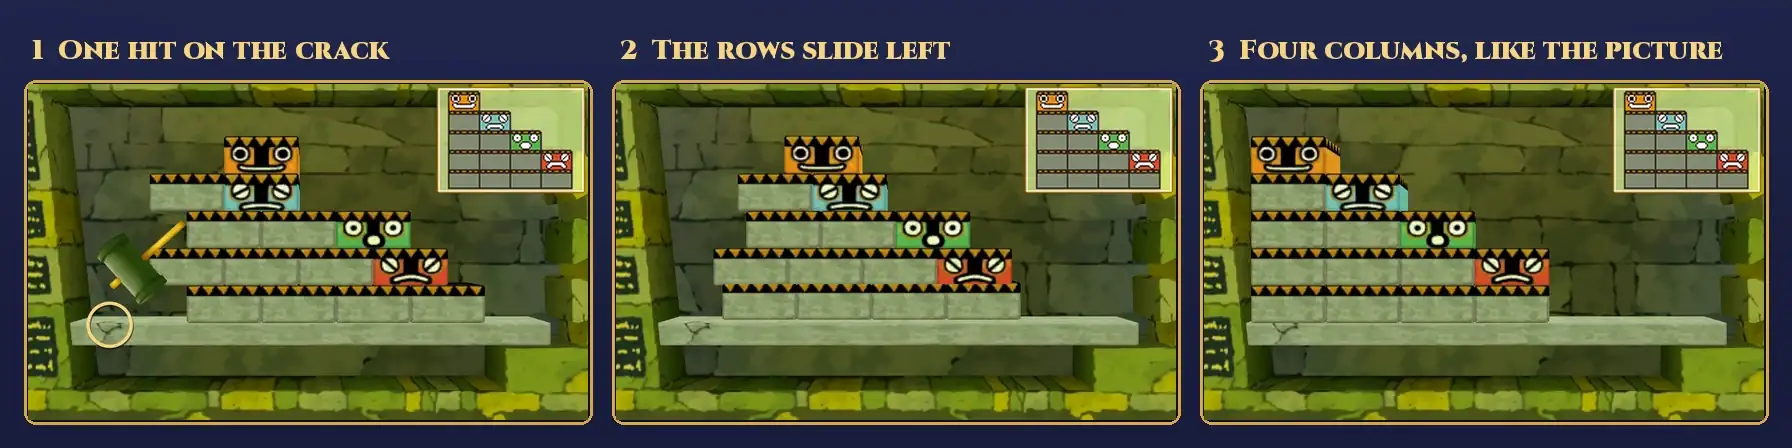
Step by step:
- Slide the stylus to bring the mallet down to the left end of the stone base, under the blocks. Look for the small crack in the base there.
- Hit the crack. That's your one hit.
- Watch the rows slide left until each row starts at the left end of the base.
- The orange face now tops a column of five, blue a column of four, green a column of three and red a column of two.
The game confirms it: "Well done! You got the idea. The only way to do it in one hit was to lean the whole base to one side. Sometimes it's good to think outside the box!"
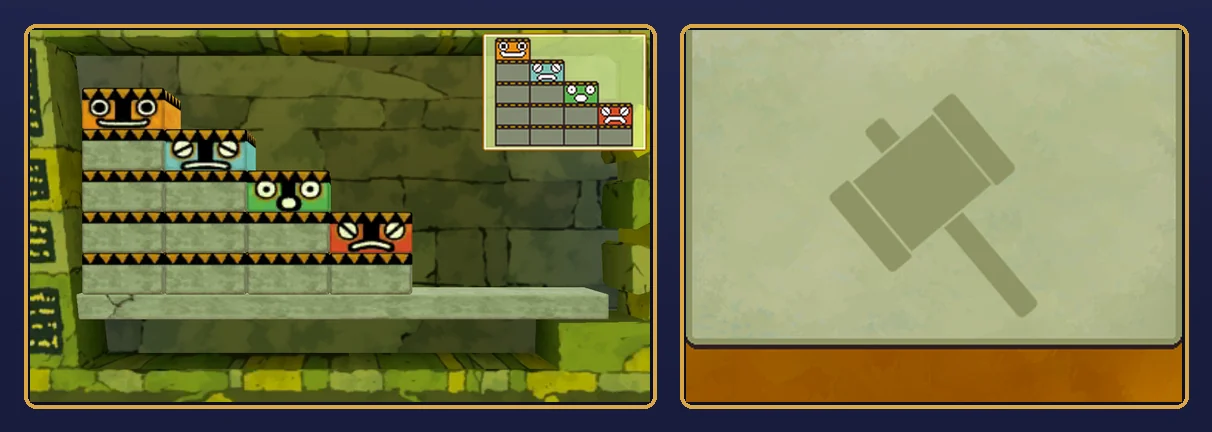
If it still doesn't work out:
- You hit a block instead. Any hit on the blocks knocks them over. Tap the touch screen to set them up again and aim lower, at the base itself.
- You missed the crack. Only the crack at the left end of the base does it. Move the mallet all the way to the left before you swing.
Picarats, hints and hint coins
Totem Tumbler shows 40 picarats when it starts. Its three picarat values are all 40. A hit that misses just sets the blocks up again after a tap. This puzzle can't be failed.
Hints cost hint coins, not picarats. Hints 1 to 3 cost one hint coin each and the Super Hint costs two, five in total. Ruins B2's three coins cover Hints 1 to 3, so you'll need two coins saved from earlier for the Super Hint, or you can use the free hints on this page.
Does it unlock anything?
No. It's an optional puzzle with no item or new area attached. You get the picarats, and it counts toward your total of solved puzzles.
Versions
- Nintendo 3DS family: this page covers the 3DS game. The blocks and the mallet are on the top screen, and you move the mallet by sliding the stylus on the touch screen.
- US and UK English versions: the blocks and the answer are the same. The UK text differs in wording in a few places.
The scene around the puzzle
When the puzzle is solved, Randall says, "I love archaeology, Hershel! You never know what is around the next corner!" Hershel answers, "This is very exciting, Randall! Let's go!"
FAQ
Where is the answer to Puzzle 091?
It's in the Answer and full solution section above, hidden until you open it. If you only want a push, open the hints one at a time first.
What is Puzzle 091 called?
Totem Tumbler, in both the North American and UK versions. In Japanese it's 洞窟の石像.
Where is Puzzle 091?
On Ruins B2 in the Akbadain ruins, in Chapter 6. Dig up the left glowing spot in the room at the top of the floor map.
Do I have to solve Puzzle 091?
No. It's optional. If you leave it, it goes to Nanna Grams at the start of Chapter 7.
Can I fail Puzzle 091?
No. This puzzle can't be failed. A hit that doesn't work just knocks the blocks over; tap the touch screen and they're set up again, as often as you need.
How many picarats is Puzzle 091 worth?
40. Its three picarat values are all 40.
Is Daily Puzzle 091 the same as Puzzle 091?
No. It's a different puzzle, listed under Wrong Puzzle 091?. Story Puzzle 091 is the totem blocks puzzle on Ruins B2.
More Miracle Mask puzzles
- Puzzle 092: Ancient Artistry
- Puzzle 090: Loose Connection
- Puzzle 089: Pumpkin Spinners
- Puzzle 088: Glass Arrows
- Puzzle 087: Merry-Go-Tiles
- Puzzle 053: Poke 'Em Totems 2
- Puzzle 022: Poke 'Em Totems
- Puzzle 60: Dangerous Holes
- Puzzle 100: Gate to the Ruins!
- Puzzle 113: Chip Champions
- Puzzle 118: Evenly Matched 3
- Puzzle 122: Kitty Solitaire 3
For the rest of the game's puzzles, see the Miracle Mask puzzle index.