
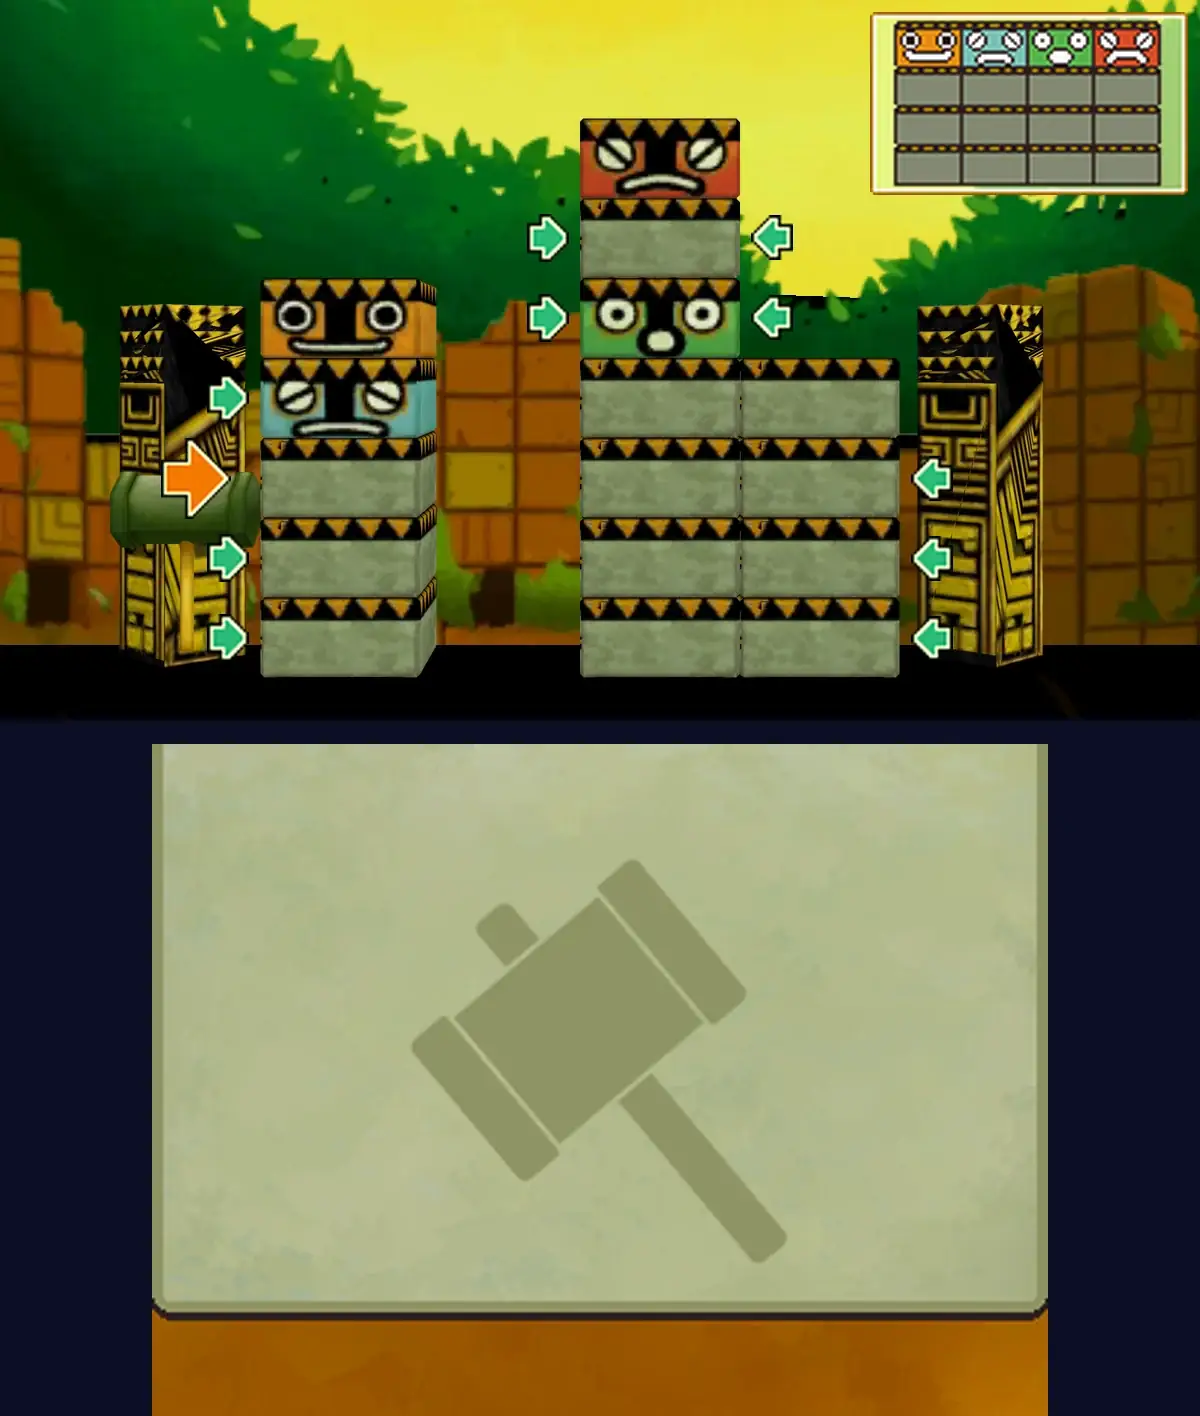
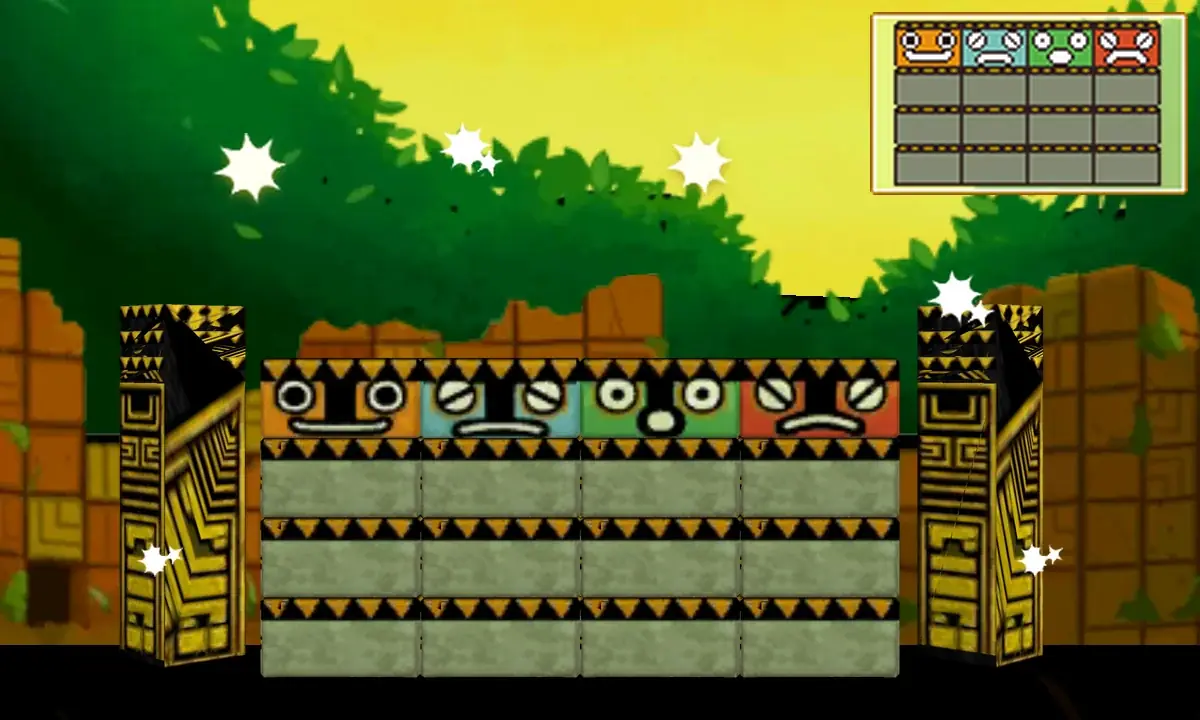
Puzzle 022 is Poke 'Em Totems, a 30-picarat Arrange puzzle hidden in the chest of drawers in Hershel's Room, during the Chapter 2 flashback to Hershel Layton's school days. Four columns of stone totem blocks have been knocked out of shape. Each column should be three plain blocks high with a totem head on top, and the heads should read yellow, blue, green and red from left to right. You put them back by hitting blocks sideways with a mallet, but you can never hit the top block of a column, so the order of your hits is the whole puzzle.
This page covers story Puzzle 022 in Professor Layton and the Miracle Mask on Nintendo 3DS, using the North American text, with pictures rebuilt from the game's own art. If you're after Daily Puzzle 022 or Puzzle 22 from another Layton game, see Wrong Puzzle 022? below.
What Puzzle 022 is
| Name | Poke 'Em Totems (written Poke 'em Totems in the UK English version) |
|---|---|
| Type | Arrange (you hit blocks with a mallet; there's no answer to write or submit) |
| Picarats | 30 |
| Location | Hershel's Room, in the Layton family home in Stansbury |
| Chapter | Chapter 2 |
| When | Hershel's school days |
| How you find it | A hidden puzzle: search the yellow chest of drawers to the right of the desk |
| Solved by | Hershel |
| Previous puzzle number | Puzzle 021, A Lick of Paint (Old Towne) |
| Next puzzle number | Puzzle 023, Fairway Fibber (Living Room) |
The question reads: "Who's responsible for this mess?! Each of these columns should be three blocks high and have a totem head on top! The heads were arranged from left to right in the order: yellow, blue, green, red. Can you use the mallet to shunt the blocks around and restore the columns to their original grandeur? Be careful, though: you can never hit the top block in a column. Think carefully about which order to hit the blocks in." The objective bar sums it up as "Arrange the totem blocks!"
The game's control help explains the mallet: "Slide the stylus on the Touch Screen to move the mallet on the top screen." Then: "Move the mallet over an arrow next to a block to highlight the arrow, then tap the Touch Screen to hit the block and slide it over." The small board in the top-right corner of the top screen shows the finished shape: four heads in a row, each on three plain blocks.
How the mallet moves the blocks
The question only states the rule about top blocks. The game doesn't spell out the rest, but the mallet seems to work like this.
- The mallet needs room to swing. It strikes from an empty space beside a block, or from outside the edge of the board. The green arrows show every strike that's possible right now.
- A hit pushes a whole row segment. The block you hit moves one column across, and so does every block touching it on that side at the same height. The last block in the line slides into the next empty space and drops down as far as it can.
- Everything above falls. When a block leaves a column, the blocks above it drop by one.
- Nothing ever goes up. Blocks only move sideways or fall. A head that falls below the fourth row from the bottom can't get back up, so that attempt is a dead end.
- The top block stays put. No column's top block can be hit, which is why every head needs something under it to be knocked out instead.
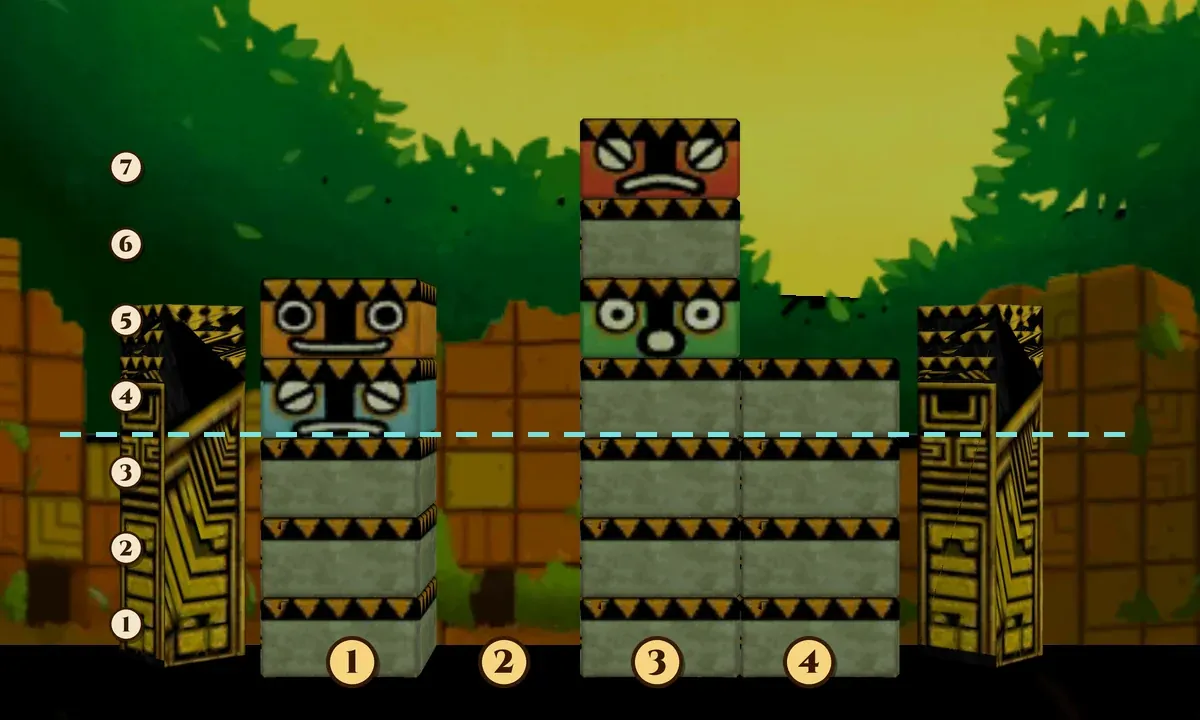
At the start, column 1 has three plain blocks with the blue head and then the yellow head on top. Column 2 is empty. Column 3 has four plain blocks, the green head, one more plain block and the red head on top. Column 4 has four plain blocks.
Puzzle names
| Version | Puzzle name |
|---|---|
| North America | Poke 'Em Totems |
| UK | Poke 'em Totems |
| Japanese | 古代の石像 ("ancient stone statues") |
The Japanese title is 古代の石像. The North American version carries a different Japanese label for it, 石像のナゾ.
The UK name is written with a lower-case "em." The blocks, the rule and the solution are the same in the US and UK English versions.
Wrong Puzzle 022?
- Daily Puzzle 022 in Miracle Mask is a different puzzle: Sailing 03, from the Perilous Voyage set. It has nothing to do with totems.
- Poke 'Em Totems 2 is Puzzle 053, a 35-picarat follow-up in Randall's Room, and Poke 'Em Totems 3 is Puzzle 138, worth 60 picarats, in Layton's Challenges. They use the same mallet with different starting blocks, so the answer on this page won't solve them.
- Puzzle 22 in another Layton game is a different puzzle. If yours doesn't show stacked totem blocks and a mallet, you're in the wrong game.
Where you get it
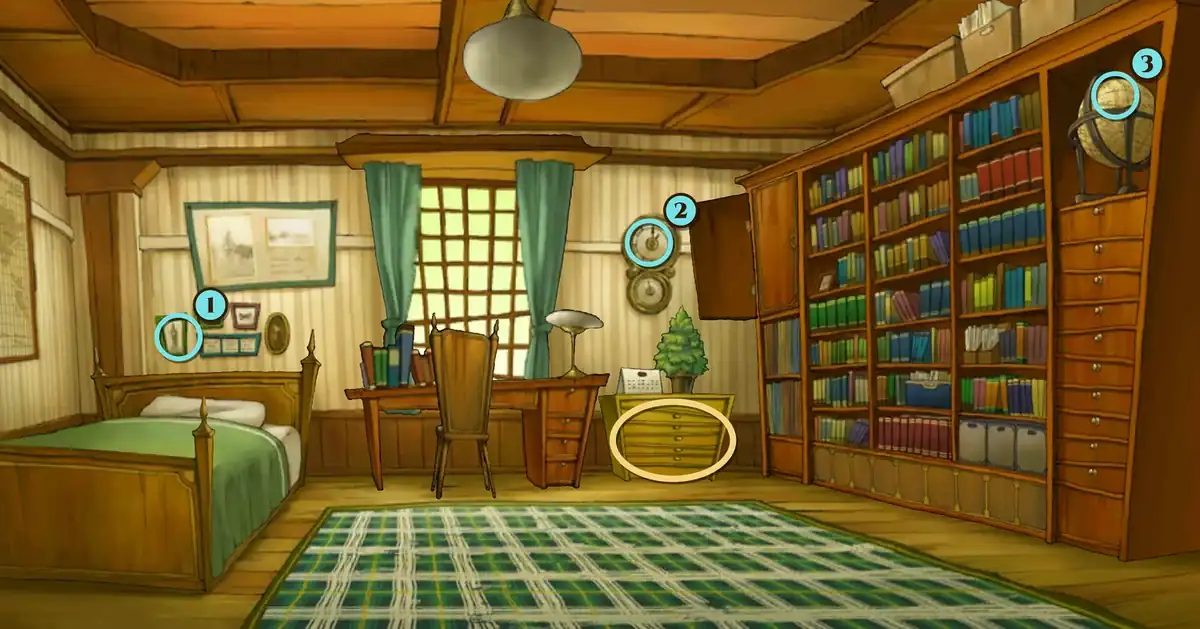
Puzzle 022 is a hidden puzzle in Chapter 2, the flashback to Hershel's time in Stansbury. You can go into Hershel's Room when he heads up to his room before dinner and the objective becomes "Do Some Studying before Dinner!" Search the lower drawers of the yellow chest of drawers to the right of his desk, the one with a little potted tree on top. Hershel says, "There's a puzzle hidden here," and adds, "Hmm. Randall must have put it here the last time he was over."
It doesn't look like a puzzle the story needs. Solving it doesn't appear to open anything new. The drawers probably keep offering the puzzle whenever you're in Hershel's Room until you solve it.
Left Hershel's Room without it?
A missed copy probably turns up with Nanna Grams (known as Elizabeth in the UK version), who keeps the puzzles you missed, from the start of Chapter 5, when the objective becomes "Continue the Investigation!" Missing it doesn't block the story.
Hint coins in Hershel's Room
Hershel's Room has three hint coins, all in the normal view, with no zoomed-in view to search. The room is wider than the screen, so slide the view to see both ends. The coins are on the small green-framed picture on the wall above the bed, on the wall clock, and on the globe on top of the tall cabinet at the far right. Three coins pay for the first three hints, but not the Super Hint as well.
Hints, one at a time
These follow the game's own hints, in the same order, with a little more explanation. Columns are numbered 1 to 4 from the left and rows from the bottom, as in the picture above. Open only the next one you need. In the game, Hints 1 to 3 cost one hint coin each and the Super Hint costs two.
Hint 1: Where to begin
Start by filling column 2, the empty one. Blocks never move up, so keep an eye on the heads: none of them may ever drop below row 4, their final height. The game's hint puts it as "Make sure the totem heads never fall below their final position, fourth from the bottom."
Hint 2: Which column to leave alone
Hitting any block in column 1 now would drop the blue head below row 4, so leave column 1 for later. Swing the mallet from the right-hand side and push three blocks from the right into column 2.
Hint 3: One way through
There's more than one route. The game suggests hitting wherever the lowest arrow on the right points, three times. After that, column 4 has two blocks. Then push the plain block under the red head one column to the right. From there, only the heads are left to sort out.
Super Hint: The last few hits
Following Hint 3, you should now have the yellow head on top of the blue one in column 1, and the red head on top of the green one in column 3. Hit the green head from the right, and the rest falls into place with one more hit.
Answer and full solution
The answer below covers every hit, with pictures of the hit order and the finished totems. Open it when you're ready.
Show the answer
The puzzle can be solved in five hits. Columns are numbered 1 to 4 from the left and rows from the bottom. "From the right" means the mallet stands on the right of the block and knocks it to the left.
| Hit | Block to hit | Swing from | What happens |
|---|---|---|---|
| 1 | Column 4, row 3 (second from the top) | The right | Column 4's and column 3's row-3 blocks both shift left, and a plain block drops into column 2 |
| 2 | The plain block under the green head (column 3, row 4) | The right | It drops into column 2, and the green head falls to row 4 |
| 3 | The plain block under the red head (column 3, row 5) | The right | It drops into column 2, which is now three blocks high, and the red head lands on the green one |
| 4 | The green head (column 3, row 4) | The right | The green head slides onto column 2, and the red head drops to row 4 of column 3 |
| 5 | The blue head (column 1, row 4) | The left | Blue, green and red each move one column right, and the yellow head drops into row 4 of column 1 |
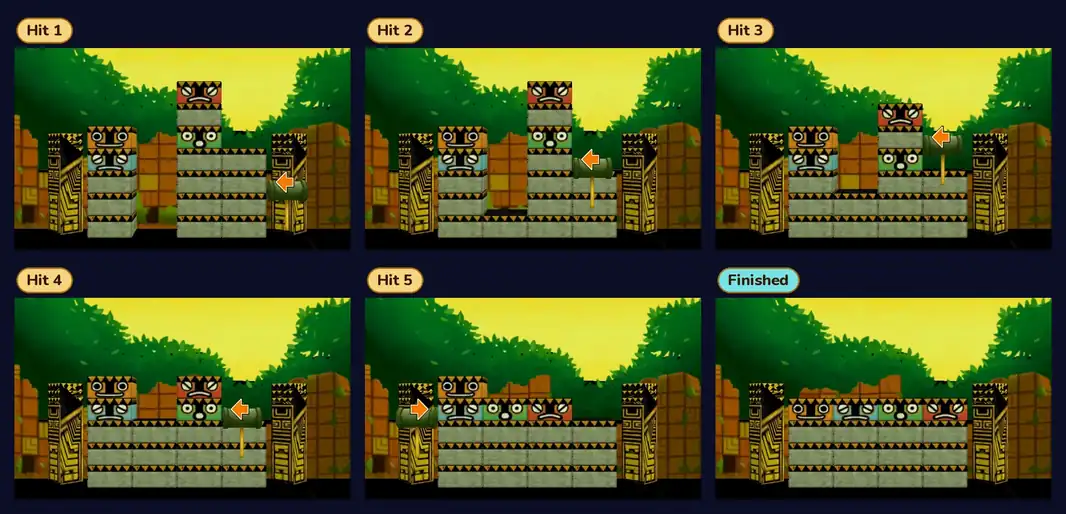
Step by step:
- Hit column 4, row 3, from the right. The mallet swings in from outside the board. The row-3 block of column 3 is pushed into column 2 and falls to the bottom, column 4's block takes its place, and column 4 drops to three blocks.
- Hit the plain block under the green head, from the right. It goes into column 2, which is now two high, and the green head falls into row 4.
- Hit the plain block under the red head, from the right. Column 2 is now three blocks high, and the red head sits on the green one in column 3.
- Hit the green head from the right. It slides onto column 2 at row 4, and the red head drops to row 4 of column 3. Column 4 still has three plain blocks and no head.
- Hit the blue head from the left. The mallet swings from outside the board, and blue, green and red all shift one column right, so red lands on column 4. The yellow head drops onto column 1, and the heads read yellow, blue, green, red.
The game's hints describe a different, six-hit route: hit the lowest right-hand arrow three times (column 4, row 1, then column 4, row 2, both from the right, then column 3, row 3, from the right), push the plain block under the red head to the right, hit the green head from the right, and finish with the blue head from the left. Both routes work. Five hits appears to be the fewest possible.
When the last head drops into place, the game says, "Well done! Even the totem heads themselves seem happy to be back in their places... Or do they?" Hershel adds, "He must have sneaked this in while I wasn't looking," and then, "Wow. Randall is really serious about getting me into these puzzles!"
If your answer keeps failing:
- A head fell below row 4. It can't come back up, so that attempt can't be finished. Start again and check which heads sit above the block before you hit it.
- The arrow you want isn't there. The mallet needs an empty space beside the block, or the edge of the board, to swing from, and it can't hit a column's top block. In Hit 4, column 4 has to be down to three blocks so that the mallet can stand at row 4 to the right of the green head.
- You started with column 1. Any hit there at the start drops the blue head too low. Column 1 is only hit once, last of all.
- The heads are in the wrong order. The goal is yellow, blue, green, red from left to right, as on the small board at the top right.
Picarats, hints and hint coins
Poke 'Em Totems shows 30 picarats when it starts. It may stay at 30 even if you go wrong. The puzzle has a "Too bad" message, "Watch where you swing that mallet!", but you may not be able to fail this puzzle, so it isn't clear when that message appears. If you back out of the puzzle, Hershel says, "Hmm. This is a tricky one," and when you come back to it he says, "Oh, Randall hid a puzzle here, didn't he?"
Hints cost hint coins, not picarats. The costs are one coin each for the first three hints and two for the Super Hint, five in total. The three coins in Hershel's Room cover the first three hints, so you'd need two coins saved from elsewhere for the Super Hint. Or use the free hints on this page and save your coins.
Versions
- Nintendo 3DS family: this page covers the 3DS game. You move the mallet with the stylus on the touch screen and tap to swing.
- US and UK English versions: the same puzzle, the same blocks and the same solution. The UK name is written Poke 'em Totems.
The scene around the puzzle
Hershel has been sent to his room until dinner, and he finds the totems in his own chest of drawers. He blames his friend Randall, who's been trying to get him interested in puzzles: "Hmm. Randall must have put it here the last time he was over." Solving it doesn't appear to open anything new, but it's a nice early look at how hard Randall worked to win Hershel over to puzzles.
If you like the mallet, Randall has another set waiting in his own room, Puzzle 053, Poke 'Em Totems 2. There's a third, Puzzle 138, Poke 'Em Totems 3, in Layton's Challenges.
FAQ
Where is the answer to Puzzle 022?
It's in the Answer and full solution section above, hidden until you open it. If you only want a push, open the hints one at a time first.
What is Puzzle 022 called?
Poke 'Em Totems in the North American version and Poke 'em Totems in the UK version. In Japanese it's 古代の石像.
Where is Puzzle 022?
In Hershel's Room, during Chapter 2. It's hidden in the yellow chest of drawers to the right of the desk, so you have to search the drawers to find it.
Why can't I hit some blocks?
The question says you can never hit the top block in a column. The mallet also seems to need an empty space beside the block, or the edge of the board, to swing from. Only the blocks with green arrows next to them can be hit.
What if a totem head falls too low?
Blocks never move up, so a head below row 4 can't get back to its place. You'll need to start the board again.
Do I have to solve Puzzle 022?
Probably not. Solving it doesn't appear to open anything new.
I left Hershel's Room without solving it. Is it gone?
Probably not for good. A missed copy probably goes to Nanna Grams from the start of Chapter 5.
How many picarats is Puzzle 022 worth?
It shows 30 picarats when it starts. It may stay at 30 even if you go wrong.
Is Daily Puzzle 022 the same as Puzzle 022?
No. Daily Puzzle 022 is Sailing 03, from the Perilous Voyage set. Story Puzzle 022 is the totem puzzle in Hershel's Room.
Does the same answer work for Poke 'Em Totems 2 and 3?
No. Puzzle 053, Poke 'Em Totems 2, and Puzzle 138, Poke 'Em Totems 3, use the same mallet rules with different blocks, so they need their own solutions.
More Miracle Mask puzzles
- Puzzle 001: Stumble's Balloons
- Puzzle 002: Where's Mother?
- Puzzle 003: Stumble's Banners
- Puzzle 004: Bumper Perspective
- Puzzle 005: Robot Factory
- Puzzle 006: Bunny-Hop Swap
- Puzzle 007: A Toasty Toast
- Puzzle 008: Carnival Colors
- Puzzle 009: Stamp Stumper
- Puzzle 010: The Place to Be!
- Puzzle 011: Backstage Blunder
- Puzzle 012: Sharing the Burden
- Puzzle 013: Ancient Arti-facts
- Puzzle 014: Bite of Bygone Days
- Puzzle 015: Fix the Fossil
- Puzzle 016: Wandering Watches
- Puzzle 017: Busted Umbrella
- Puzzle 018: That's Juicy!
- Puzzle 019: Spinning Maize
- Puzzle 020: Nine Red Bricks
- Puzzle 021: A Lick of Paint
- Puzzle 023: Fairway Fibber
- Puzzle 024: Patterned Apron
- Puzzle 025: Brave the Caves
- Puzzle 60: Dangerous Holes
- Puzzle 100: Gate to the Ruins!
- Puzzle 113: Chip Champions
- Puzzle 118: Evenly Matched 3
- Puzzle 122: Kitty Solitaire 3
For the rest of the game's puzzles, see the Miracle Mask puzzle index.