
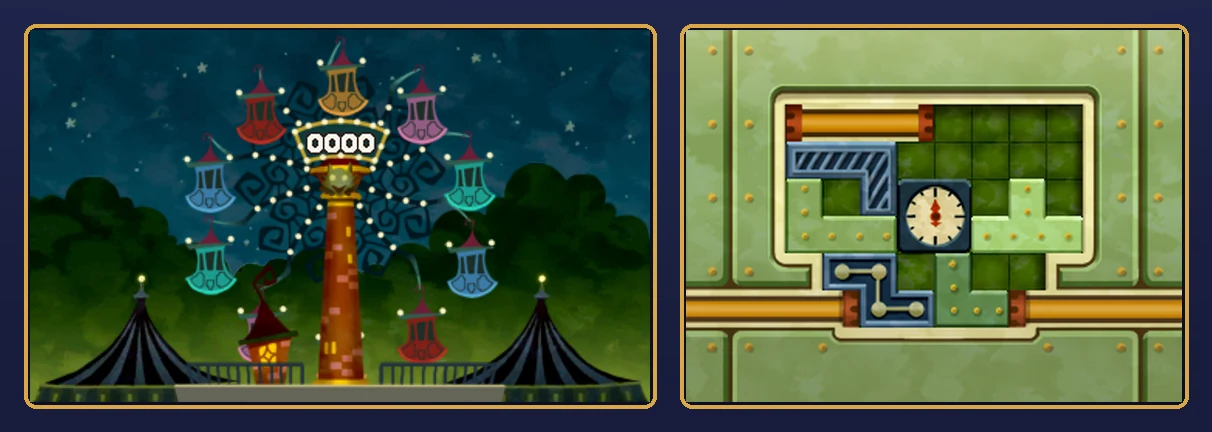
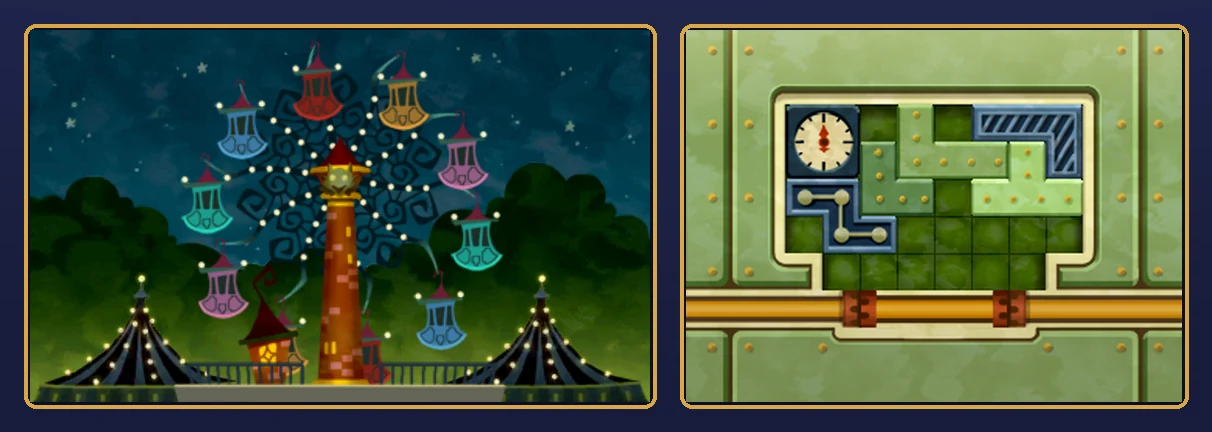
Puzzle 090 is Loose Connection, a 70-picarat Slide puzzle at Pumpkin Spinners in Pumpkin Park, in Chapter 5. You start it by tapping the Ferris wheel. A cable section has come loose in the wheel's control circuit, and the touch screen shows a grid packed with sliding pieces. Your job is to slide them around until the long yellow cable section drops into the gap at the bottom of the grid.
This page covers story Puzzle 090 in Professor Layton and the Miracle Mask, the 3DS game (US and UK English). The grid and the solution are the same in the US and UK English versions; quotes use the North American text. If you're after Daily Puzzle 090, the other puzzles in Pumpkin Park, or Puzzle 90 from another Layton game, see Wrong Puzzle 090? below.
What Puzzle 090 is
| Name | Loose Connection (US and UK) |
|---|---|
| Type | Slide |
| Picarats | 70 |
| Location | Pumpkin Spinners, Pumpkin Park |
| Chapter | Chapter 5 |
| Objective | "Investigate the Attractions!" |
| How you start it | Tap the Ferris wheel behind the tall brick tower at Pumpkin Spinners |
| Previous puzzle number | Puzzle 089, Pumpkin Spinners (Pumpkin Spinners) |
| Next puzzle number | Puzzle 091, Totem Tumbler (Chapter 6) |
The puzzle reads: "Oh no! A cable section in this circuit has come loose, and now the Ferris wheel's controls don't work! You have to repair the yellow cable quickly! Fix the circuit by moving the long yellow section down into the gap at the bottom of the grid." The objective bar says "Connect the cable!"
The touch screen shows seven pieces in a grid eight squares wide and six high, with the bottom corners walled off. Drag a piece to slide it into empty squares. One drag counts as one move, even when the piece turns a corner on the way, and the sign on the Ferris wheel tower on the top screen counts your moves. The puzzle is solved when the long yellow section sits in the gap at the bottom, between the two yellow cables.
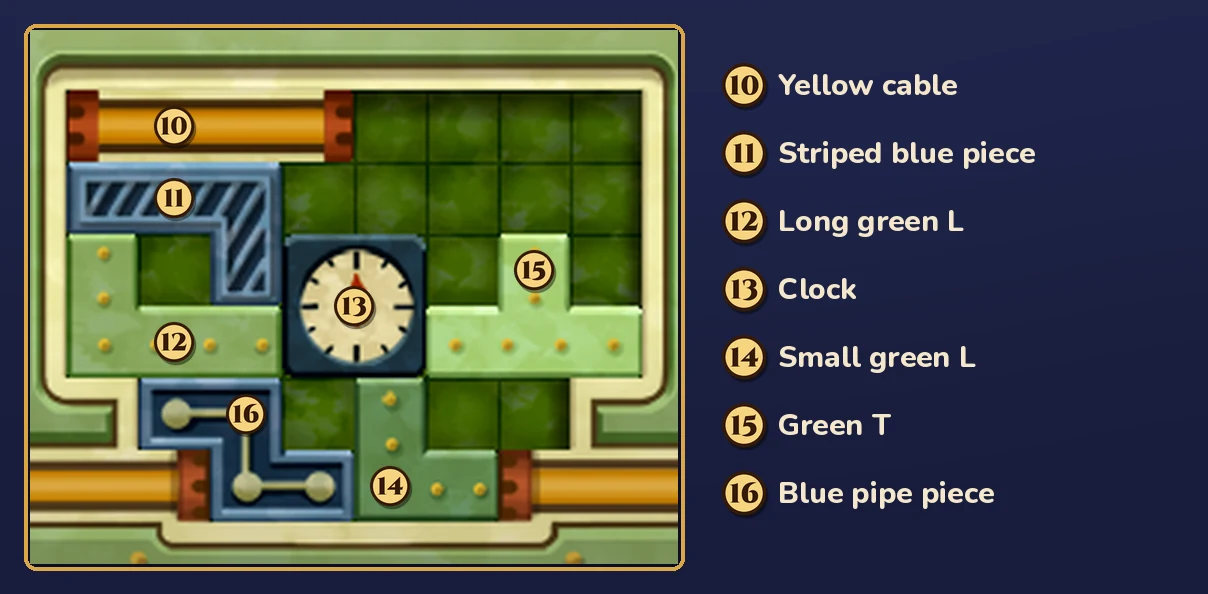
The game's hints mark each piece with a small picture of its shape. On this page those pieces are numbered ⑩ to ⑯, as in the picture below.
Puzzle names
| Version | Puzzle name |
|---|---|
| North America | Loose Connection |
| UK | Loose Connection |
| Japanese | 揺れる観覧車 (Yureru Kanransha, "the swaying Ferris wheel") |
The name is the same in the US and UK versions. The UK text differs only in small wording details: the puzzle has no comma before "and now", Hint 1 says "and slot ⑪ and ⑫ into the resulting gap" instead of "and then slide blocks ⑪ and ⑫ into the resulting gap", and Hint 3 ends "You're nearly there!" The grid and the solution are the same in the US and UK English versions.
Wrong Puzzle 090?
- Daily Puzzle 090 is Tortoises 02, from the Sun, Sand, and Turtles set.
- Puzzle 089, Pumpkin Spinners, is the other park puzzle at Pumpkin Spinners. You start it from the pumpkin teacup ride, not the Ferris wheel.
- Puzzle 087, Merry-Go-Tiles, and Puzzle 088, Glass Arrows, are the two park puzzles at the Carousel.
- Puzzle 091, Totem Tumbler, is the next puzzle number, but you meet it later, in Chapter 6. It's about putting columns of blocks back in order in a cave.
- Puzzle 116, Ferris Letters, is a later Ferris wheel puzzle, in Chapter 7. If yours asks for the missing letter on the wheel's cabins, that's the one you've got.
- Puzzle 117, Ride Rotation, is a later puzzle at Pumpkin Spinners, in Chapter 7, about a girl on a spinning teacup ride.
- Puzzle 90 in another Layton game is a different puzzle. If yours doesn't have a yellow cable to slide into a gap, you're in the wrong game.
Where you find it
In Chapter 5, the group goes to Pumpkin Park at night. At the entrance, Yukkles the clown checks your puzzle count: "You must have solved at least 50 puzzles to ride the rides here." Inside, Grosky reports a poster that reads, "Try to find a new spin on the miraculous!" Layton points out, "There is no shortage of things that spin here: the Ferris wheel, the carousel, the pumpkin ride..." Your objective becomes "Investigate the Attractions!" At Pumpkin Spinners, tap the Ferris wheel behind the tall brick tower. Layton says, "This Ferris wheel is perhaps the largest 'spin' here in the amusement park." Emmy asks, "Professor, does it look to you like that Ferris wheel is a little wobbly?" Luke answers, "You're right, Emmy! I wonder if it's broken." Then the puzzle starts.
You have to solve it to move the story on. The story continues only when all four park puzzles are solved: this one, Pumpkin Spinners from the teacup ride here at Pumpkin Spinners, and Merry-Go-Tiles and Glass Arrows at the Carousel. You can solve them in any order. The Ferris wheel keeps offering this puzzle until you solve it.
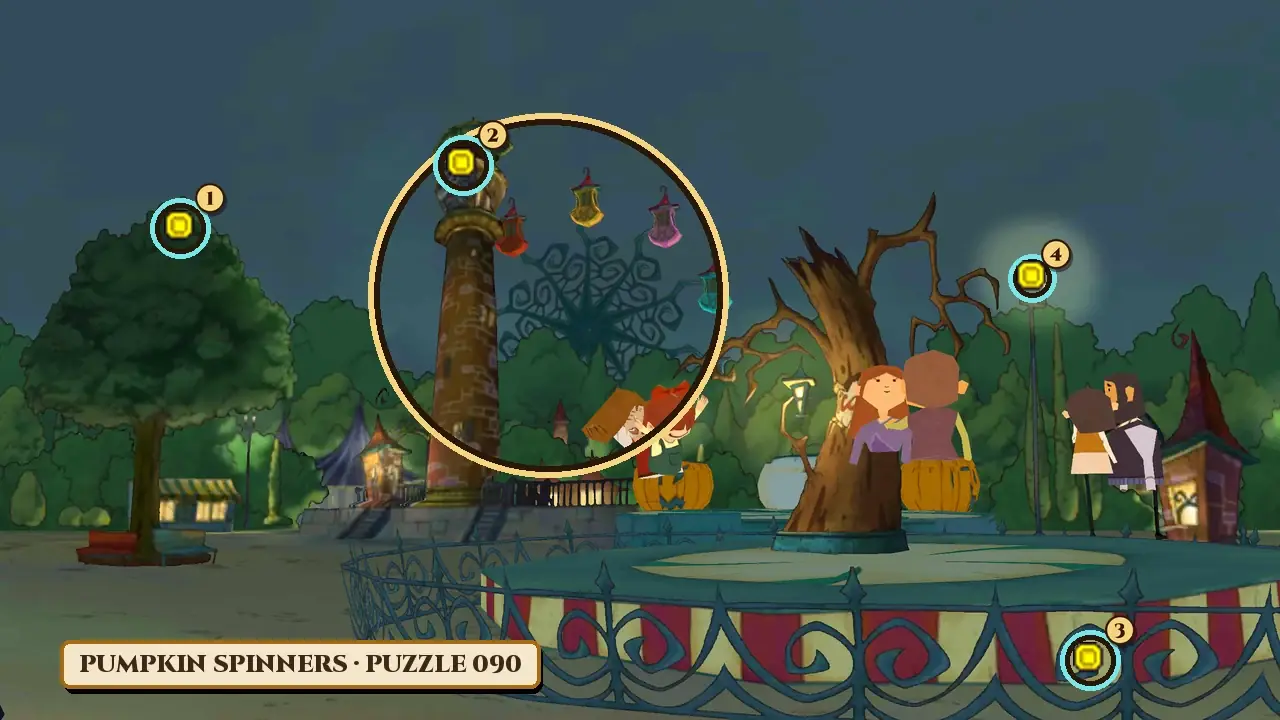
Pumpkin Spinners has four hint coins, all in the normal view: at the top of the big leafy tree on the left (1), on top of the tall brick tower in front of the Ferris wheel (2), on the iron fence around the teacup ride, at the front right (3), and at the top of the lamp post on the right (4). Each coin can be collected only once.
When the yellow cable won't reach the gap
- You can't tell which piece a hint means. The hints number the pieces ⑩ to ⑯. Check the numbered picture above: ⑩ is the yellow cable section and ⑬ is the clock.
- A piece won't go where you want. Pieces only slide into empty squares, but one drag can take a piece round corners and still counts as one move.
- The move counter keeps climbing. Extra moves don't cost you anything. The puzzle ends as soon as the yellow section is in the gap, however many moves you take.
- You don't know where to start. Hint 1 below names the first pieces to move, and each hint carries on from the one before.
- You can't find the puzzle. It's at Pumpkin Spinners in Pumpkin Park, in Chapter 5: tap the Ferris wheel behind the tall brick tower.
Hints, one at a time
These are the game's own hints, word for word from the North American version and in the same order. Open only the next one you need. In the game, Hints 1 to 3 cost one hint coin each and the Super Hint costs two.
Hint 1: where to start
You can solve this puzzle in 18 moves.
First, slide the yellow section, ⑩, to the top right, and then slide blocks ⑪ and ⑫ into the resulting gap.
The next piece to move is ⑬, the clock.
Hint 2: the next two pieces
Continuing from Hint 1, make sure ⑬ is against the left edge, then slide ⑭ up next to ⑬.
Looks a bit tidier now, doesn't it? The next few moves are tricky, though.
Hint 3: the tricky middle
Continuing from Hint 2:
1. Move ⑮ to the far right of the second row from the bottom.
2. Move ⑩ above ⑮, then slide ⑪ and ⑫ into the now vacant top-right space.
3. Move ⑬ into the top-left corner and slot ⑭ between ⑬ and ⑫.
4. Move ⑩ to the left edge of the third row from the bottom.
You're almost there!
Super Hint: the last moves
Continuing from Hint 3:
1. Move ⑭ down one row.
2. Move ⑫ one column left.
3. Move ⑮ into the small gap created by moving ⑫.
4. Move ⑩ all the way to the right.
Now if you move ⑯ out of the way, you can slot the yellow section into place.
Answer and full solution
The answer below lists every move, in four stages that follow the game's hints, with a picture of every move, checkpoints to compare your grid against, and the finished puzzle. Open it when you're ready.
Show the answer
Answer: 18 moves, the number the game mentions. Park the yellow cable in the top right and tidy the striped blue piece, the long green L, the clock and the small green L into the top-left part of the grid. Then move the green T and the yellow cable down, send the striped blue piece and the long green L across to the top right, fit the clock and the small green L into the top-left corner, and park the yellow cable on the left. Finally, shuffle the small green L, the long green L and the green T up into the top, slide the yellow cable right, move the blue pipe piece up and drop the yellow cable into the gap.
| Stage | Moves | What you do |
|---|---|---|
| 1. Hint 1 | 1 to 3 | Yellow cable to the top right, striped blue piece and long green L into the gap it leaves |
| 2. Hint 2 | 4 to 5 | Clock against the left edge, small green L up next to it |
| 3. Hint 3 | 6 to 12 | Green T to the far right of the second row from the bottom, yellow cable above it, striped blue piece and long green L to the top right, clock into the top-left corner, small green L beside it, yellow cable to the left edge of the third row from the bottom |
| 4. Super Hint | 13 to 18 | Small green L down, long green L left, green T up into the gap, yellow cable all the way right, blue pipe piece out of the way, yellow cable into the gap |
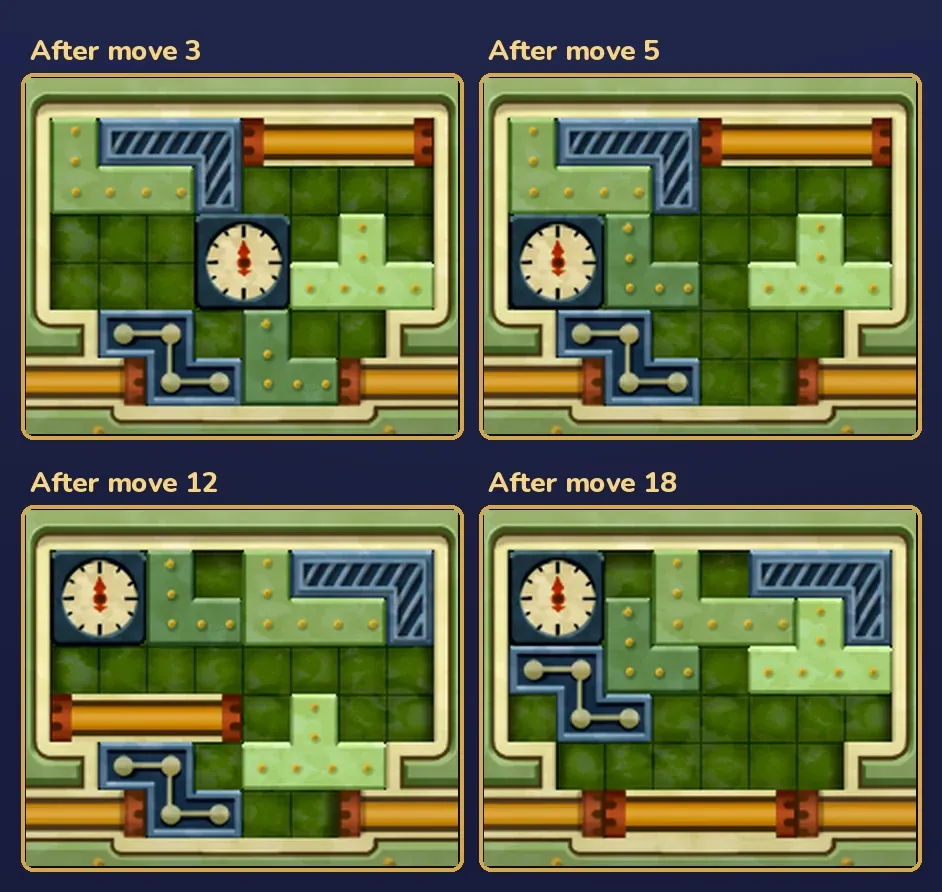
Step by step. Each step is one drag. The directions describe the route the piece takes, counted in squares, and you can do each step as one drag even when it turns a corner.
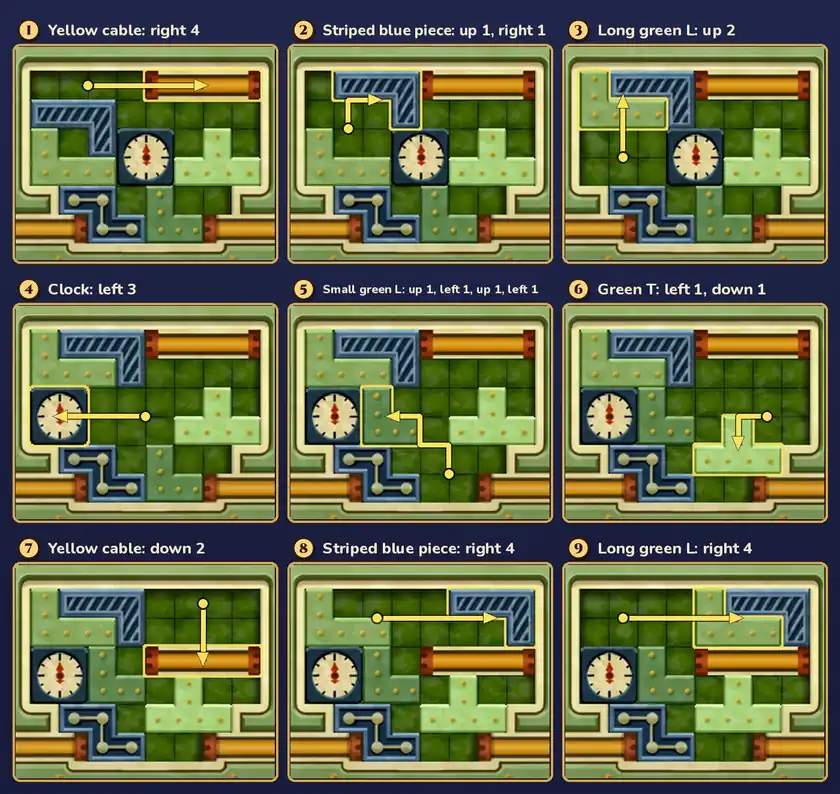
- Yellow cable ⑩: right 4, into the top-right corner.
- Striped blue piece ⑪: up 1, then right 1, into the top row.
- Long green L ⑫: up 2, into the top-left corner. That's Hint 1 done.
- Clock ⑬: left 3, against the left edge.
- Small green L ⑭: up 1, left 1, up 1, then left 1, next to the clock. That's Hint 2 done.
- Green T ⑮: left 1, then down 1, to the far right of the second row from the bottom.
- Yellow cable ⑩: down 2, just above the green T.
- Striped blue piece ⑪: right 4, into the top-right corner.
- Long green L ⑫: right 4, next to the striped blue piece.
- Clock ⑬: up 2, into the top-left corner.
- Small green L ⑭: up 2, between the clock and the long green L.
- Yellow cable ⑩: left 4, then down 1, to the left edge of the third row from the bottom. That's Hint 3 done.
- Small green L ⑭: down 1.
- Long green L ⑫: left 1.
- Green T ⑮: up 1, right 1, then up 1, into the gap the long green L left.
- Yellow cable ⑩: right 4, all the way to the right.
- Blue pipe piece ⑯: up 1, left 1, then up 1, out of the way.
- Yellow cable ⑩: left 1, down 1, left 1, then down 1, into the gap.
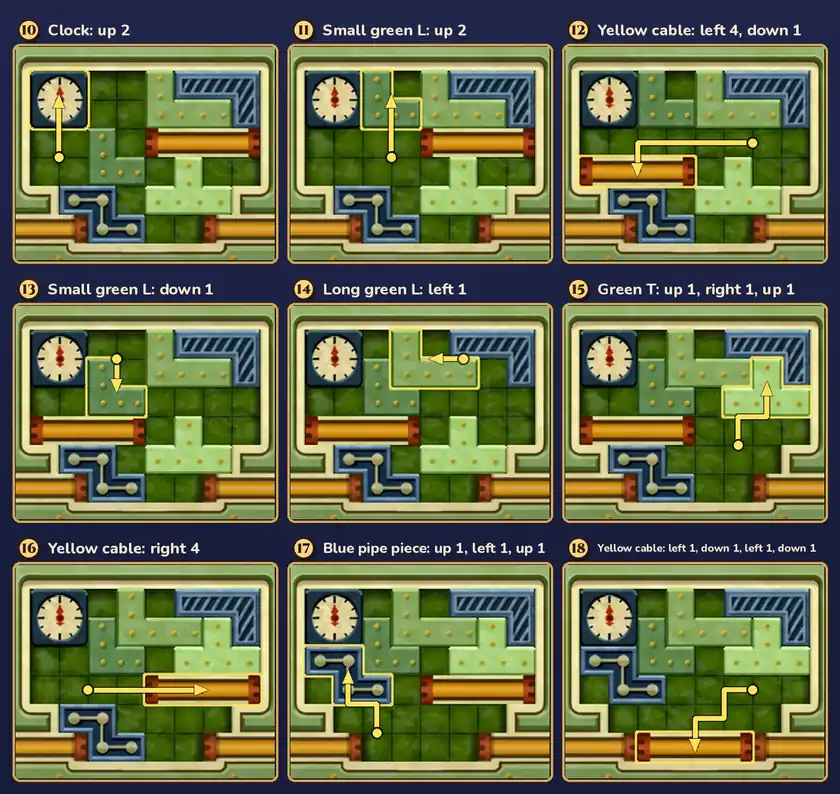
This route is the one the game's hints describe: moves 1 to 3 follow Hint 1, moves 4 and 5 Hint 2, moves 6 to 12 Hint 3 and moves 13 to 18 the Super Hint. Eighteen moves is the fewest the puzzle can be done in.
The game confirms it: "Well done! If you solved the puzzle in 18 moves, give yourself a round of applause! Now the Ferris wheel should be back under control!"
If it still doesn't work out:
- The yellow cable won't go above the green T at move 7. The green T has to be at the far right of the second row from the bottom first (move 6), with the top-right corner still holding the yellow cable.
- The small green L won't fit beside the clock at move 11. The clock has to be in the top-left corner first (move 10), and the long green L has to be over on the right (move 9).
- The yellow cable can't drop in at the end. The blue pipe piece is still in the way. Move it up and left out of the bottom row first (move 17), then bring the yellow cable down from the right.
- You took more than 18 moves. That's fine. The puzzle is solved either way and still awards 70 picarats.
Picarats, hints and hint coins
Loose Connection shows 70 picarats when it starts. Its three picarat values are all 70. This puzzle can't be failed: it ends as soon as the yellow section is in the gap, however many moves it takes, so solving it always awards 70 picarats.
Hints cost hint coins, not picarats. Hints 1 to 3 cost one hint coin each and the Super Hint costs two, five in total. Pumpkin Spinners' four coins cover Hints 1 to 3 with one coin left over, one short of the Super Hint, so you'll need a coin saved from earlier for that one, or you can use the free hints on this page.
If you leave the puzzle unsolved, Layton says, "If we don't repair this quickly, things could get ugly." Emmy answers, "You're right. We can't give up!" When you come back to the Ferris wheel, Layton says, "Let's get that control panel repaired."
Does it unlock anything?
It doesn't give you an item, but it moves the story on. After the puzzle, Luke spots one of the Masked Gentleman's cards stuck on the tower of the Ferris wheel. Once you have all four cards from the park puzzles, they form a map that points to Topsy Tower, and your objective becomes "Head to Topsy Tower!" You also get the picarats, and the puzzle counts toward your total.
Versions
- Nintendo 3DS family: this page covers the 3DS game. You slide the pieces on the touch screen, and the sign on the Ferris wheel tower on the top screen counts your moves.
- US and UK English versions: the grid and the solution are the same. The UK text differs only in small details of wording.
The scene around the puzzle
When the puzzle is solved, Layton says, "Good work! I wonder where the Ferris-wheel operator went." Luke calls out, "Professor, look! There's a card stuck on the tower of the Ferris wheel! It has a picture of the Mask of Chaos on it!" Emmy is angry: "I knew it! What kind of man would endanger innocent Ferris-wheel riders?!" Layton studies it: "A message from the Masked Gentleman... This won't be enough on its own, though."
FAQ
Where is the answer to Puzzle 090?
It's in the Answer and full solution section above, hidden until you open it. If you only want a push, open the hints one at a time first.
What is Puzzle 090 called?
Loose Connection, in both the North American and UK versions. In Japanese it's 揺れる観覧車.
Where is Puzzle 090?
At Pumpkin Spinners in Pumpkin Park, in Chapter 5. Tap the Ferris wheel behind the tall brick tower.
Do I have to solve Puzzle 090?
Yes. The story moves on only when all four park puzzles are solved: this one, Pumpkin Spinners, Merry-Go-Tiles and Glass Arrows.
How many picarats is Puzzle 090 worth?
70. Its three picarat values are all 70. This puzzle can't be failed.
Is Daily Puzzle 090 the same as Puzzle 090?
No. It's a different puzzle, listed under Wrong Puzzle 090?. Story Puzzle 090 is the Ferris wheel cable puzzle at Pumpkin Spinners.
More Miracle Mask puzzles
- Puzzle 089: Pumpkin Spinners
- Puzzle 088: Glass Arrows
- Puzzle 087: Merry-Go-Tiles
- Puzzle 086: Even Deal
- Puzzle 085: Slot Sequence
- Puzzle 084: Neon Orange
- Puzzle 083: Settle the Scores
- Puzzle 082: Rainbow Repair
- Puzzle 081: King Arthur's Sword
- Puzzle 045: From Left to Right
- Puzzle 60: Dangerous Holes
- Puzzle 100: Gate to the Ruins!
- Puzzle 113: Chip Champions
- Puzzle 118: Evenly Matched 3
- Puzzle 122: Kitty Solitaire 3
For the rest of the game's puzzles, see the Miracle Mask puzzle index.