
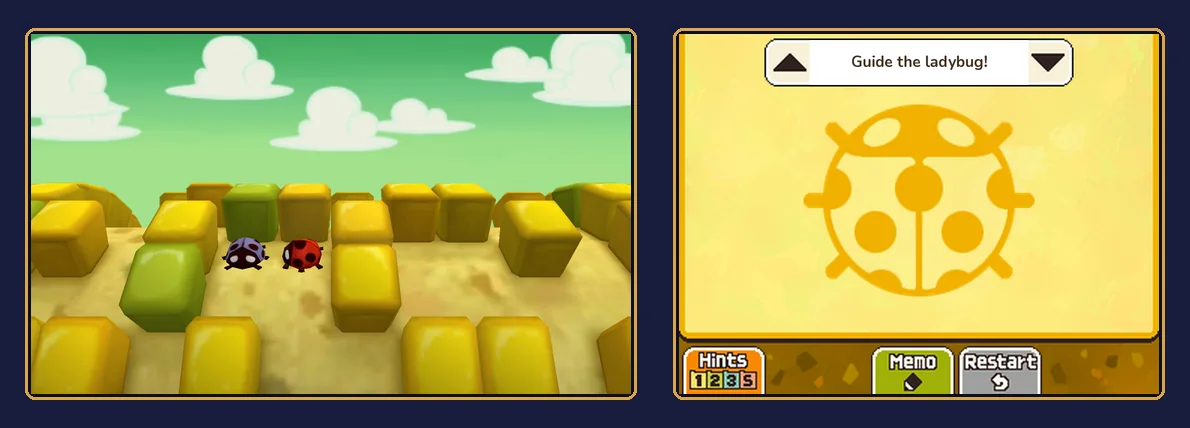
Puzzle 019 is Spinning Maize, a 25-picarat Maze puzzle on Pebble Lane in Chapter 2. It comes during the flashback to the Professor's teenage years, while young Hershel is out looking for his father. Esther, an old lady on Pebble Lane, has two ladybugs on her corncob, one red and one blue, and they've lost each other among the kernels. You walk the red ladybug through the rows of kernels until it meets its blue friend. The cob turns as you walk, so you only ever see part of the maze at once. The hints below open one at a time, and the answer stays hidden until you choose to show it.
This page covers story Puzzle 019 in Professor Layton and the Miracle Mask on Nintendo 3DS, using the North American text, with pictures rebuilt from the game's own art. The maze and the answer are the same in the US and UK English versions; only some wording differs. If you're after Spinning Maize 2 or 3, Daily Puzzle 019 or Puzzle 19 from another Layton game, see Wrong Puzzle 019? below.
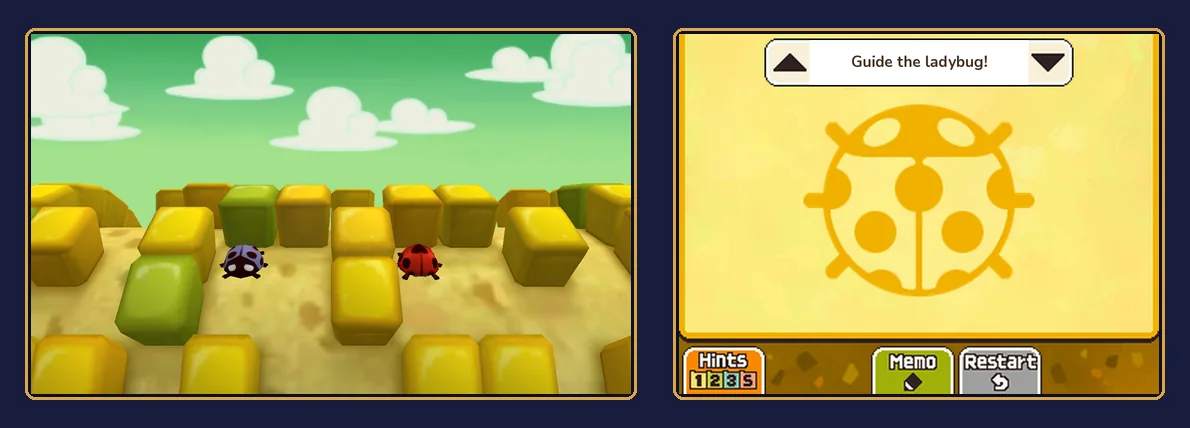
What Puzzle 019 is
| Name | Spinning Maize |
|---|---|
| Type | Maze |
| Picarats | 25 |
| Location | Pebble Lane, Stansbury |
| Chapter | Chapter 2 |
| Given by | Esther, an old lady on Pebble Lane |
| Solved by | Young Hershel |
| Goal | Guide the red ladybug round the corncob to the blue ladybug |
| Reward | Market Street opens, and the Shop minigame gets its Crockery aisle |
| Hints | Three hints and a Super Hint |
| Previous / next puzzle | 018 That's Juicy! (a hidden puzzle in the Living Room) / 020 Nine Red Bricks (Market Street) |
The puzzle text sets it up like this: "Two ladybug friends, one red and one blue, have lost each other on this corncob. Wherever they go, the corn kernels seem to get between them! Can you guide the red ladybug around the corncob to meet its blue friend?" The kernels are the walls of the maze, and the gaps between them are the paths. There's no answer to type in: the puzzle is solved the moment the red ladybug reaches the blue one.
Puzzle names
The North American version calls it Spinning Maize, and the UK English version uses the same name. The UK text says "ladybird" instead of "ladybug" and words a few lines differently, but the maze is the same. The Japanese title is ぐるぐるコーン (Guruguru Kōn), roughly "round-and-round corn".
| Version | Puzzle name |
|---|---|
| English (US and UK) | Spinning Maize |
| Japanese | ぐるぐるコーン (Guruguru Kōn) |
Wrong Puzzle 019?
- Spinning Maize 2 is Puzzle 055, back on Pebble Lane in Chapter 4, worth 40 picarats. It's another ladybug maze on a corncob, with its own layout, so the route on this page won't work there.
- Spinning Maize 3 is Puzzle 142, one of Layton's Challenges, worth 55 picarats. It's a different maze again.
- Daily Puzzle 019 in Miracle Mask is a separate puzzle: Mural 02, from the Vault of the Ancients set. It has nothing to do with the corncob.
- Puzzle 19 in another Layton game is a different puzzle. If yours has no ladybugs on a corncob, you're in the wrong game.
Where you get it
Puzzle 019 is on Pebble Lane in Stansbury, during Chapter 2, the flashback to Hershel's school days. It's there once Hershel has set out to look for his father, Roland. Talk to Esther on Pebble Lane. She hasn't seen Roland, but before Hershel moves on she asks for a favor: "Before you leave, can I trouble you to help out an old lady for a moment?" Then she shows him the ladybugs on her corncob.
If you back out, Esther says "Sorry to keep you from your errand.", and when you talk to her again she asks "Can you help me with this ladybug?" The puzzle stays with her until it's solved.
Pebble Lane has four hint coins: on a bucket, a barrel, a pump and a cloth hanging high up. Four coins aren't enough for all four hints, which cost five coins together.
How the maze works
The game's controls text says: "Tap the Touch Screen to make the ladybug change direction. Hold down the stylus to make the ladybug walk in that direction." The upper display shows the ladybugs on the cob, and the touch display shows a yellow pad with a ladybug icon, which is where you tap and hold.
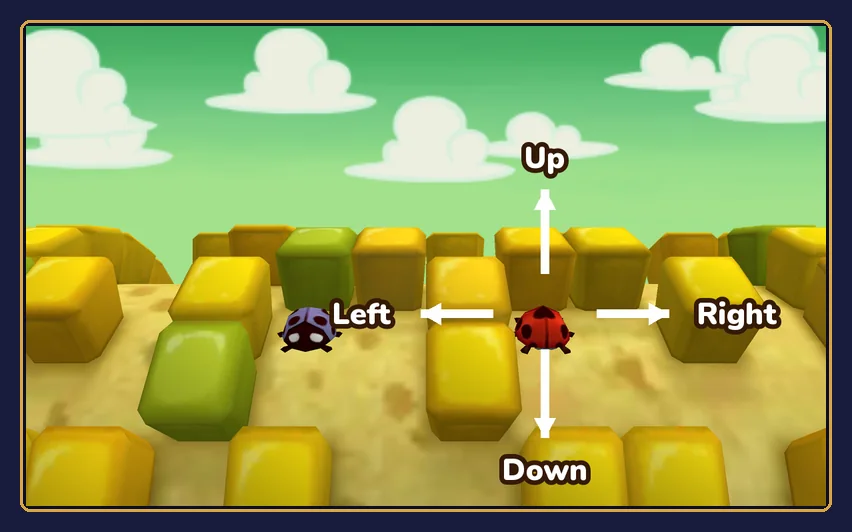
This page uses directions as they look on the upper display:
- Up means away from you, over the top of the cob toward the horizon. The cob turns as you go, so the ladybug stays near the middle of the view.
- Down means toward you, back the way the cob came round.
- Left and right go across the cob. The cob's ends are solid walls of kernels, so you can't walk off the sides.
- The cob is round. The rows carry on round the back of the cob, out of sight, so the maze has no top or bottom edge.
Most kernels are yellow, but a few are green or brown. They're walls like the others; they just make good landmarks, and the game's hints use a green one to point the way.
Hints, one at a time
These follow the game's own hints, in the same order, with a little more explanation. Open only the next one you need. In the game, Hints 1 to 3 cost one hint coin each and the Super Hint costs two.
Hint 1: where to start
Overall, you're heading up, over the top of the cob. Don't worry that the blue ladybug looks close: the way to it isn't the obvious one.
There's a wall right in front of the red ladybug, so you'll need a short step around it before you can start climbing. If you get completely lost, touch Restart and start again from the beginning.
Hint 2: the fork
Go back to the start and work your way up the right-hand side. You'll soon reach a fork with three possible paths.
Take the middle one, carrying straight on the way you were walking, and head for the green kernel you can see near the horizon.
Hint 3: the green kernel
When you reach that green kernel, take the path just to the right of it and keep going up.
You're well on your way. From here the path carries on over the top of the cob, round the side you can't see at the start.
Super Hint: the rest of the way
Once you're on the path to the right of the green kernel, stick to the left wall. As the game puts it: just keep left, and head upwards until you reach the blue ladybug.
Hugging the wall all the way works, but it's not the shortest way: it pokes into three one-square dead ends that you have to back out of. The 43-move route in the answer below skips them.
Answer and full solution
The answer below gives the whole route move by move, with a flat map of the whole cob, pictures of the landmarks and the solved puzzle. Open it when you're ready.
Show the answer
The answer: the red ladybug has to go all the way round the cob. The blue ladybug starts only three squares to the left, but the wall between them never opens. The shortest route is 43 moves: start down and to the right, climb the right-hand side, cut left through the fork, pass the green kernel, go over the far side of the cob and come back round to the blue ladybug from below.
The whole route: down 1, right 3, up 3, left 3, up 3, left 1, up 1, left 2, up 2, right 1, up 3, left 2, up 1, left 1, up 3, left 1, up 2, right 2, down 1, right 2, up 4, left 1.
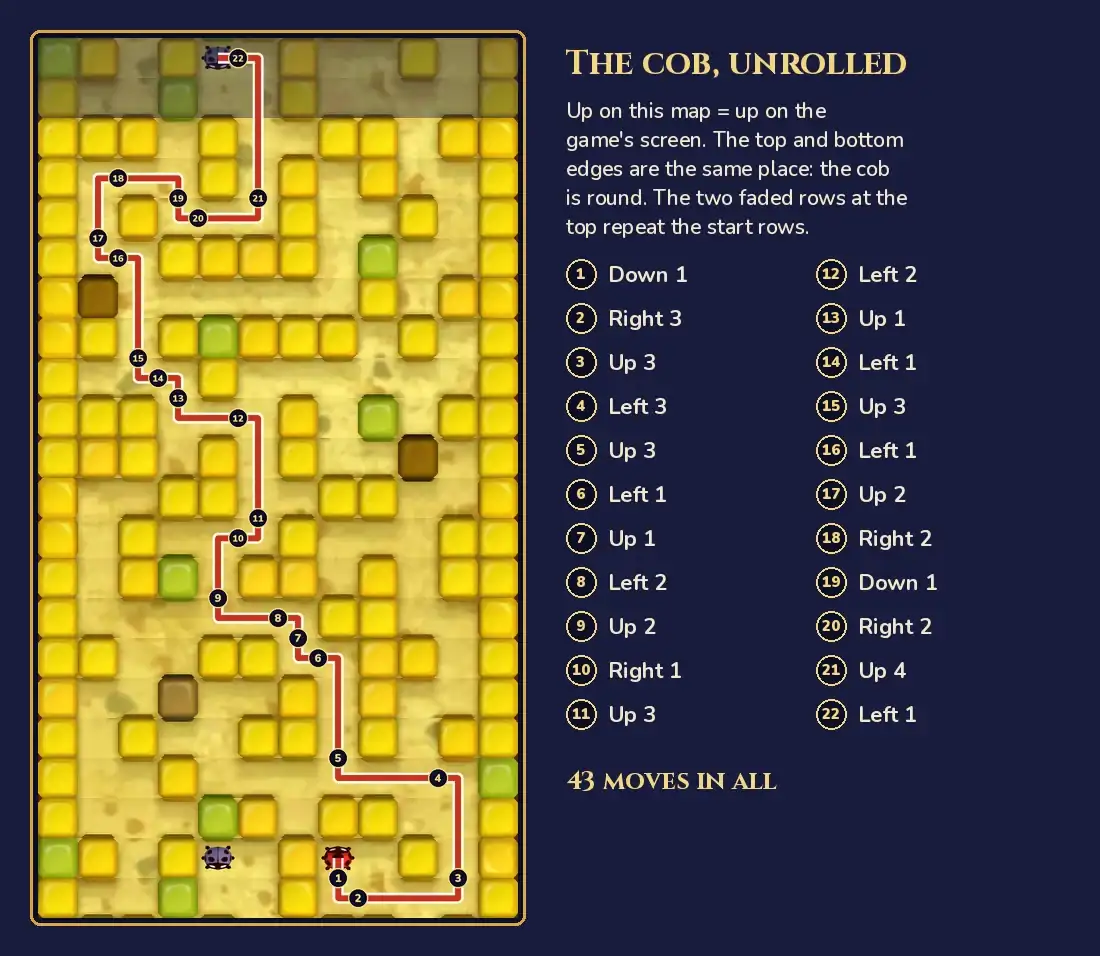
| Leg | Direction | Squares | Where you are |
|---|---|---|---|
| 1 | Down | 1 | Up is blocked, so step down first |
| 2 | Right | 3 | Along the row below the start, to the right-hand wall |
| 3 | Up | 3 | Up the right-hand side to the fork |
| 4 | Left | 3 | The middle path at the fork: straight on, past the side path going up |
| 5 | Up | 3 | Toward the green kernel on the horizon |
| 6 | Left | 1 | |
| 7 | Up | 1 | |
| 8 | Left | 2 | You're now just right of the green kernel's column |
| 9 | Up | 2 | The path right of the green kernel, over the top of the cob |
| 10 | Right | 1 | On the far side of the cob; this is where the Super Hint's "keep left" stretch starts |
| 11 | Up | 3 | |
| 12 | Left | 2 | |
| 13 | Up | 1 | |
| 14 | Left | 1 | |
| 15 | Up | 3 | |
| 16 | Left | 1 | Close to the left-hand wall |
| 17 | Up | 2 | |
| 18 | Right | 2 | The start of a short detour |
| 19 | Down | 1 | The only other step down on the route |
| 20 | Right | 2 | End of the detour |
| 21 | Up | 4 | Back round to the start rows, from below the blue ladybug |
| 22 | Left | 1 | Onto the blue ladybug: solved |
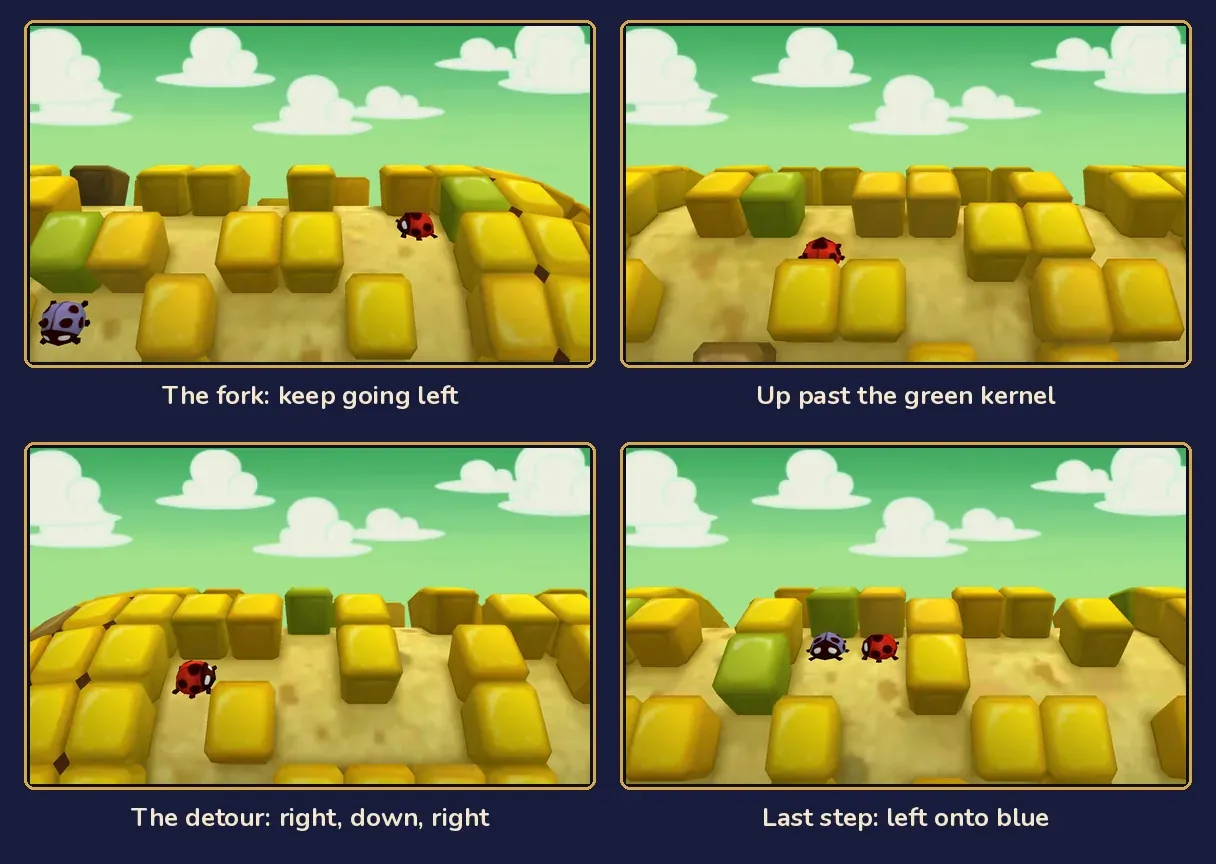
Step by step:
- Get to the right-hand side. Go down 1 and right 3, then up 3. You're now at the fork from Hint 2.
- Take the middle path. Go left 3, straight past the side path that goes up. Then up 3, left 1, up 1 and left 2.
- Pass the green kernel. Go up 2. The green kernel is right beside you on the left: this is the path to the right of it, from Hint 3. You're now going over the top of the cob.
- Keep left. Right 1, up 3, left 2, up 1, left 1, up 3, left 1 and up 2. This covers the stretch of the Super Hint, but it doesn't follow the wall into every corner: it skips the three one-square dead ends that strict wall-hugging would enter.
- Take the detour. Right 2, down 1, right 2.
- Finish. Go up 4. You've come all the way round the cob, and the blue ladybug is just to your left. Go left 1 to meet it.
This isn't the only route of that length. At the start, right 1, down 1, right 2 works just as well as down 1, right 3. Near the fork, up 2, left 1, up 1, left 2 works as well as up 3, left 3. And at the very end, up 3, left 1, up 1 works as well as up 4, left 1. None of these change the rest of the route. There doesn't appear to be a move limit either, so any route that reaches the blue ladybug should count.
When the ladybugs meet, they fly off together, and the game says: "Well done! From the point of view of a ladybug, a corn-cob must seem like an impenetrable maze."
If you keep getting lost:
- You tried to go straight across to the blue ladybug. There's no way through on that side. The route really does go all the way round the cob.
- You went up at the fork. The path going up from the fork leads into dead ends. Take the middle path, straight on to the left.
- You lost track after the green kernel. Keep left, as the Super Hint says; if you hit a one-square dead end, just back out. If you're not sure where you are, touch Restart and follow the moves from the start.
- You're counting squares on the screen. The cob turns as you walk, so it's easy to lose count. Count each step of the ladybug instead, or follow the map above.
Picarats, hints and hint coins
Spinning Maize is worth 25 picarats, and it may stay at 25 even if you go wrong.
Hints cost hint coins, not picarats: each of the first three hints costs one coin and the Super Hint costs two, so opening all four costs five coins. Pebble Lane has four hint coins, which is enough for the first three hints but not for all four. If you're out of coins, the hints on this page are free.
What you get: Market Street and the Crockery aisle
Solving Spinning Maize opens Market Street in Stansbury, where Puzzle 020, Nine Red Bricks, is waiting.
Solving it also appears to add the second aisle to the Shop minigame in the Professor's trunk: Crockery. In the game's words: "Our delightful porcelain tea sets are arranged here for your pleasure, including teapots, cups, and saucers." The Shop itself, and its first aisle, Fresh Fruits, come from Puzzle 010, The Place to Be!
Versions and systems
- Nintendo 3DS, 3DS XL, 2DS and New 3DS: the puzzle's solution is the same on every 3DS model. You steer the ladybug on the touch screen, with no motion controls.
- US and UK English versions: the same maze and the same answer. The UK English text says "ladybird" and words the question and hints slightly differently, and the giver's name may differ: the UK version may call her Gloria.
Esther's corncob (story spoiler)
Spoiler warning: this section covers the scene around the puzzle. In the flashback, young Hershel is searching Stansbury for his father. On Pebble Lane he meets Esther, who greets him with "Oh, Hershel, my boy. Where are you going?" She hasn't seen Roland, guesses that Lucille must be worried, and tells Hershel he's a good son. Then she asks him to help with the ladybugs on her corncob.
Once they're reunited, Esther is delighted: "Now I can eat the rest of my corn in peace! And that's really all an old lady wants." She promises to tell Roland that Hershel is looking for him, and sends him off with "You be sure not to go running around with any scissors, Hershel!" Hershel mutters, "That woman will always see me as a child...", and carries on with his search. If you talk to her later, she still hasn't seen Roland.
FAQ
Where is the answer to Puzzle 019?
It's in the Answer and full solution section above, hidden until you open it. If you only want a push, open the hints one at a time first.
What is Puzzle 019 called?
Spinning Maize, in both the North American and UK English versions. In Japanese it's ぐるぐるコーン.
How do you move the ladybug?
Tap the touch screen to change the ladybug's direction, then hold the stylus down to make it walk that way. See How the maze works for what up, down, left and right mean on the cob.
Who gives you Spinning Maize?
Esther, in the North American version: an old lady on Pebble Lane who knows Hershel's family. The UK version may call her Gloria.
I'm completely lost on the cob. What now?
Touch Restart to put the ladybugs back where they started, then follow the hints from the beginning. The game's first hint says the same: if you get completely lost, you can always start again.
How many picarats is Puzzle 019 worth?
25 picarats, and it may stay at 25 even if you go wrong.
What does Puzzle 019 unlock?
Market Street, where Puzzle 020 is, and the Crockery aisle of the Shop minigame.
Can you skip Puzzle 019?
It doesn't look like it. Solving it is what opens Market Street, where the story carries on, so it seems you have to solve it to move on.
Is Spinning Maize the same as Spinning Maize 2 and 3?
No. Spinning Maize 2 is Puzzle 055, back on Pebble Lane in Chapter 4, and Spinning Maize 3 is Puzzle 142, one of Layton's Challenges. Each has its own maze and its own route.
Is Daily Puzzle 019 the same as Puzzle 019?
No. Daily Puzzle 019 is Mural 02, from the Vault of the Ancients set. Story Puzzle 019 is the ladybug maze on Esther's corncob.
More Miracle Mask puzzles
- Puzzle 001: Stumble's Balloons
- Puzzle 002: Where's Mother?
- Puzzle 003: Stumble's Banners
- Puzzle 004: Bumper Perspective
- Puzzle 005: Robot Factory
- Puzzle 006: Bunny-Hop Swap
- Puzzle 007: A Toasty Toast
- Puzzle 008: Carnival Colors
- Puzzle 009: Stamp Stumper
- Puzzle 010: The Place to Be!
- Puzzle 011: Backstage Blunder
- Puzzle 012: Sharing the Burden
- Puzzle 013: Ancient Arti-facts
- Puzzle 014: Bite of Bygone Days
- Puzzle 015: Fix the Fossil
- Puzzle 016: Wandering Watches
- Puzzle 017: Busted Umbrella
- Puzzle 018: That's Juicy!
- Puzzle 020: Nine Red Bricks
- Puzzle 021: A Lick of Paint
- Puzzle 022: Poke 'Em Totems
- Puzzle 023: Fairway Fibber
- Puzzle 024: Patterned Apron
- Puzzle 025: Brave the Caves
- Puzzle 60: Dangerous Holes
- Puzzle 100: Gate to the Ruins!
- Puzzle 113: Chip Champions
- Puzzle 118: Evenly Matched 3
- Puzzle 122: Kitty Solitaire 3
For the rest of the game's puzzles, see the Miracle Mask puzzle index.