
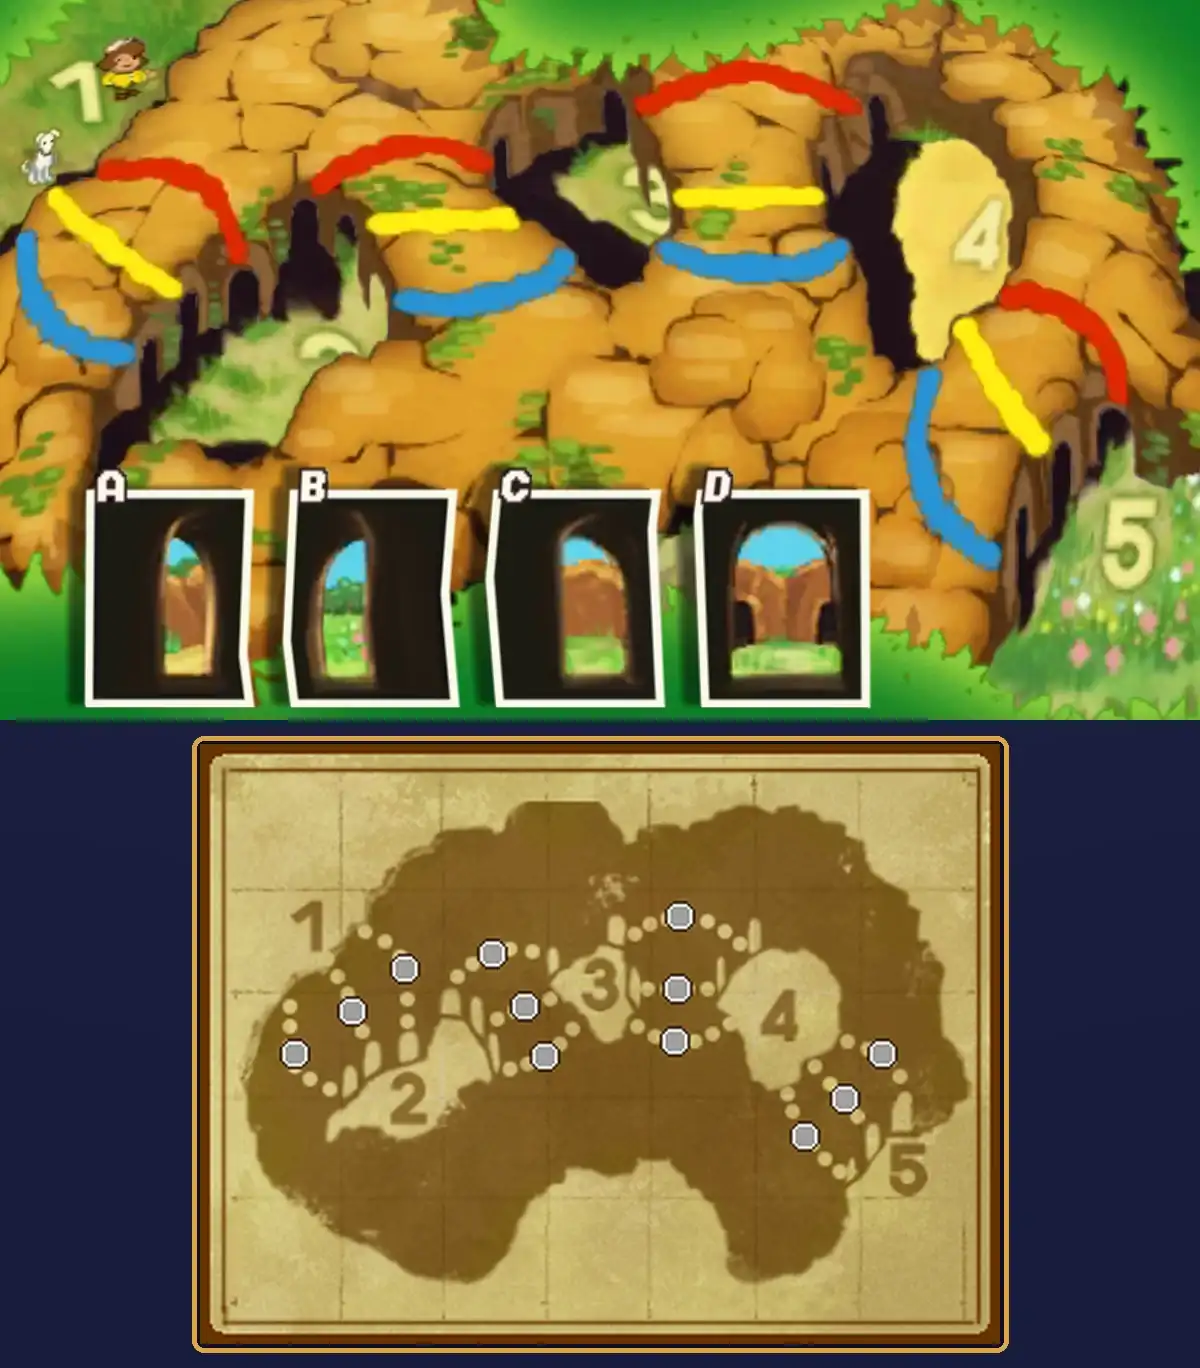
Puzzle 025 is Brave the Caves, a 40-picarat Select puzzle at the Academy Gate, during the Chapter 2 flashback to Hershel Layton's school days. Mr. Collins sets it when he catches Hershel outside the school at night. A young explorer has to get from area 1 to area 5 through a cave complex, and between each pair of areas there are three caves, marked by red, yellow and blue lines. Only one cave in each stretch is safe. You have four photos, A to D, taken inside the right caves, but you don't know which photo goes with which stretch. Work out the safe route and mark it on the touch-screen map. It doesn't look like a puzzle the story needs, since it doesn't appear to give a reward.
This page covers story Puzzle 025 in Professor Layton and the Miracle Mask on Nintendo 3DS (US and UK English), using the North American text, with pictures rebuilt from the game's own art. If you're after Daily Puzzle 025 or Puzzle 25 from another Layton game, see Wrong Puzzle 025? below.
What Puzzle 025 is
| Name | Brave the Caves (the same in the US and UK English versions) |
|---|---|
| Type | Select (touch dots on the map) |
| Picarats | 40 |
| Location | Academy Gate, Kingsbrook Academy, Stansbury |
| Chapter | Chapter 2 |
| Story scene | Hershel's school days |
| Given by | Mr. Collins |
| Solved by | Hershel |
| When it's there | At night, probably around the time your objective is "Go to Randall's House!" |
| Previous puzzle number | Puzzle 024, Patterned Apron (Living Room) |
| Next puzzle number | Puzzle 026, Mangled Math (Pebble Lane) |
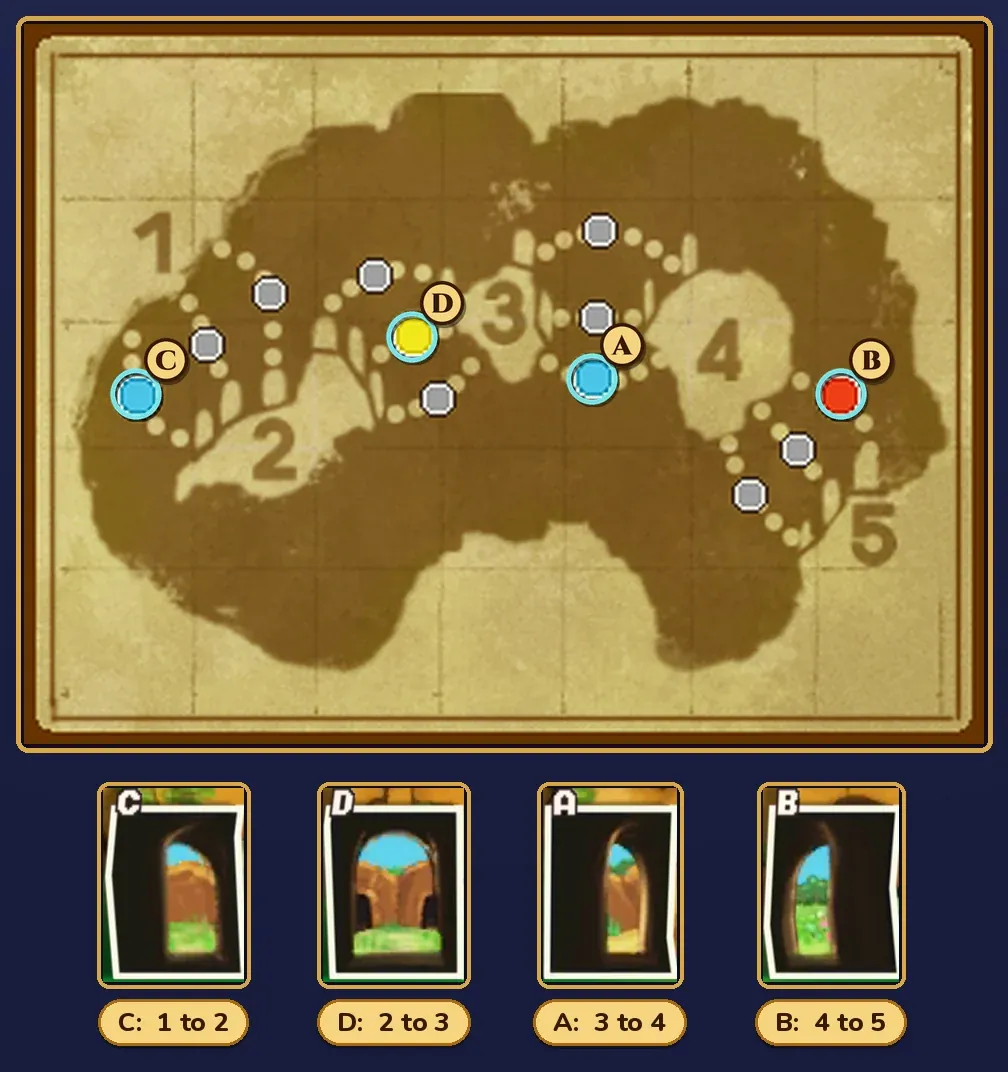
The question reads: "This young explorer wants to go from point 1 to point 5. To do so, he must pass through the correct four caves in the cave complex shown. The wrong caves are filled with horrible traps. He has with him four photos, A to D, taken by an explorer who made it through successfully. Work out the correct route using the photographs. However, keep in mind that you don't know where the photos were taken." The objective bar on the touch screen sums it up as "Which way to go?"
How the map works
The touch screen shows a parchment copy of the cave map with twelve grey dots, three on each of the four stretches: 1 to 2, 2 to 3, 3 to 4 and 4 to 5. The three dots on a stretch stand for its three caves, in the same order as the red, yellow and blue lines on the top screen. Touch a dot and it lights up in its cave's color. Touch it again and it goes back to grey.
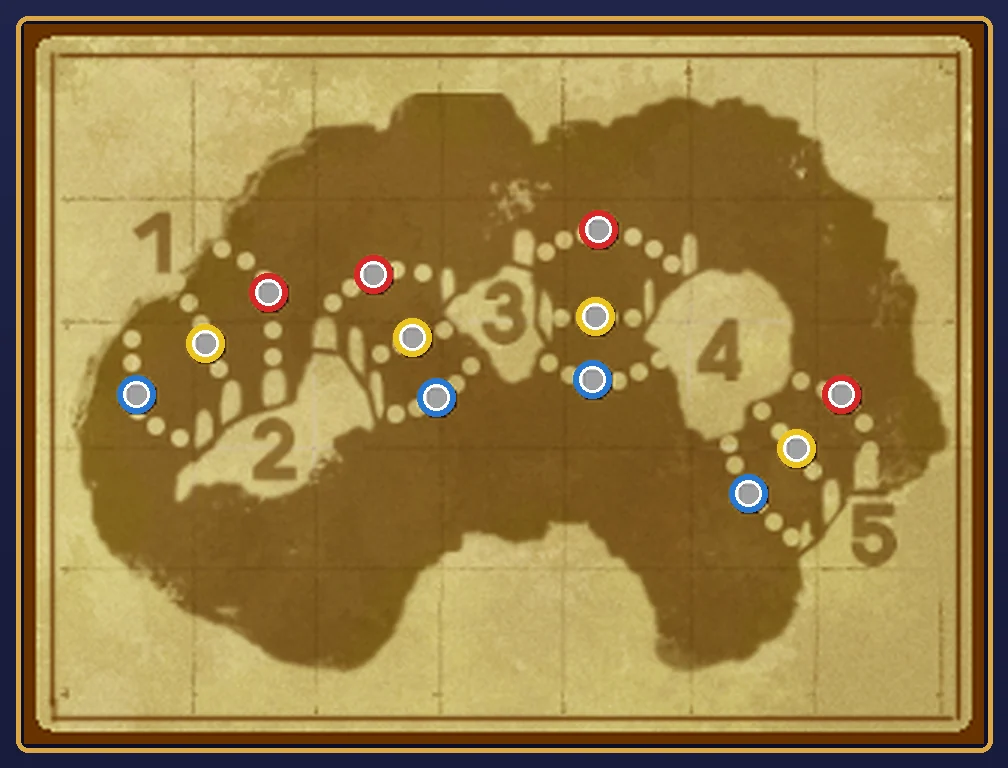
Each dot switches on and off by itself, so you can light more than one on a stretch, but that won't be accepted. The puzzle appears to want exactly one dot lit on each stretch, the right one, with the other eight dots left grey. When your route is set, touch Submit.
The four photos
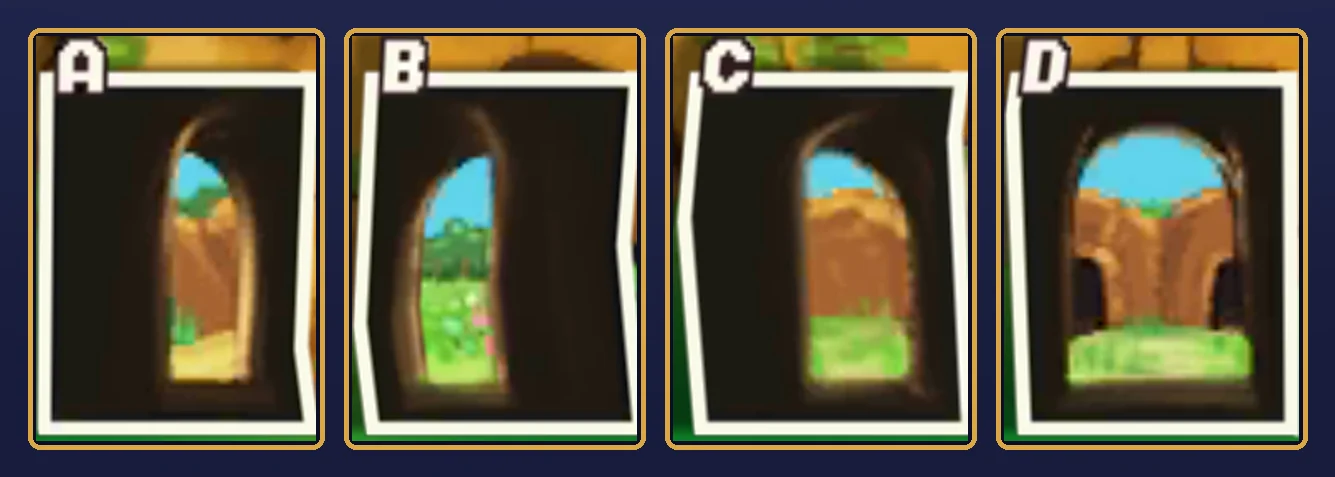
Each photo looks out of a dark cave toward its exit. On the top screen they're small, so here they are enlarged.
Puzzle names
| Version | Puzzle name |
|---|---|
| North America | Brave the Caves |
| UK | Brave the Caves |
| Japanese | 洞窟の写真 ("photos of the caves") |
The Japanese title is 洞窟の写真. The North American version carries a different Japanese label for it, ぬいぐるみの展示.
The UK English text keeps the title, the photos and the hints but words the question a little differently. It begins "A young explorer wants to go from point 1 to point 5" and ends "keep in mind that you don't know which photo was taken where." The caves and the answer are the same in the US and UK English versions.
Wrong Puzzle 025?
- Daily Puzzle 025 in Miracle Mask is a different puzzle: Kingdom 04, from the Kingdoms set. It has nothing to do with caves.
- Puzzle 024, Patterned Apron, is Lucille's apron puzzle in the Living Room at home. If your puzzle is about folding an apron, you've got the one before this.
- Puzzle 25 in another Layton game is a different puzzle. If yours doesn't show a cave map, four photos and a boy with a dog, you're in the wrong game.
Where you get it
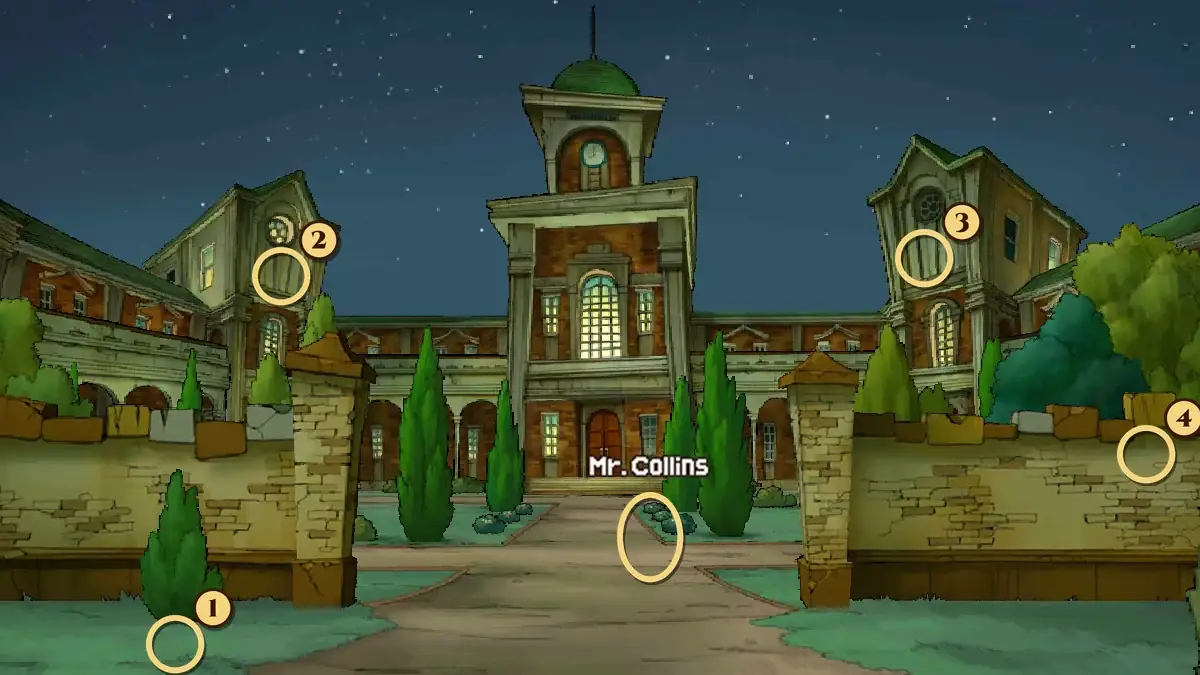
Puzzle 025 comes in Chapter 2, the flashback to Hershel's time in Stansbury. After dinner, your objective becomes "Go to Randall's House!" On the way, go to the Academy Gate, in front of Kingsbrook Academy, and talk to Mr. Collins on the path in front of the gate. He says, "Out for a late-night constitutional, Layton?" and asks whether Hershel shouldn't be writing an essay. Hershel claims it's "almost done...mostly," and Mr. Collins answers, "Well then, you'll be fully prepared for this puzzle, I assume." Then the puzzle starts.
Mr. Collins is probably at the gate somewhere between the objectives "Go to Randall's House!" and "Find a Way into Randall's Room!", though exactly when he turns up and when he leaves isn't clear. He should be at the gate at night, after dinner, when you head toward the academy. His lines fit that: he's surprised to find Hershel near the school so late. Solving it doesn't appear to give a reward.
The Academy Gate has four hint coins. Going from left to right in the picture, they're at the foot of the small shrub in front of the left wall, on the left tower just below its round window, on the right tower just below its round window, and on the wall to the right of the gateway. The Academy Gate also has a zoomed-in view, but none of these coins appears to be limited to it, so you should be able to find all four from the normal view. In the Layton games a hint coin normally disappears once you pick it up.
Hints, one at a time
These follow the game's own hints, in the same order, with a little more explanation. Open only the next one you need. In the game, Hints 1 to 3 cost one hint coin each and the Super Hint costs two.
Hint 1: Look past the exits
Don't worry about the caves yet. First work out where each photo was taken by looking at what lies beyond its exit, then match that to the areas on the map. Photo B is the easy one: it shows flowers past the exit, and it's the only photo with no rocks in the background. Which area on the map has flowers?
Hint 2: Placing the other photos
Photo A shows sand past the exit, and only one area on the map is sandy, so A was taken in a cave that comes out there. Photos C and D look alike, but C shows nothing but a wall of rock, with no cave entrances. Look at what someone coming out of each stretch would see in front of them. That places C, and D takes the stretch that's left.
Hint 3: Which side is hidden
Now look at the shape of each exit. In a cave that bends to the right, the right-hand wall gets in the way, hiding the right side of the exit, so the light shows on the left. In a cave that bends to the left, it's the other way round. In a straight cave, you see the exit square on. Photo B's exit is hidden on the right, so B was taken in a cave that bends right: the one marked by the red line.
Super Hint: Matching photos to colors
From Hints 1 and 2, A was taken between areas 3 and 4, B between 4 and 5, C between 1 and 2, and D between 2 and 3. B is the red-line cave. D looks straight through to its exit, so it's the straight cave, marked by the yellow line. That leaves A and C. Which side of each exit is hidden?
Answer and full solution
The answer below covers every step, with a diagram that matches each photo to its cave and a picture of the solved puzzle. Open it when you're ready.
Show the answer
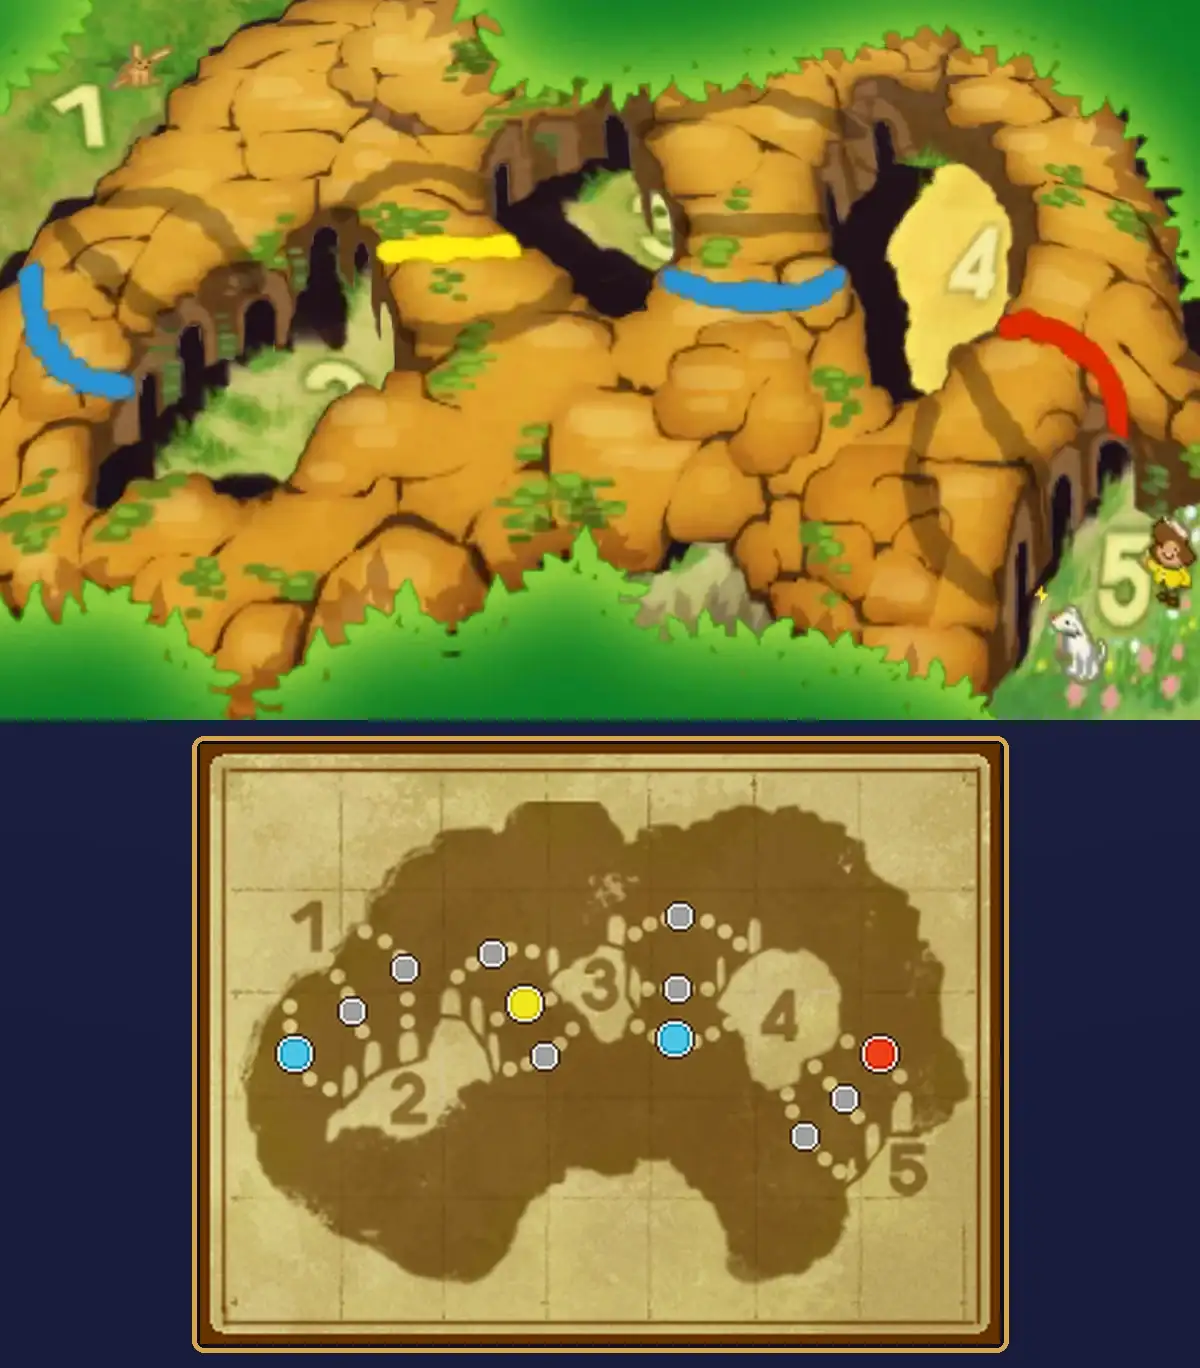
Answer: blue, yellow, blue, red. Going from area 1 to area 5, light the blue dot between 1 and 2, the yellow dot between 2 and 3, the blue dot between 3 and 4 and the red dot between 4 and 5. Leave the other eight dots grey and touch Submit.
| Stretch | Photo | What gives it away | Cave |
|---|---|---|---|
| 1 to 2 | C | Only a rock wall past the exit; the exit is hidden on the left | Blue |
| 2 to 3 | D | The exit is seen square on | Yellow |
| 3 to 4 | A | Sand past the exit; the exit is hidden on the left | Blue |
| 4 to 5 | B | Flowers past the exit; the exit is hidden on the right | Red |
- B is between 4 and 5. It's the only photo with flowers and no rocks past the exit, and area 5 is the flowery one.
- A is between 3 and 4. There's sand past its exit, and area 4 is the sandy one.
- C is between 1 and 2, and D between 2 and 3. C shows only a rock wall with no cave entrances, which is what you'd see coming out into area 2. D shows a rock face with cave mouths in it, which fits the last stretch left.
- B is red. Its exit is hidden on the right and the light is on the left, so the cave bends right.
- D is yellow. You see its exit square on, so it's the straight cave.
- A and C are blue. In both photos the left side of the exit is hidden and the light is on the right, so both caves bend left.
The game confirms it: "Correct! If you take a good look at the scenery in the distance of each photo, you can tell where they were taken. The light will be on the left-hand side of a cave that bends right, and vice versa. With this in mind, you can work out the correct route."
If your answer keeps failing:
- More than one dot is lit on a stretch. Touch the extra dots again to turn them grey. Only one dot per stretch should be lit.
- You lit red between 1 and 2. Photo C's exit is hidden on the left, not the right, so that cave bends left: blue.
- You lit yellow between 3 and 4. Photo A isn't a straight-on view. Its left side is hidden, so it's the cave that bends left: blue.
- You swapped photos A and C, or B and D. Check what's past each exit again: sand means area 4, flowers mean area 5.
Picarats, hints and hint coins
Brave the Caves shows 40 picarats when it starts. The puzzle can award 40, 35 or 30 picarats. Wrong answers may reduce the picarat value, so it pays to check your route before you touch Submit. A wrong answer gets "Too bad. Try again before he runs into one of those horrible traps!" If you back out of the puzzle, Mr. Collins says, "Disappointing, Layton. You know that sloppy research yields sloppy results." If you try again, he says, "You shouldn't have any trouble here if you did your due diligence on the essay."
Hints cost hint coins, not picarats. The costs are one coin each for the first three hints and two for the Super Hint, five in total. The Academy Gate has only four coins, so they can't pay for every hint on their own. Or use the free hints on this page and save your coins.
Versions
- Nintendo 3DS family: this page covers the 3DS game. You mark the route by touching dots on the touch-screen map.
- US and UK English versions: same name, same photos, same answer. The UK question is worded a little differently.
The scene around the puzzle
Mr. Collins finds Hershel outside the school late at night. "What are you doing lurking around the school at this hour? Don't you have an essay you could be writing?" he asks. Hershel insists the essay is "coming along quite well. Almost done...mostly. Sir." Mr. Collins decides to test that with a puzzle.
When it's solved, he says, "It seems you have done your work after all." Hershel thanks him, and Mr. Collins adds, "Don't stay out too late. A rested mind is a spongy mind. Meaning it soaks up facts and knowledge, not that it resembles cake." Talk to him again afterwards and he says, "Be on your way, Layton. I won't have students loitering around here at night."
FAQ
Where is the answer to Puzzle 025?
It's in the Answer and full solution section above, hidden until you open it. If you only want a push, open the hints one at a time first.
What is Puzzle 025 called?
Brave the Caves, in both the North American and UK English versions. In Japanese it's 洞窟の写真.
Where is Puzzle 025?
At the Academy Gate, in front of Kingsbrook Academy in Stansbury, during Chapter 2. Talk to Mr. Collins on the path in front of the gate at night, on your way to Randall's house.
Why can't I find Mr. Collins at the gate?
He's probably there at night, around the time your objective is "Go to Randall's House!", and probably not once you're trying to get into Randall's room. If it's still daytime in the story, carry on until dinner is over.
How do I mark the route?
Touch one grey dot on each stretch of the touch-screen map. It lights up in the color of the cave it stands for. Touch it again to turn it off. Then touch Submit.
How many picarats is Puzzle 025 worth?
It shows 40 picarats when it starts. The puzzle can award 40, 35 or 30 picarats, and wrong answers lower what you earn.
Is Daily Puzzle 025 the same as Puzzle 025?
No. Daily Puzzle 025 is Kingdom 04, from the Kingdoms set. Story Puzzle 025 is Mr. Collins's cave puzzle.
More Miracle Mask puzzles
- Puzzle 001: Stumble's Balloons
- Puzzle 002: Where's Mother?
- Puzzle 003: Stumble's Banners
- Puzzle 004: Bumper Perspective
- Puzzle 005: Robot Factory
- Puzzle 006: Bunny-Hop Swap
- Puzzle 007: A Toasty Toast
- Puzzle 008: Carnival Colors
- Puzzle 009: Stamp Stumper
- Puzzle 010: The Place to Be!
- Puzzle 011: Backstage Blunder
- Puzzle 012: Sharing the Burden
- Puzzle 013: Ancient Arti-facts
- Puzzle 014: Bite of Bygone Days
- Puzzle 015: Fix the Fossil
- Puzzle 016: Wandering Watches
- Puzzle 017: Busted Umbrella
- Puzzle 018: That's Juicy!
- Puzzle 019: Spinning Maize
- Puzzle 020: Nine Red Bricks
- Puzzle 021: A Lick of Paint
- Puzzle 022: Poke 'Em Totems
- Puzzle 023: Fairway Fibber
- Puzzle 024: Patterned Apron
- Puzzle 026: Mangled Math
- Puzzle 027: That Rings a Bell
- Puzzle 028: Bunny-Hop Swap 2
- Puzzle 60: Dangerous Holes
- Puzzle 100: Gate to the Ruins!
- Puzzle 113: Chip Champions
- Puzzle 118: Evenly Matched 3
- Puzzle 122: Kitty Solitaire 3
For the rest of the game's puzzles, see the Miracle Mask puzzle index.