
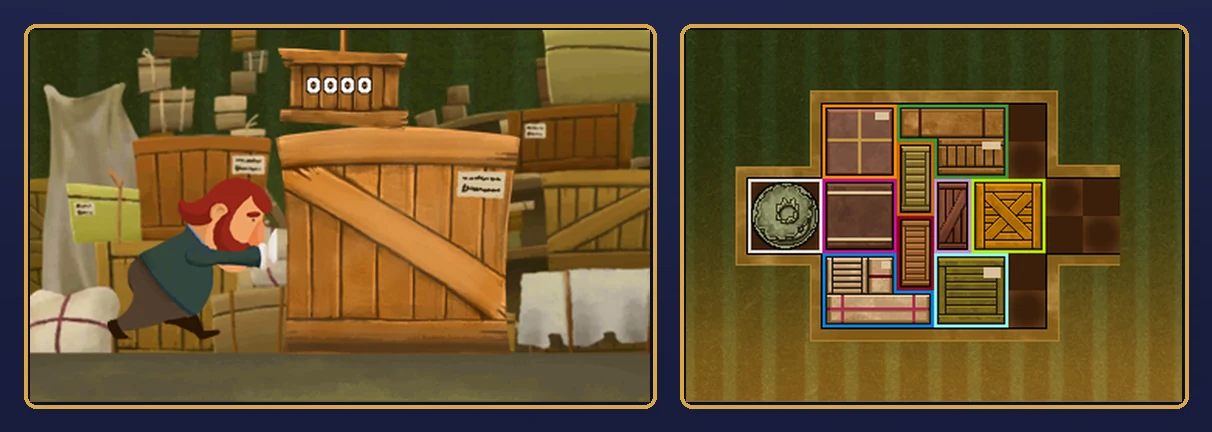
Puzzle 045 is From Left to Right, a 55-picarat Slide puzzle hidden in Montsarton Gallery in Monte d'Or, from Chapter 3. Nobody hands it to you: you start it by tapping a large painting after you zoom in on the left archway of the gallery. The museum's prize statue sits at the far left of a crowded warehouse, and you have to slide the crates around until the statue can reach the exit on the right. The story doesn't check it.
This page covers story Puzzle 045 in Professor Layton and the Miracle Mask on Nintendo 3DS. The play and the answer are the same in the US and UK English versions; quotes use the North American text, and the UK question and hints differ in spelling and wording. If you're after Daily Puzzle 045, Puzzle 149 or Puzzle 45 from another Layton game, see Wrong Puzzle 045? below.
What Puzzle 045 is
| Name | From Left to Right (US and UK) |
|---|---|
| Type | Slide (move crates to free a path) |
| Picarats | 55 |
| Location | Montsarton Gallery, Monte d'Or |
| Chapter | Chapter 3 |
| When | Your first visit to the gallery |
| How you start it | Hidden puzzle: tap the large painting in the zoomed-in view of the gallery |
| Fewest moves | 26, according to the game's own message |
| Previous puzzle number | Puzzle 044, Suit Crates (Dromedary Plaza) |
| Next puzzle number | Puzzle 046, Toppings Up! (Montsarton Gallery) |
The question reads: "The museum has received a letter from a mysterious art thief. It reads: "Your precious queen is all mine." The curator, awash with panic, has rushed off to see whether his prize statue really has been stolen. Since he keeps it well hidden right at the back of the warehouse, however, it is rather difficult to check. Move the crates around to open up a path, and get the statue from the far left to the exit on the right." The objective bar sums it up as "Get the statue out!"
How the warehouse works
The touch screen shows the warehouse floor from above. In the middle is a block six spaces wide and six spaces tall, packed with crates. On the left, level with the middle two rows, is a small alcove where the statue starts; on the right, at the same height, is the exit, which is empty. At the start, the only other free spaces are two at the top and two at the bottom of the right-hand column of the middle block.
- Drag a crate with the stylus to move it. It can travel through any free spaces, even around a corner, as long as nothing is in the way. Crates never turn or rotate.
- Every drag is one move. The sign hanging on the top screen counts them, and a drag that goes round a corner still counts as one. That's how the game's minimum of 26 works out.
- The statue is a crate like the others for moving purposes. It takes up two by two spaces, and the puzzle ends as soon as it reaches the exit.
- The curator keeps pushing. On the top screen, he appears to shove his big crate a little further along with each move you make. It's just for show.
There are ten pieces. This page names them by the colour of their outline in the game, which stays the same wherever they go:
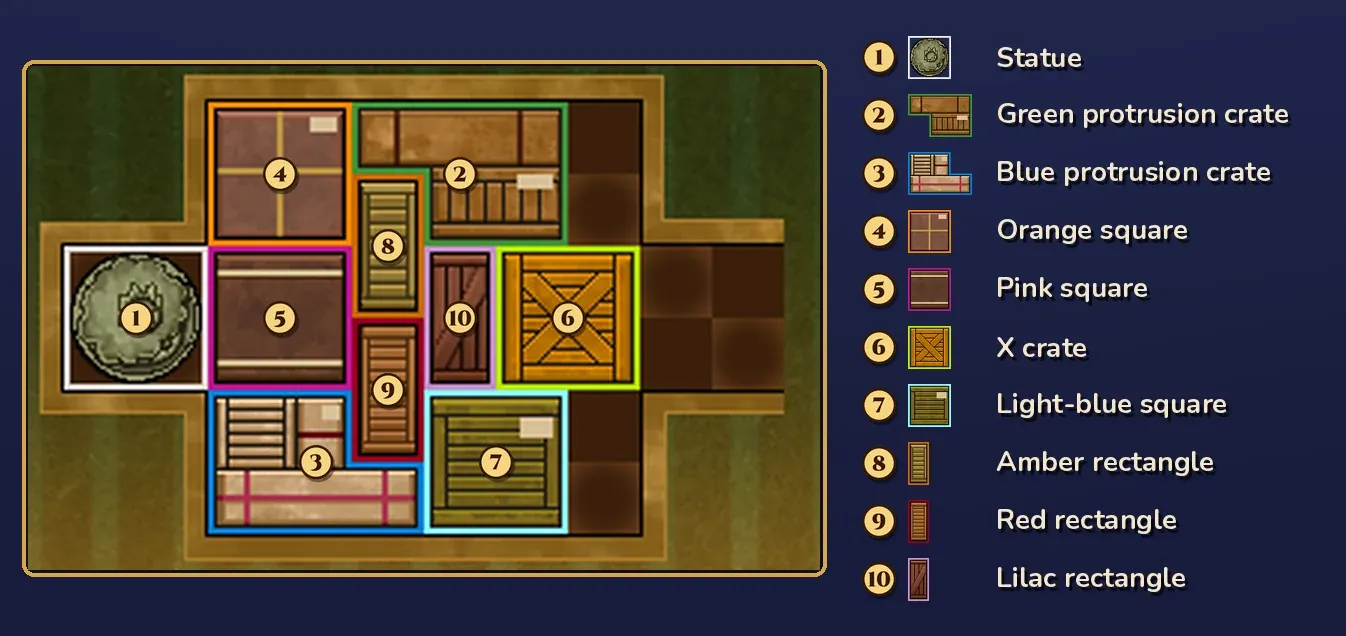
- The statue (white outline): two by two, in the alcove on the far left.
- Two crates with protrusions, the odd shapes the game's hints talk about. The green protrusion crate starts at the top: three spaces wide on its top row, with two more spaces under its right-hand end. The blue protrusion crate starts at the bottom left: two spaces wide on its top row and three wide on its bottom row.
- Four square crates, each two by two: the orange square (top left), the pink square (beside the statue), the X crate with a yellow-green outline (on the right, next to the exit) and the light-blue square (bottom right).
- Three small rectangular crates, each one space wide and two tall, all standing upright: the amber rectangle and the red rectangle one above the other in the middle, and the lilac rectangle to their right.
Puzzle names
| Version | Puzzle name |
|---|---|
| North America | From Left to Right |
| UK | From Left to Right |
| Japanese | 左から右へ (Hidari kara Migi e, "from left to right") |
The UK question and hints probably differ only in small details: the UK question spells the word "theif" in "a mysterious art theif" and says "Move the crates around so as to open up a path and get the statue...", and the UK Super Hint says "move the bottom-left crate with a protrusion up". The crates and the answer are the same in the US and UK English versions.
Wrong Puzzle 045?
- Daily Puzzle 045 in Miracle Mask is a different puzzle: Blocks 06, from the Big Block Box set.
- Puzzle 149, From Right to Left, is the reverse puzzle in Layton's Challenges, worth 90 picarats. The thief has brought the statue back, and you have to slide it back into the alcove on the far left of a different warehouse layout. Its first hint says it takes no fewer than 101 moves.
- Puzzle 046, Toppings Up!, is the pizza puzzle that Artie, the gallery's director, gives you in the same building. If you talked to Artie, that's the one you got, not this one.
- Puzzle 044, Suit Crates, is the crane-and-crates puzzle in Dromedary Plaza.
- Puzzle 45 in another Layton game is a different puzzle. If yours doesn't show a statue in a warehouse full of crates, you're in the wrong game.
Where you find it
In Chapter 3, after the task force's briefing at City Hall, your objective becomes "Go to Montsarton Gallery!" Go into the gallery, zoom in on the archway on the left, and tap the largest painting there, at the back in the middle. It's a hidden puzzle, so nobody asks you to solve it. Layton just says, "A hidden puzzle, if I'm not mistaken." Then the puzzle starts.
You don't appear to need to talk to Artie or anyone else first. The painting seems to work from your first visit, and it appears to stay there until you solve it, so you can probably come back for it later.
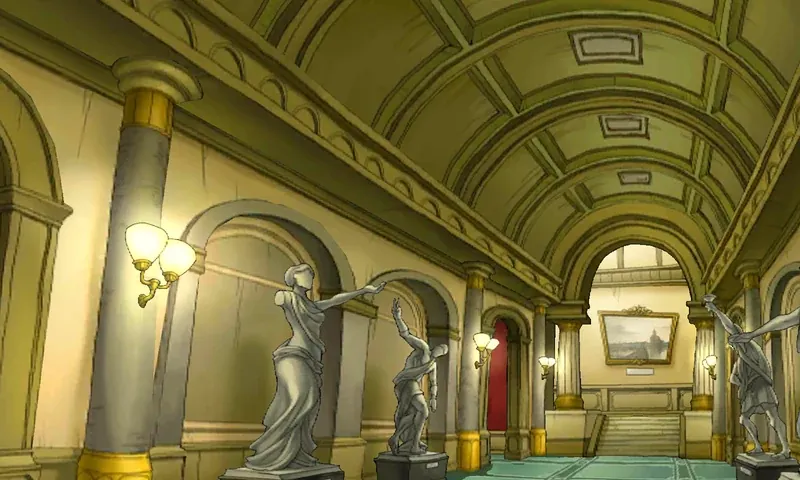
Montsarton Gallery has six hint coins. Three are in the normal view of the hall. They appear to be at the hand of the statue on the left, on the stairs and at the light on the right. The other three are in the zoomed-in view of the left archway and appear to be at the top of the left pillar and at two spots in the small-painting area. Each coin can be collected only once, and the coins belong to the room, so they're the same ones you'd find when you come here for Puzzle 046.
It isn't clear whether this puzzle goes to Nanna Grams (known as Elizabeth in the UK version) if you miss it. The painting appears to stay there until you solve it, so the simplest thing is to solve it while you're in the gallery, or come back to the painting later.
When you're stuck
- The statue has nowhere to go. It can't move until a whole two-space-tall corridor is open from the alcove to the exit. Everything else has to be packed into the top two rows and the bottom two rows first.
- The two odd-shaped crates keep getting in the way. The game's first hint says the key is getting both crates with protrusions into the top area. Their shapes only fit together once the space under them has been cleared.
- A crate won't go where you drag it. There has to be a free path for its whole shape, all the way along the route. If another crate is in the way at any point, it won't get through.
- You used more than 26 moves. That still counts. You probably can't fail this puzzle; the game only tells you afterwards that 26 is the minimum.
- You've lost track. Reset the puzzle to put every crate back where it started.
- You can't find the puzzle. Zoom in on the left archway in Montsarton Gallery and tap the large painting at the back.
Hints, one at a time
These are the game's own hints, word for word from the North American version and in the same order. Open only the next one you need. In the game, Hints 1 to 3 cost one hint coin each and the Super Hint costs two.
Hint 1: the first two moves
The key to this puzzle is working out how to get the two crates with protruding parts into the top area. Start off by sliding the far-right crate into the exit, then move the small rectangular crate next to it into the gap in the top-right corner. What now?
Hint 2: the small rectangles
Continuing from Hint 1, you should now aim to get the other two small, rectangular crates lined up beneath the first one. Shove the bottom-right crate out of the way, and try to get all three rectangular crates in a vertical line.
Hint 3: the squares
The next step is to move the crate beside the statue to the right, then move the top-left square crate down. This lets you move the top crate with a protrusion to the left. You can use the newly-created open space to line up the three square crates vertically.
Super Hint: the crates with protrusions
Once the three square crates are lined up vertically on the right, move up the bottom-left crate with a protrusion. The open space below can be filled with the square crates, which makes space at the top. You'll find that the two crates with protrusions fit together nicely. Now it's simply a case of shuffling the other crates around until you get the statue out!
Answer and full solution
The answer below covers all 26 moves, in five stages that follow the game's hints, with a picture of every move and of the finished puzzle. Open it when you're ready.
Show the answer
Answer: 26 moves, the minimum the game mentions. Clear the right-hand column and stand the three rectangles in it, stand three squares in a column next to them, lock the two protrusion crates together along the top, fill the bottom row with the rest, then slide the statue across. Move the X crate back out of the exit just before the statue leaves.
| Stage | Moves | What you do |
|---|---|---|
| 1. Hint 1 | 1 to 2 | X crate into the exit, lilac rectangle into the top-right corner |
| 2. Rectangles | 3 to 6 | Light-blue square out of the way and back, red and amber rectangles under the lilac one |
| 3. Squares | 7 to 11 | Pink square right, orange square down, green protrusion crate left, then pink, orange and light-blue squares in one column |
| 4. Protrusions | 12 to 18 | Blue protrusion crate up, the light-blue and orange squares and the amber rectangle into the bottom rows, the pink square to the right, then the two protrusion crates locked together at the top |
| 5. Statue out | 19 to 26 | Statue to the middle, the rest packed in behind it, X crate out of the exit, statue out |
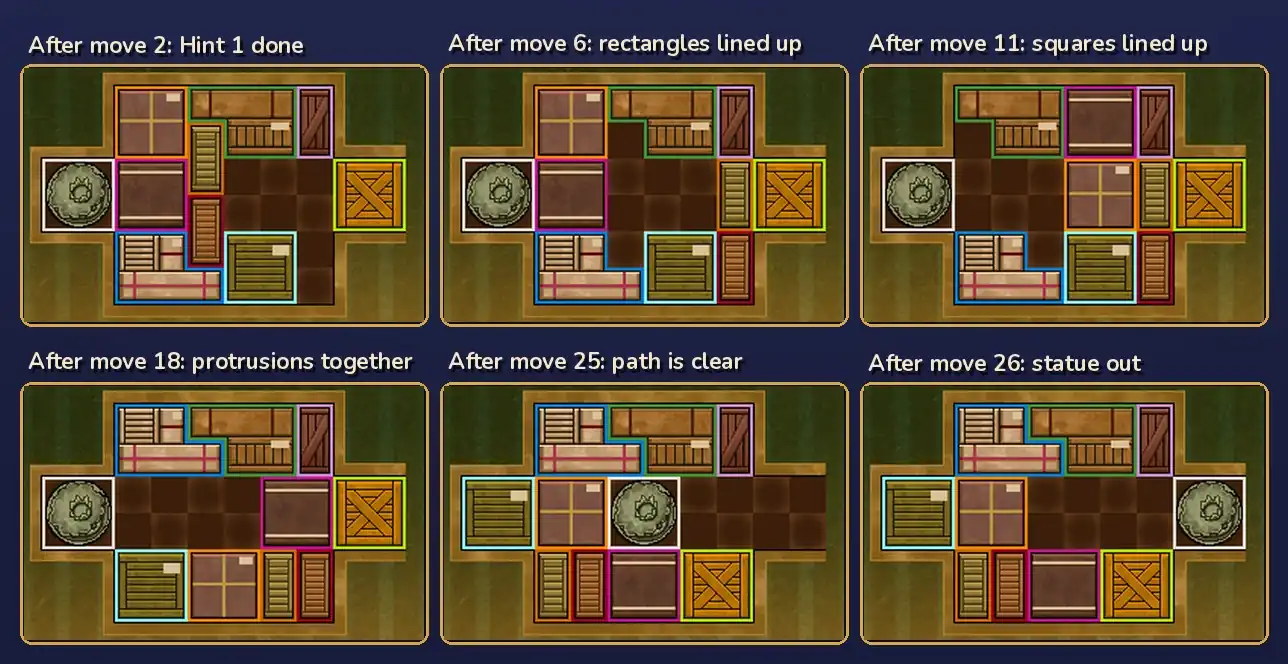
Step by step. Each step is one drag. The directions describe the route the crate takes, counted in spaces, and you can do each step as one drag even when it turns a corner.
- X crate: right 2, into the exit.
- Lilac rectangle: right 2, then up 2, into the gap in the top-right corner.
- Light-blue square: right 1, then up 2, into the space the X crate left.
- Red rectangle: right 1, down 1, then right 2, into the bottom-right corner.
- Light-blue square: left 1, then down 2, back where it started.
- Amber rectangle: down 1, then right 3. All three rectangles now stand in the right-hand column.
- Pink square: right 3.
- Orange square: down 2, into the space beside the statue.
- Green protrusion crate: left 2, into the top-left corner.
- Pink square: up 2.
- Orange square: right 3. The pink, orange and light-blue squares now stand in a column next to the rectangles.
- Blue protrusion crate: up 2.
- Light-blue square: left 3, into the bottom-left corner.
- Orange square: down 2, then left 1.
- Amber rectangle: left 1, then down 2.
- Pink square: down 2, then right 1.
- Green protrusion crate: right 2.
- Blue protrusion crate: up 2. It now fits against the green one, and the two fill the top two rows together with the lilac rectangle.
- Statue: right 4, into the middle.
- Light-blue square: up 2, then left 2, into the alcove where the statue started.
- Orange square: left 2, then up 2.
- Amber rectangle: left 4.
- Red rectangle: left 4.
- Pink square: down 2, then left 2.
- X crate: left 2, then down 2, out of the exit.
- Statue: right 4, into the exit.
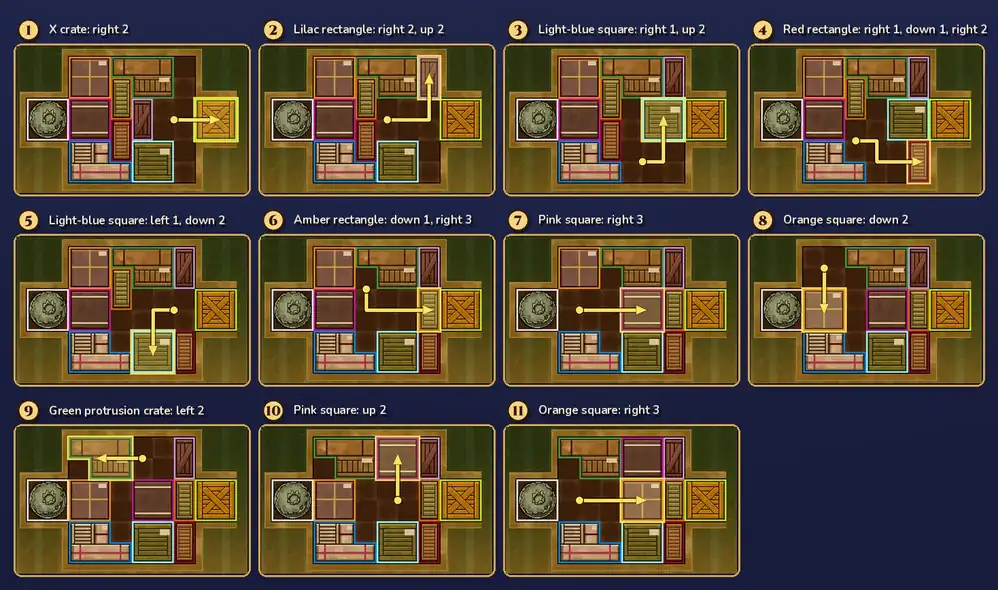
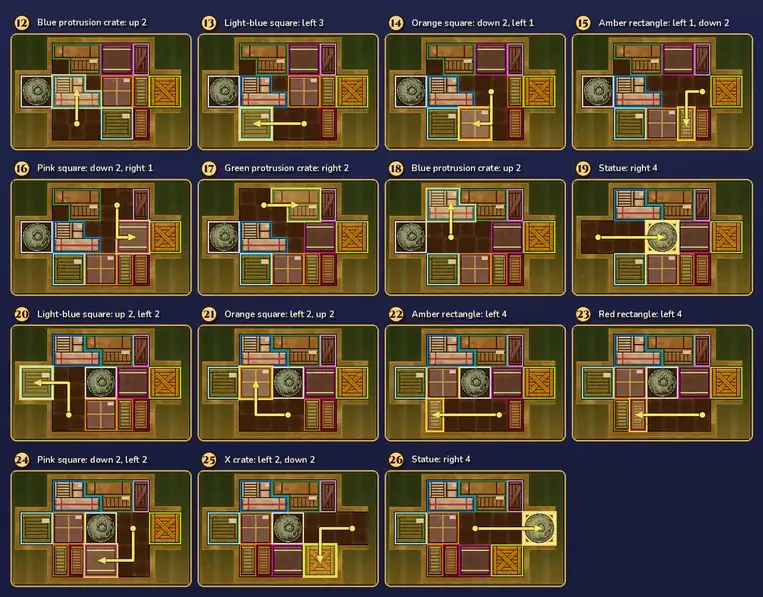
This route follows the game's hints: moves 1 and 2 follow Hint 1, moves 3 to 6 Hint 2, moves 7 to 11 Hint 3 and moves 12 to 18 the Super Hint. Other 26-move routes you may find start differently: they move the green protrusion crate one space right first and send the lilac rectangle to the bottom of the right-hand column instead of the top. From move 12 on, they make the same moves from the same layout, except that the lilac and red rectangles have swapped places, and both routes take 26 moves.
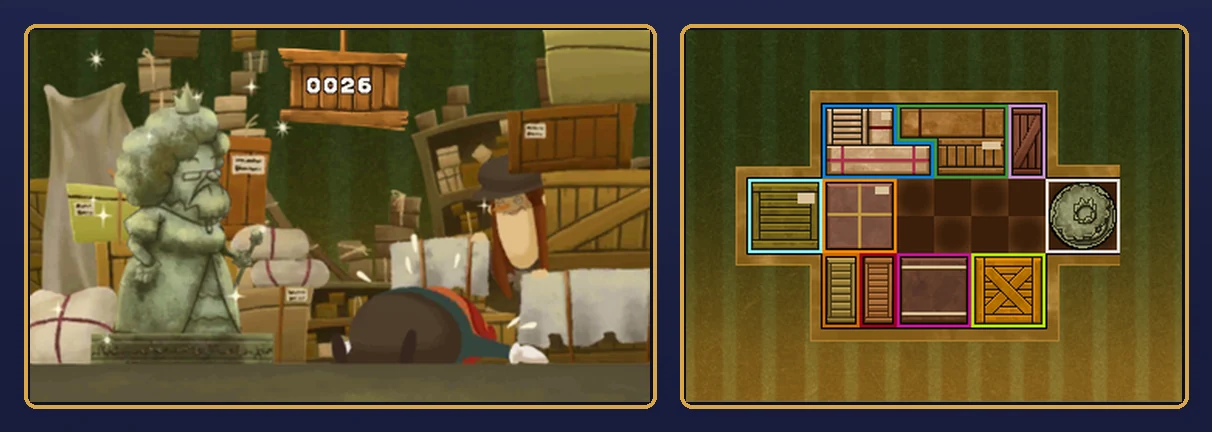
The game confirms it: "Correct! It takes a minimum of 26 moves to get the statue out. What a relief that it is safe and sound!"
If it still doesn't work out:
- The blue protrusion crate won't go up at move 18. The green protrusion crate has to move back to the right first (move 17), so the top-left corner is free.
- The statue won't reach the middle at move 19. The middle two rows have to be clear all the way from the alcove to the pink square on the right. Check your board against the "after move 18" checkpoint above.
- The statue can't get into the exit at the end. The X crate is still in it. Move the X crate left and down into the bottom-right corner first (move 25).
Picarats, hints and hint coins
From Left to Right shows 55 picarats when it starts. Its three picarat values are all 55. If you quit, Layton says, "Let's leave this puzzle for later." When you come back to try again, he says, "I think we have time to muse upon this hidden puzzle once more."
Hints cost hint coins, not picarats. The costs are one coin each for the first three hints and two for the Super Hint, five in total. Montsarton Gallery's six coins are enough for all four hints, as long as you haven't already spent them, or you can use the free hints on this page.
Does it unlock anything?
It doesn't appear to. You get the picarats, and the puzzle counts toward your total.
Versions
- Nintendo 3DS family: this page covers the 3DS game. You drag the crates with the stylus on the touch screen, and the top screen shows the warehouse and the move counter.
- US and UK English versions: the crates and the answer are the same, and so is the name. The UK question and hints probably differ only in small details of wording and spelling.
The scene around the puzzle
Nobody introduces this puzzle. When you tap the painting, Layton says, "A hidden puzzle, if I'm not mistaken." When it's solved, he says, "I love the thrill of a good solution."
The puzzle's own story ends with a twist. After the game says the statue is safe and sound, it adds: "But wait! Who is that lurking in the shadows? Could it be...the dastardly thief herself?!" The finished top screen shows the statue, a queen with a crown, and a figure in a hat peeking out from behind the crates.
FAQ
Where is the answer to Puzzle 045?
It's in the Answer and full solution section above, hidden until you open it. If you only want a push, open the hints one at a time first.
What is Puzzle 045 called?
From Left to Right, in both the North American and the UK version. The official Japanese title is 左から右へ.
Where is Puzzle 045?
In Montsarton Gallery in Monte d'Or, from Chapter 3. It's hidden: zoom in on the left archway of the gallery and tap the large painting at the back.
What's the fewest number of moves?
26, according to the message you get when you solve it. Every drag counts as one move, even if the crate goes round a corner. Taking more moves still solves the puzzle.
Do I have to solve Puzzle 045?
It doesn't appear to be required. It's a hidden puzzle, and the story doesn't check it. The painting appears to stay there until you solve it.
How many picarats is Puzzle 045 worth?
It shows 55 picarats when it starts. Its three picarat values are all 55.
Is Daily Puzzle 045 the same as Puzzle 045?
No. Daily Puzzle 045 is Blocks 06, from the Big Block Box set. Story Puzzle 045 is the warehouse puzzle behind the painting in Montsarton Gallery.
More Miracle Mask puzzles
- Puzzle 046: Toppings Up!
- Puzzle 044: Suit Crates
- Puzzle 043: Evenly Matched
- Puzzle 042: Couple at the Café
- Puzzle 036: Going Dough-Nuts!
- Puzzle 037: Spin Shenanigans
- Puzzle 038: Pattern Pending
- Puzzle 039: A Hat of Tiles
- Puzzle 040: Crossed Connections
- Puzzle 041: From the Sidelines
- Puzzle 001: Stumble's Balloons
- Puzzle 002: Where's Mother?
- Puzzle 003: Stumble's Banners
- Puzzle 004: Bumper Perspective
- Puzzle 005: Robot Factory
- Puzzle 006: Bunny-Hop Swap
- Puzzle 007: A Toasty Toast
- Puzzle 008: Carnival Colors
- Puzzle 009: Stamp Stumper
- Puzzle 010: The Place to Be!
- Puzzle 011: Backstage Blunder
- Puzzle 012: Sharing the Burden
- Puzzle 013: Ancient Arti-facts
- Puzzle 014: Bite of Bygone Days
- Puzzle 015: Fix the Fossil
- Puzzle 016: Wandering Watches
- Puzzle 017: Busted Umbrella
- Puzzle 018: That's Juicy!
- Puzzle 019: Spinning Maize
- Puzzle 020: Nine Red Bricks
- Puzzle 021: A Lick of Paint
- Puzzle 022: Poke 'Em Totems
- Puzzle 023: Fairway Fibber
- Puzzle 024: Patterned Apron
- Puzzle 025: Brave the Caves
- Puzzle 026: Mangled Math
- Puzzle 027: That Rings a Bell
- Puzzle 028: Bunny-Hop Swap 2
- Puzzle 029: Tenth-Round Ace
- Puzzle 030: Big Cake, Little Cake
- Puzzle 031: Emperor's Throne
- Puzzle 032: Target Practice
- Puzzle 033: Chained Circle
- Puzzle 034: The Cat's Trophy
- Puzzle 035: Guess Stars
- Puzzle 60: Dangerous Holes
- Puzzle 100: Gate to the Ruins!
- Puzzle 113: Chip Champions
- Puzzle 118: Evenly Matched 3
- Puzzle 122: Kitty Solitaire 3
For the rest of the game's puzzles, see the Miracle Mask puzzle index.