
Puzzle 042 is Couple at the Café, a 40-picarat Circle Answer puzzle on City Hall Steps in Monte d'Or, in Chapter 3. Hanna, president of Inspector Grosky's fan club, the Groskettes, gives it to you outside City Hall. A café owner took a photo of a visiting celebrity couple, but it came out looking miserable. You have to circle the best place in the café to put it up, and the photo can't be cut.
This page covers story Puzzle 042 in Professor Layton and the Miracle Mask on Nintendo 3DS. The name, question, picture and answer are the same in the US and UK English versions; Hint 3 and the Super Hint are worded slightly differently in the UK text. Quotes use the North American text. If you're after Daily Puzzle 042 or Puzzle 42 from another Layton game, see Wrong Puzzle 042? below.
What Puzzle 042 is
| Name | Couple at the Café (the same in the US and UK English versions) |
|---|---|
| Type | Circle Answer (circle one spot on the touch screen) |
| Picarats | 40 |
| Location | City Hall Steps, Monte d'Or |
| Chapter | Chapter 3 |
| Given by | Hanna, president of the Groskettes (probably Hannah in the UK version) |
| Solved by | Emmy |
| Previous puzzle number | Puzzle 041, From the Sidelines (Briefing Room) |
| Next puzzle number | Puzzle 043, Evenly Matched (also on City Hall Steps, from a police officer) |
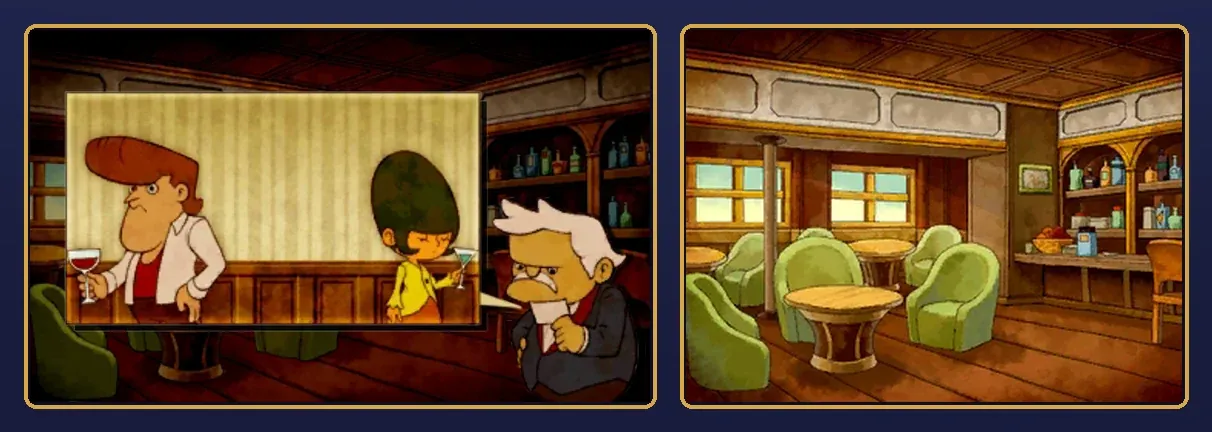
The question reads: "The owner of a café took a photo of a visiting celebrity couple. Pleased as punch, the owner said he'd put it up somewhere in the café, but the resulting photo ended up looking a bit, well...miserable. Where's the best place to put it up without harming the cheerful ambiance of the café? Oh, and this is a special photo, so you can't cut it up." The objective bar asks, "Where should the photo go?"
The game's own help for this kind of puzzle says: "Use the stylus to circle the answer on the Touch Screen. If done correctly, a finger icon will appear within the circle, pointing at your answer. If it doesn't, try again."
Reading the photo and the café
The top screen shows the photo. The touch screen shows the café, and that's where you circle your answer.
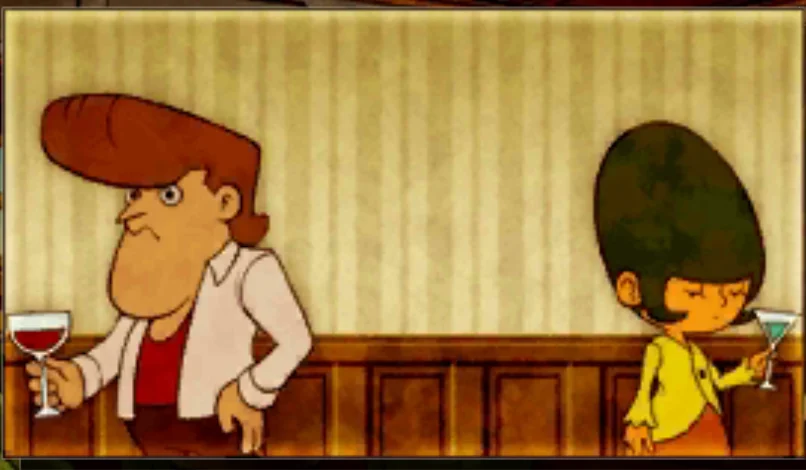
- The couple are at opposite edges. The man stands at the far left and the woman at the far right, with nothing but striped wallpaper and wood panelling between them.
- They face away from each other. He looks off to the left, she faces to the right, and each holds a drink.
- The photo is special. The question says you can't cut it up, so you can't simply trim it and move the two of them closer.
- The café. On the touch screen you can see green armchairs around round wooden tables, two windows on the left-hand wall, a small framed picture, shelves of bottles and a fruit bowl above the counter on the right, and a wooden chair at the far right. Look at all of it before you circle anything.
Draw your loop around only the one thing you mean. If the loop takes in more than one thing, the finger icon may point at something else.
Puzzle names
| Version | Puzzle name |
|---|---|
| North America | Couple at the Café |
| UK | Couple at the Café |
| Japanese | バーの写真 (Bā no Shashin, roughly "the bar photo") |
Couple at the Café is probably the name in both English versions. The UK English text probably differs only in a few small wording changes in Hint 3 and the Super Hint. The question, the picture and the answer are the same in the US and UK English versions. The Japanese name calls the place a bar rather than a café.
Wrong Puzzle 042?
- Daily Puzzle 042 in Miracle Mask is a different puzzle: Alchemy 05, from The Alchemist's Lair set. You connect flasks with glass tubes, and there's no photo in it.
- Puzzle 043, Evenly Matched, is also on City Hall Steps. A police officer gives you that one. If your puzzle isn't about a photo, you've probably got the next one.
- Puzzle 111, Holiday Snaps, is a much later puzzle on the same City Hall Steps, in Chapter 7.
- Puzzle 42 in another Layton game is a different puzzle. If yours doesn't show a café and a photo of a couple, you're in the wrong game.
Where you find it
In Chapter 3, after the task force's meeting in City Hall (Puzzle 041 is in that Briefing Room), your objective is first "Resume the Investigation!" and then "Go to Montsarton Gallery!" From then on, step outside onto City Hall Steps and talk to Hanna, who stands on the road on the left in front of City Hall. She's busy daydreaming about Inspector Grosky, then introduces herself: "I'm Hanna, president of the Groskettes. That's my fan club for Inspector Grosky. Care to join?" After some talk about the inspector, she says, "I also found this photo when I was following the inspector around the other day. I was hoping it would be a useful clue...", and the puzzle starts.
Hanna appears to stay on City Hall Steps for the rest of this part of Chapter 3, until your objective becomes "Listen to the Tiger's Tale!", so you can probably come back for her if you walked past.
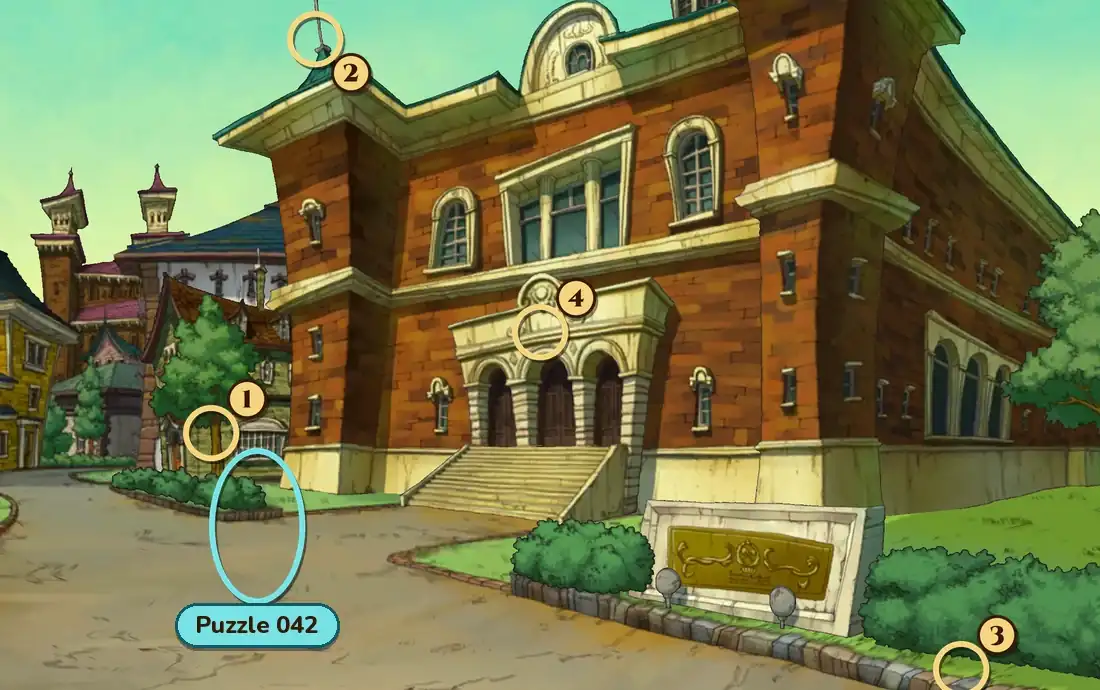
City Hall Steps has four hint coins. They appear to be at the trunk of the tree to the left of City Hall (1), at the tip of the thin spire on the left corner of the roof (2), at the foot of the hedge on the right, by the curb (3) and on the stonework above the entrance arches (4). There doesn't appear to be a zoomed-in view here. Each coin can be collected only once, and the coins belong to the place, so they're the same ones you'd find when you come here for Puzzle 043.
When the answer comes back wrong
- "Too bad." The game's message for a wrong answer adds, "It looks as if this calls for a rather unusual way of putting the photo up." A flat spot on a wall is probably not what it wants.
- The finger points at the wrong thing. Your loop took in more than you meant. Draw a smaller loop around just the one thing.
- You tried to fix the photo itself. You can't cut it. The question is only where it goes.
- You can't find the puzzle. Hanna gives it to you on City Hall Steps after the task-force meeting. Talk to her.
Hints, one at a time
These are the game's own hints, word for word from the North American version and in the same order. Open only the next one you need. In the game, Hints 1 to 3 cost one hint coin each and the Super Hint costs two.
Hint 1
What a photo! He's managed to get it so that the couple are right on the far edges from each other. They've even got their backs turned. Maybe the photo would be a bit more cheery if they were each facing someone.
Hint 2
Is there any way to get the couple to face each other without cutting the photo? You could put them together by rolling up the photo, couldn't you?
Hint 3
You'll need to make the photo cylindrical so that you can get the couple to face each other. Where can you put the photo up so that it's cylindrical? Is there anything you can wrap it around?
Super Hint
Is there anything in the café that you can wrap the photo around to put it on display? Oh, what about that? That right there! The thing standing right between those two chairs there!
Answer and full solution
The answer below covers every step, with a picture of where to circle and a picture of the solved puzzle. Open it when you're ready.
Show the answer
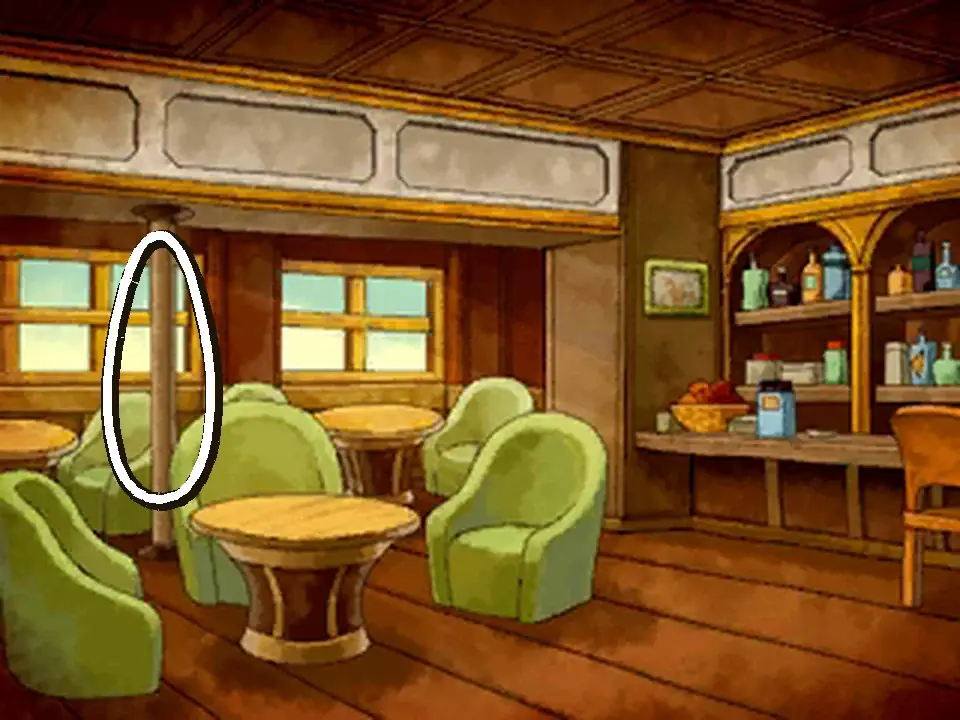
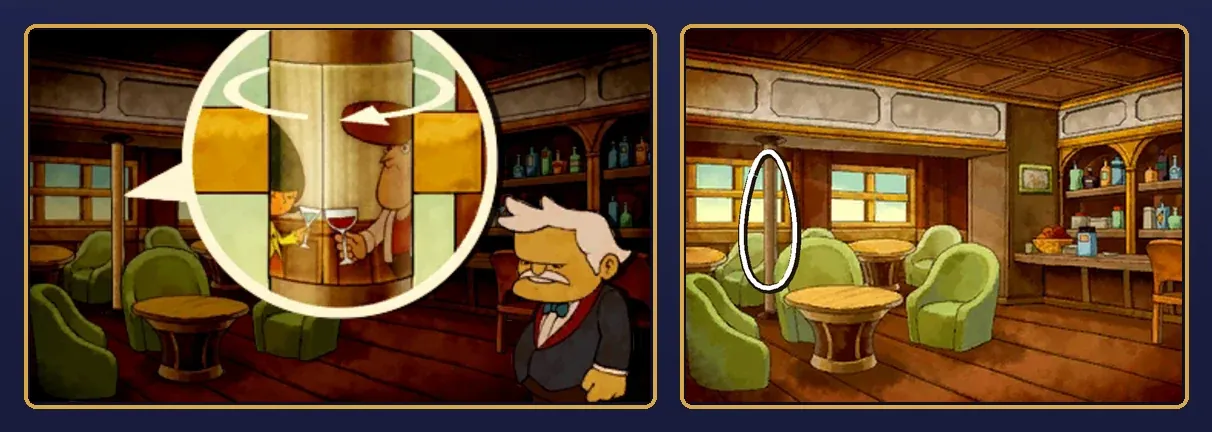
Answer: circle the thin wooden column on the left of the café. It stands between the green armchairs, in front of the window wall. Draw a small loop around the column on the touch screen, check that the finger icon points at it, then submit.
Step by step:
- Find what's wrong with the photo. The man is at the far left edge and the woman at the far right edge, and they face away from each other, out toward the edges.
- Bring the edges together. If you roll the photo into a tube, its left and right edges meet. The two people who were furthest apart now stand side by side, and because each was facing an edge, they now face each other.
- Find something round to hold it. A flat wall can't keep the photo rolled up. The thin column between the armchairs on the left is the one thing in the café you can wrap the photo around.
- Circle the column. With the photo wrapped round it, the couple raise their glasses to each other, and the photo is cheerful instead of miserable.
The game confirms it: "Correct! Well, would you look at that! By wrapping it around the column, the photo is transformed into one depicting an amicable toast!"
If your answer keeps failing:
- You circled a wall, the window or the picture frame. Hanging the photo flat leaves the couple apart, however good the spot.
- You circled the shelves, the bottles or a table. None of them is something the photo can go round.
- You circled an armchair or the floor. The Super Hint's "thing standing right between those two chairs" is the column, not a chair.
- Your loop took in the armchairs as well. Draw a narrow loop around the column alone, so the finger icon points at it.
Picarats, hints and hint coins
Couple at the Café shows 40 picarats when it starts. The puzzle can award 40, 32 or 24 picarats. Wrong answers may reduce the picarat value. If you back out of the puzzle, Hanna says, "It's OK. I'm confused too. About a lot." If you try again, she says, "I should show this to Inspector Grosky!"
Hints cost hint coins, not picarats. The costs are one coin each for the first three hints and two for the Super Hint, five in total. City Hall Steps has four coins, one short of that, so you'd need a coin saved from elsewhere to open every hint. Or use the free hints on this page and save your coins.
What you get: the Instruments aisle
Solving it appears to add the fourth aisle to the Shop minigame in the Professor's trunk: Instruments. The game tells you, "You got a new shop aisle: Instruments!" and describes it like this: "Whether starting off or well versed in your harmonic minors, you'll find high-quality flutes, drums, and violins here."
The Shop itself, and its first aisle, Fresh Fruits, come from Puzzle 010, The Place to Be! Crockery comes after Puzzle 019 and Explorer's Needs after Puzzle 030. The fifth aisle, Baked Goods, comes later, from Puzzle 047.
The puzzle doesn't appear to be required to finish the story. If you leave it unsolved, it probably goes to Nanna Grams (known as Elizabeth in the UK version) at the start of Chapter 5, so you can still pick it up later.
Versions
- Nintendo 3DS family: this page covers the 3DS game. You answer by drawing a loop with the stylus on the touch screen.
- US and UK English versions: same name, same picture, same answer. The UK text probably words Hint 3 and the Super Hint slightly differently, and the character's name is probably spelled Hannah in the UK version.
The scene around the puzzle
Hanna is daydreaming when you arrive: "Ohhhh, that Inspector Grosky is such a dreamboat. The neon lights of Monte d'Or really highlight his pompadour!" Emmy has met her before and turns down her fan club: "And thanks but no thanks. I'm not really much of a joiner." Hanna has been following the inspector around, and she hopes the photo she found while doing it will be a useful clue.
When it's solved, Hanna sighs, "If only life was as simple as a puzzle." Then she pulls herself together: "What am I doing? I don't have time to mope around! I've got things to do! Inspector Grosky isn't going to follow himself around!" If you talk to her again afterward, she says, "If Inspector Grosky was turned into stone, I would put him up in my living room!"
FAQ
Where is the answer to Puzzle 042?
It's in the Answer and full solution section above, hidden until you open it. If you only want a push, open the hints one at a time first.
What is Puzzle 042 called?
Couple at the Café, in both the North American and UK English versions. In Japanese it's バーの写真.
Where is Puzzle 042?
On City Hall Steps in Monte d'Or, in Chapter 3. Hanna gives it to you when you come out of City Hall after the task-force meeting.
Who solves Puzzle 042?
Emmy takes this one on.
Do I have to solve Puzzle 042?
It doesn't appear to be required. Nanna Grams probably collects it if you leave it unsolved. Solving it does appear to give you the Instruments aisle of the Shop minigame.
How many picarats is Puzzle 042 worth?
It shows 40 picarats when it starts. The puzzle can award 40, 32 or 24 picarats. Wrong answers may reduce the picarat value.
Is Daily Puzzle 042 the same as Puzzle 042?
No. Daily Puzzle 042 is Alchemy 05, from The Alchemist's Lair set. Story Puzzle 042 is the café photo puzzle on City Hall Steps.
More Miracle Mask puzzles
- Puzzle 041: From the Sidelines
- Puzzle 043: Evenly Matched
- Puzzle 040: Crossed Connections
- Puzzle 039: A Hat of Tiles
- Puzzle 038: Pattern Pending
- Puzzle 037: Spin Shenanigans
- Puzzle 036: Going Dough-Nuts!
- Puzzle 044: Suit Crates
- Puzzle 045: From Left to Right
- Puzzle 001: Stumble's Balloons
- Puzzle 002: Where's Mother?
- Puzzle 003: Stumble's Banners
- Puzzle 004: Bumper Perspective
- Puzzle 005: Robot Factory
- Puzzle 006: Bunny-Hop Swap
- Puzzle 007: A Toasty Toast
- Puzzle 008: Carnival Colors
- Puzzle 009: Stamp Stumper
- Puzzle 010: The Place to Be!
- Puzzle 011: Backstage Blunder
- Puzzle 012: Sharing the Burden
- Puzzle 013: Ancient Arti-facts
- Puzzle 014: Bite of Bygone Days
- Puzzle 015: Fix the Fossil
- Puzzle 016: Wandering Watches
- Puzzle 017: Busted Umbrella
- Puzzle 018: That's Juicy!
- Puzzle 019: Spinning Maize
- Puzzle 020: Nine Red Bricks
- Puzzle 021: A Lick of Paint
- Puzzle 022: Poke 'Em Totems
- Puzzle 023: Fairway Fibber
- Puzzle 024: Patterned Apron
- Puzzle 025: Brave the Caves
- Puzzle 026: Mangled Math
- Puzzle 027: That Rings a Bell
- Puzzle 028: Bunny-Hop Swap 2
- Puzzle 029: Tenth-Round Ace
- Puzzle 030: Big Cake, Little Cake
- Puzzle 031: Emperor's Throne
- Puzzle 032: Target Practice
- Puzzle 033: Chained Circle
- Puzzle 034: The Cat's Trophy
- Puzzle 035: Guess Stars
- Puzzle 60: Dangerous Holes
- Puzzle 100: Gate to the Ruins!
- Puzzle 113: Chip Champions
- Puzzle 118: Evenly Matched 3
- Puzzle 122: Kitty Solitaire 3
For the rest of the game's puzzles, see the Miracle Mask puzzle index.