
Puzzle 043 is Evenly Matched (Pawn Portions in the UK version), a 35-picarat Draw Line puzzle on City Hall Steps in Monte d'Or, in Chapter 3. A policeman stops Layton's group outside City Hall and won't believe they were just walking until they solve it. You have to cut an unusual 6 x 6 chessboard into four pieces that have the same shape and the same area, with one white pawn and one black pawn in each piece. Pieces may be rotated but not mirrored, and you answer by drawing the cut lines on the touch screen. The game doesn't need it to move on.
This page covers story Puzzle 043 in Professor Layton and the Miracle Mask on Nintendo 3DS. The puzzle is the same in the US and UK English versions apart from its name; quotes use the North American text. If you're after Daily Puzzle 043 or Puzzle 43 from another Layton game, see Wrong Puzzle 043? below.
What Puzzle 043 is
| Name | Evenly Matched (US); Pawn Portions (UK) |
|---|---|
| Type | Draw Line (draw the cuts on the board) |
| Picarats | 35 |
| Location | City Hall Steps, Monte d'Or |
| Chapter | Chapter 3 |
| Given by | A policeman in front of City Hall |
| Solved by | Professor Layton |
| Previous puzzle number | Puzzle 042, Couple at the Café (also on City Hall Steps, from Hanna) |
| Next puzzle number | Puzzle 044, Suit Crates (Dromedary Plaza) |
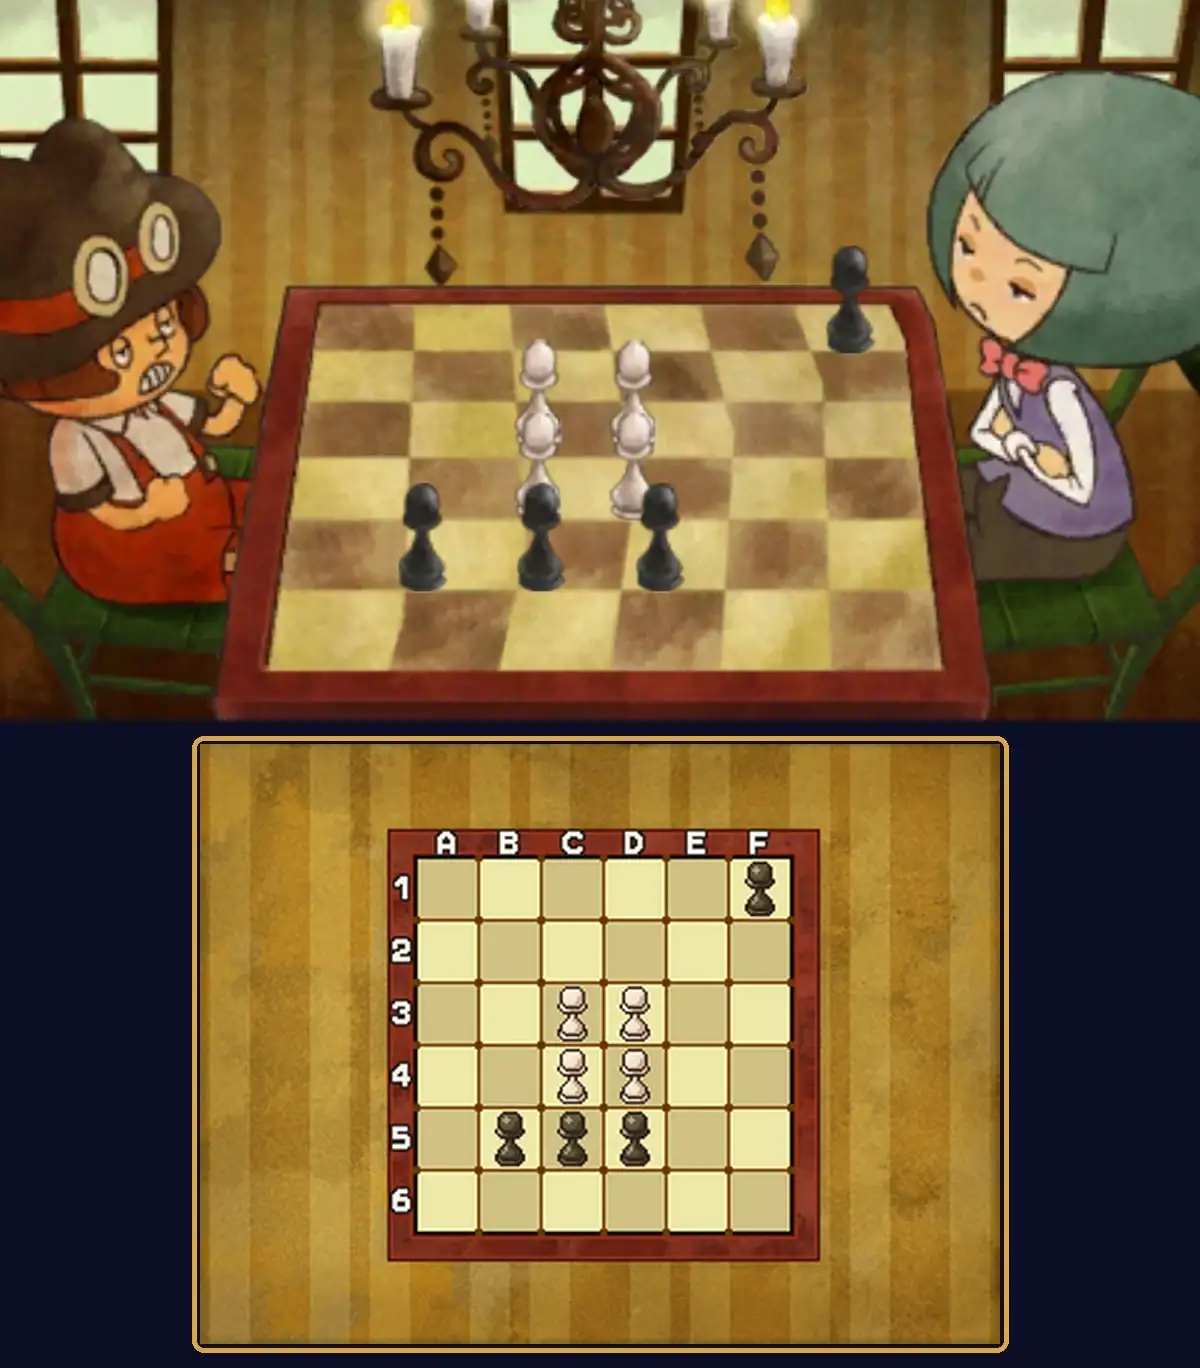
The question reads: "You want to cut this unusual 6 x 6 chessboard into four pieces that are the same shape, have an equal area, and each contain one white pawn and one black pawn. Can you work out how to do it? Draw lines on the board to show where to cut it. Keep in mind that solutions may be rotated but cannot be mirrored." The objective bar sums it up as "Divide the board!"
Reading the board
The top screen shows two players at a chessboard. The touch screen is where you answer.
- Columns and rows. Columns A to F run from left to right along the top of the board, and rows 1 to 6 run from top to bottom down the left side. The game's hints name squares this way, so C6 is the third square from the left in the bottom row.
- Four white pawns sit in a block in the middle, on C3, D3, C4 and D4.
- Four black pawns are on F1 in the top-right corner and on B5, C5 and D5 in row 5.
- Same shape and same area. The board has 36 squares, so each of the four pieces has 9.
- Rotated, not mirrored. A piece can be a turned copy of another piece, but not a flipped one.
You draw along the lines between squares. The edge of the board is already a cut, so you only need the lines inside it.
Puzzle names
| Version | Puzzle name |
|---|---|
| North America | Evenly Matched |
| UK | Pawn Portions |
| Japanese | チェス盤を分けろ (Chesuban o Wakero, roughly "divide the chessboard") |
The UK question probably differs only in punctuation, and the UK hints probably use British spelling such as "centre". The board and the answer are the same in the US and UK English versions. The North American version carries a different Japanese label for it, チェスのナゾ.
Wrong Puzzle 043?
- Daily Puzzle 043 in Miracle Mask is a different puzzle: Sailing 04, from the Perilous Voyage set. There's no chessboard in it.
- Puzzle 042, Couple at the Café, is on the same City Hall Steps. Hanna gives you that one. If your puzzle is about a photo in a café, you've got the one before.
- Puzzle 047, Trial by Tennis, is the one at Madame Lapushka's. You can do Puzzle 043 around the same time, so the two sometimes get mixed up.
- Evenly Matched 2, 3 and 4 are later puzzles with the same idea: Puzzle 071 (Reception, Chapter 5), Puzzle 118, Evenly Matched 3 (Reception, Chapter 7) and Puzzle 140 (Layton's Challenges).
- Puzzle 43 in another Layton game is a different puzzle. If yours doesn't show a 6 x 6 board with pawns, you're in the wrong game.
Where you find it
In Chapter 3, after the task force's briefing inside City Hall (Puzzle 041 is in that Briefing Room), your objective becomes "Go to Montsarton Gallery!" Step outside onto City Hall Steps and talk to the policeman near the foot of the steps. He says, "Stop right there! Who are you? What business do you have here?!" Layton answers, "I think there's been a misunderstanding. We were just...walking." The policeman isn't convinced: "A likely story. If you're really as innocent as you say you are, you should have no trouble solving this puzzle."
The policeman probably keeps this puzzle while your objective goes through "Go to Montsarton Gallery!", "Go to Madame Lapushka's!" and "Head to the One-Ring Circus!", and he's probably moved on by the time you're told to "Listen to the Tiger's Tale!". Before the briefing, he appears to have something else to say, so come back after it.
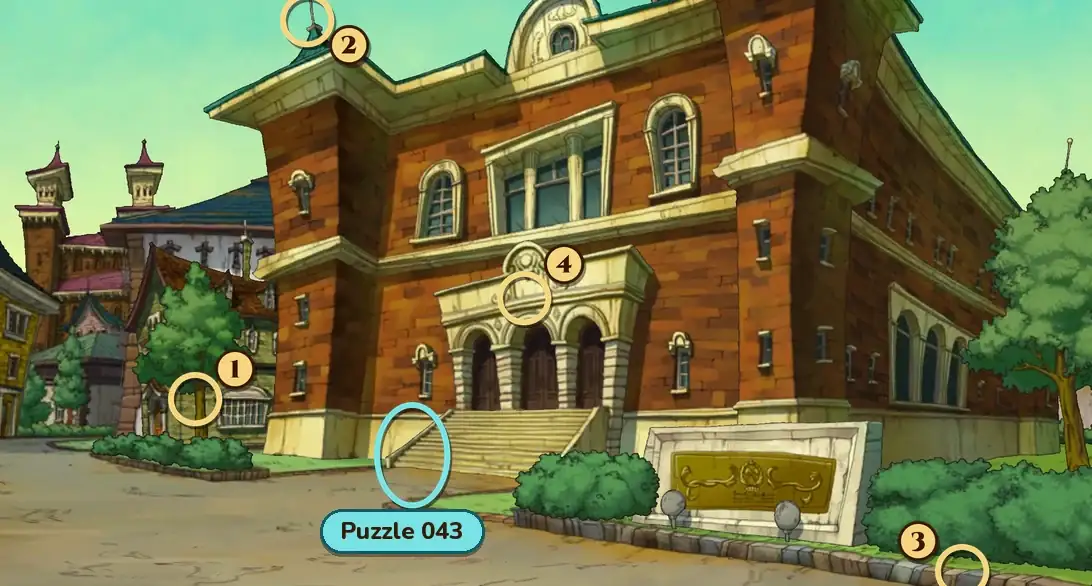
City Hall Steps has four hint coins. They appear to be at the tree to the left of City Hall (1), at the top of the thin spire on the left corner of the roof (2), at the front edge of the bushes at the bottom right (3) and above the City Hall entrance (4). There doesn't appear to be a zoomed-in view here. Each coin can be collected only once, and the coins belong to the place, so they're the same ones you'd find when you come here for Puzzle 042.
If you leave this part of Chapter 3 without solving it, a missed copy probably turns up with Nanna Grams (known as Elizabeth in the UK version) from the start of Chapter 5, when your objective is "Continue the Investigation!".
When the answer comes back wrong
- "Try again." The game's message for a wrong answer adds, "Try to visualize where you'll have to divide up the board."
- Your pieces aren't all 9 squares. Count them. Four pieces of equal area on a 36-square board means 9 squares each.
- One piece is a mirror image. The pieces have to match by turning only. If one only fits after flipping it over, it doesn't count.
- Two pawns of the same color share a piece. Each piece needs exactly one white pawn and one black pawn.
- You can't find the puzzle. Talk to the policeman on City Hall Steps after the briefing in City Hall.
Hints, one at a time
These are the game's own hints, word for word from the North American version and in the same order. Open only the next one you need. In the game, Hints 1 to 3 cost one hint coin each and the Super Hint costs two.
Hint 1: the white pawns
Look at the four white pawns in the center of the board. One of these will have to go into each of the four separate pieces, so you can draw a cross to cut between them. Extend that cross so that the whole board is divided into quarters. You'll see that the top-left section doesn't have a black pawn in it. What can you do to fix that?
Hint 2: the top-left quarter
Continuing from Hint 1, let's try to make the top-left section include a black pawn. Draw lines so that the top-left quarter includes the squares A4, A5, and B5. Now that section has a black pawn, but the shapes are off...
Hint 3: the bottom-left quarter
Now try to change the shape of the other sections to match that of the section you adjusted in Hint 2. Draw lines so that the bottom-left quarter includes the squares D6, E6, and E5. The shapes still aren't identical, but they're getting closer...
Super Hint: the last two quarters
Draw lines so that the bottom-right section includes the squares F3, F2, and E2. Next, draw so that the top-right section includes the squares C1, B1, and B2. How does that look?
Answer and full solution
The answer below covers every step, with a step-by-step picture, the finished cut lines and a picture of the solved puzzle. Open it when you're ready.
Show the answer
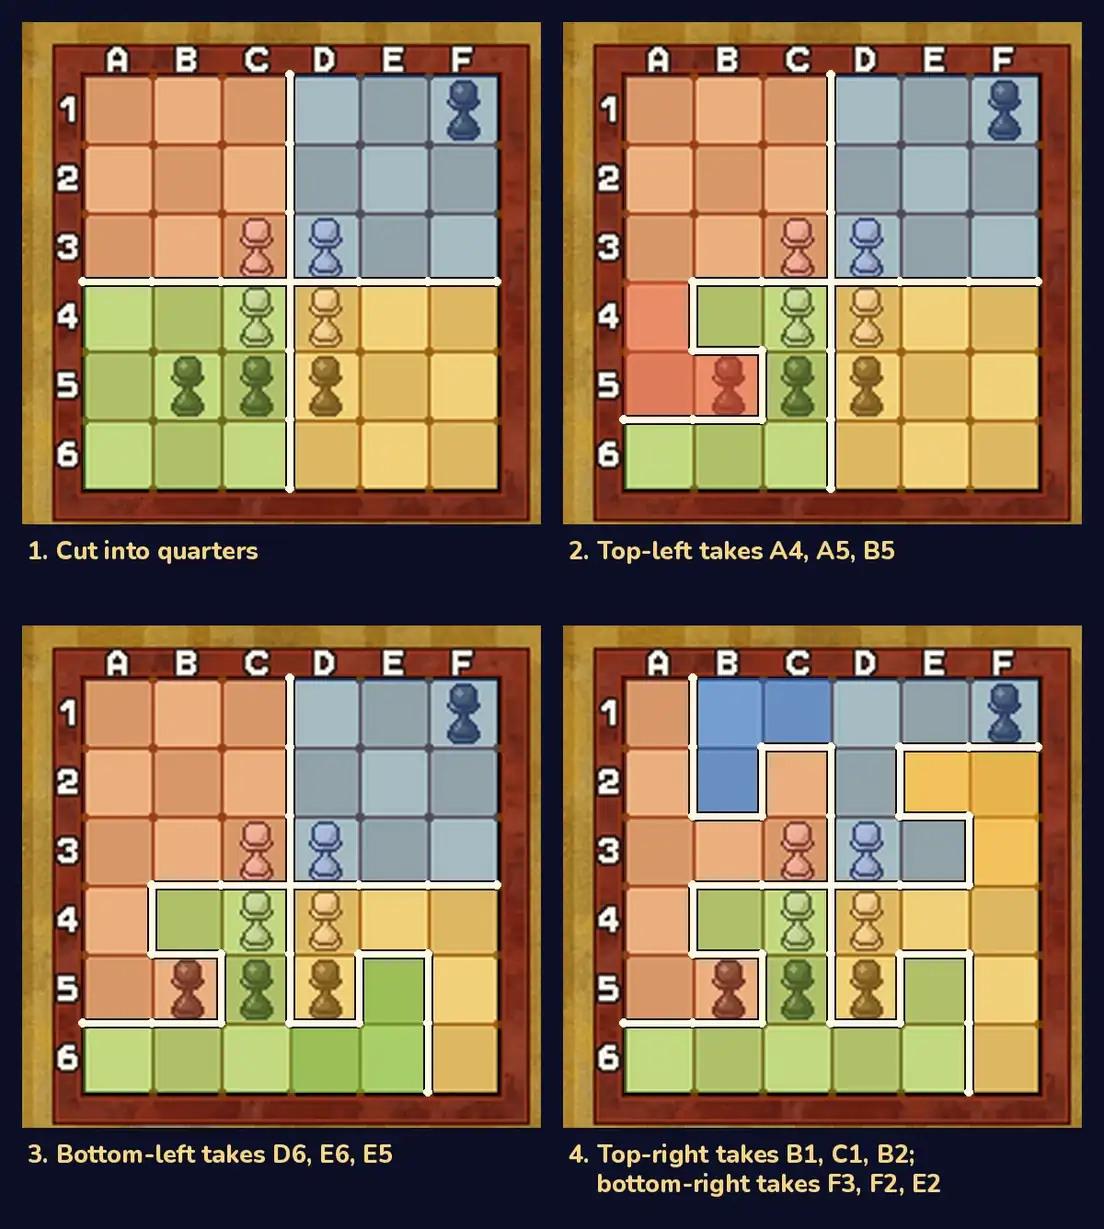
Answer: start from the four quarters, then have each quarter hand three squares to the next quarter, going clockwise. The four pieces are:
| Piece | Squares | White pawn | Black pawn |
|---|---|---|---|
| Top-left (red) | A1, A2, A3, B3, C2, C3, A4, A5, B5 | C3 | B5 |
| Top-right (blue) | B1, C1, D1, E1, F1, B2, D2, D3, E3 | D3 | F1 |
| Bottom-right (orange) | E2, F2, F3, D4, E4, F4, D5, F5, F6 | D4 | D5 |
| Bottom-left (green) | B4, C4, C5, E5, A6, B6, C6, D6, E6 | C4 | C5 |
- Cut into quarters. A cross between the four white pawns splits the board into four 3 x 3 quarters, each with one white pawn. The top-left quarter has no black pawn, and the bottom-left quarter has two (B5 and C5).
- Top-left takes A4, A5 and B5. That L of three squares comes from the bottom-left quarter, and it brings the black pawn on B5 with it.
- Bottom-left takes D6, E6 and E5. It gives three squares away and takes three back from the bottom-right quarter, so it stays at 9 squares.
- Bottom-right takes F3, F2 and E2 from the top-right quarter, and top-right takes B1, C1 and B2 from the top-left quarter.
- Check. Each quarter gave three squares away and took three, so every piece has 9 squares. Each piece is the one before it turned a quarter turn clockwise, so all four are the same shape, with no mirroring. Every piece holds one white pawn and one black pawn. Draw those lines and submit.
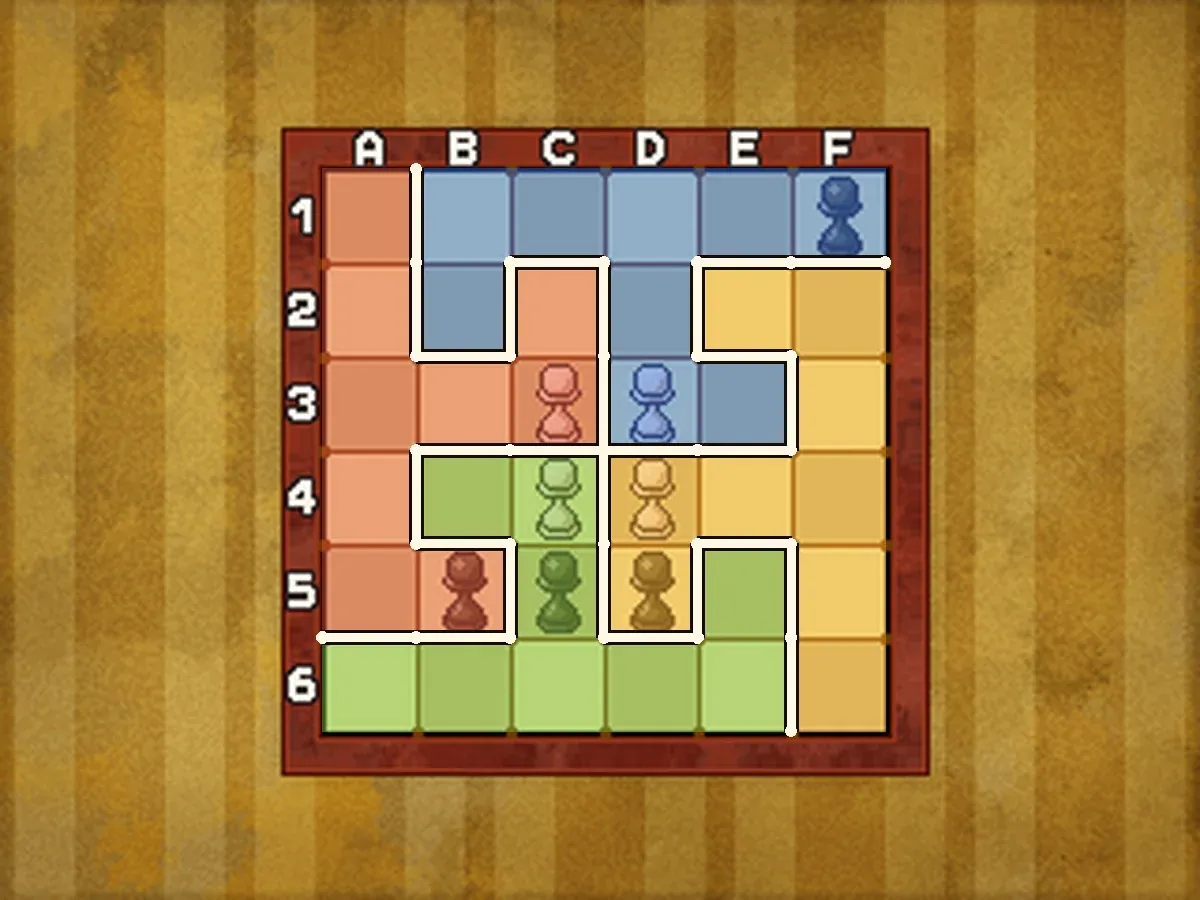
The game confirms it: "Correct! That was nicely cut!" Draw only the cut lines inside the board; extra lines that split a piece probably make the answer wrong.
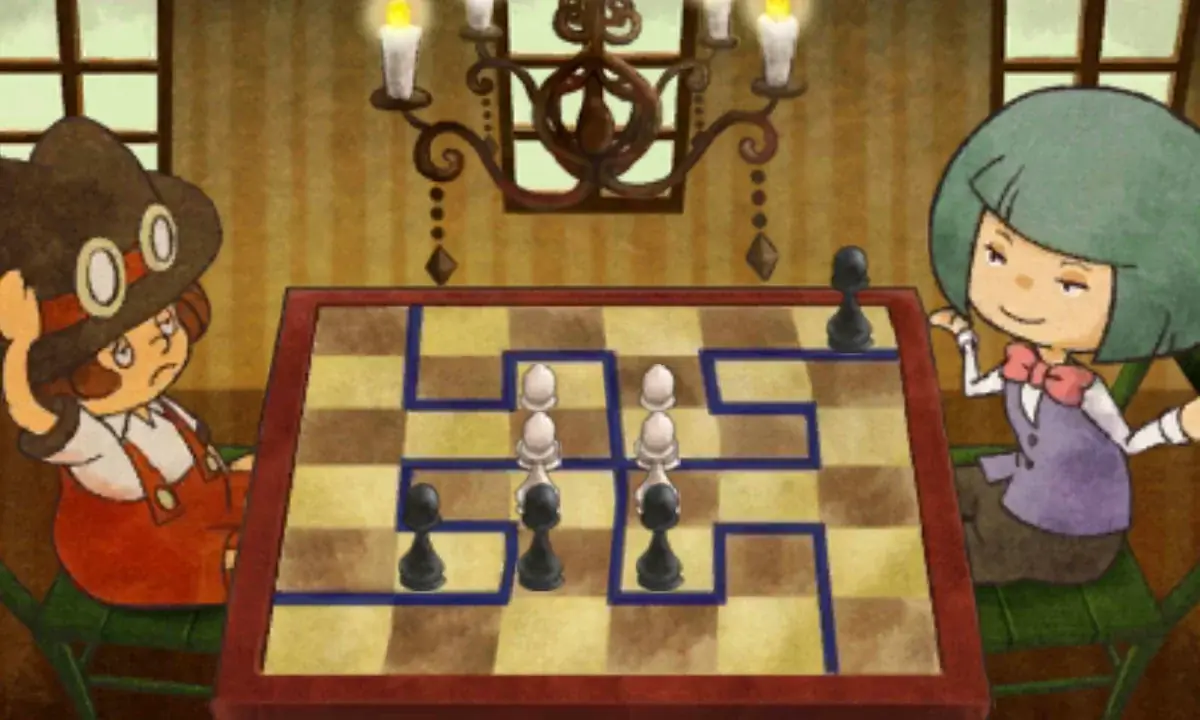
If your answer keeps failing:
- You swapped squares the other way around. The squares move clockwise. If the top-left piece doesn't take A4, A5 and B5, it misses the black pawn on B5.
- You left the cross straight in one place. All four quarters have to swap squares. If one cut still runs straight along the cross, the shapes won't match.
- You drew an extra line. Any line that splits one of the four pieces makes five or more pieces. Erase it.
Picarats, hints and hint coins
Evenly Matched shows 35 picarats when it starts. The puzzle can award 35, 28 or 21 picarats. Wrong answers may reduce the picarat value. If you quit, the policeman says, "I should bring you in under suspicion of... being suspicious." When you come back to try again, he says, "NOW you want to try to prove your innocence. Criminals are so predictable."
Hints cost hint coins, not picarats. The costs are one coin each for the first three hints and two for the Super Hint, five in total. City Hall Steps has four coins, one short of that, and they're shared with Puzzle 042, so you'd need coins saved from elsewhere to open every hint. Or use the free hints on this page and save your coins.
Does it unlock anything?
It doesn't appear to. You get the picarats, and the puzzle counts toward your total.
Versions
- Nintendo 3DS family: this page covers the 3DS game. You answer by drawing lines with the stylus on the touch screen.
- US and UK English versions: the board and the answer are the same. The UK version calls the puzzle Pawn Portions, and its wrong-answer message probably reads "Start from somewhere you know will have to be cut."
- Japanese version: the pawn layout there is probably mirrored left to right, so the squares named on this page probably won't match it.
The scene around the puzzle
The policeman stops the group outside City Hall: "Stop right there! Who are you? What business do you have here?!" Layton insists, "I think there's been a misunderstanding. We were just...walking."
When it's solved, the policeman says, "Hmm..." and then, "Everything seems to be in order. Try to be less suspicious next time." Layton repeats, "As I said, we were just walking," and the policeman snaps back, "You were prowling around like a pack of wolves! Now go, before I call for backup." Talk to him again and he says, "I've got my eye on you lot. On all of you! And your suspicious-looking hats, too!"
FAQ
Where is the answer to Puzzle 043?
It's in the Answer and full solution section above, hidden until you open it. If you only want a push, open the hints one at a time first.
What is Puzzle 043 called?
Evenly Matched in the North American version and Pawn Portions in the UK version. The Japanese title is チェス盤を分けろ; the North American game carries the Japanese label チェスのナゾ.
Where is Puzzle 043?
On City Hall Steps in Monte d'Or, in Chapter 3. Talk to the policeman near the foot of the steps after the task force's briefing in City Hall.
I missed Puzzle 043. Can I still get it?
Probably. A missed copy probably turns up with Nanna Grams from the start of Chapter 5.
How many picarats is Puzzle 043 worth?
It shows 35 picarats when it starts. The puzzle can award 35, 28 or 21 picarats. Wrong answers may reduce the picarat value.
Is Daily Puzzle 043 the same as Puzzle 043?
No. Daily Puzzle 043 is Sailing 04, from the Perilous Voyage set. Story Puzzle 043 is the chessboard puzzle on City Hall Steps.
More Miracle Mask puzzles
- Puzzle 042: Couple at the Café
- Puzzle 044: Suit Crates
- Puzzle 036: Going Dough-Nuts!
- Puzzle 037: Spin Shenanigans
- Puzzle 038: Pattern Pending
- Puzzle 039: A Hat of Tiles
- Puzzle 040: Crossed Connections
- Puzzle 041: From the Sidelines
- Puzzle 045: From Left to Right
- Puzzle 001: Stumble's Balloons
- Puzzle 002: Where's Mother?
- Puzzle 003: Stumble's Banners
- Puzzle 004: Bumper Perspective
- Puzzle 005: Robot Factory
- Puzzle 006: Bunny-Hop Swap
- Puzzle 007: A Toasty Toast
- Puzzle 008: Carnival Colors
- Puzzle 009: Stamp Stumper
- Puzzle 010: The Place to Be!
- Puzzle 011: Backstage Blunder
- Puzzle 012: Sharing the Burden
- Puzzle 013: Ancient Arti-facts
- Puzzle 014: Bite of Bygone Days
- Puzzle 015: Fix the Fossil
- Puzzle 016: Wandering Watches
- Puzzle 017: Busted Umbrella
- Puzzle 018: That's Juicy!
- Puzzle 019: Spinning Maize
- Puzzle 020: Nine Red Bricks
- Puzzle 021: A Lick of Paint
- Puzzle 022: Poke 'Em Totems
- Puzzle 023: Fairway Fibber
- Puzzle 024: Patterned Apron
- Puzzle 025: Brave the Caves
- Puzzle 026: Mangled Math
- Puzzle 027: That Rings a Bell
- Puzzle 028: Bunny-Hop Swap 2
- Puzzle 029: Tenth-Round Ace
- Puzzle 030: Big Cake, Little Cake
- Puzzle 031: Emperor's Throne
- Puzzle 032: Target Practice
- Puzzle 033: Chained Circle
- Puzzle 034: The Cat's Trophy
- Puzzle 035: Guess Stars
- Puzzle 60: Dangerous Holes
- Puzzle 100: Gate to the Ruins!
- Puzzle 113: Chip Champions
- Puzzle 118: Evenly Matched 3
- Puzzle 122: Kitty Solitaire 3
For the rest of the game's puzzles, see the Miracle Mask puzzle index.