
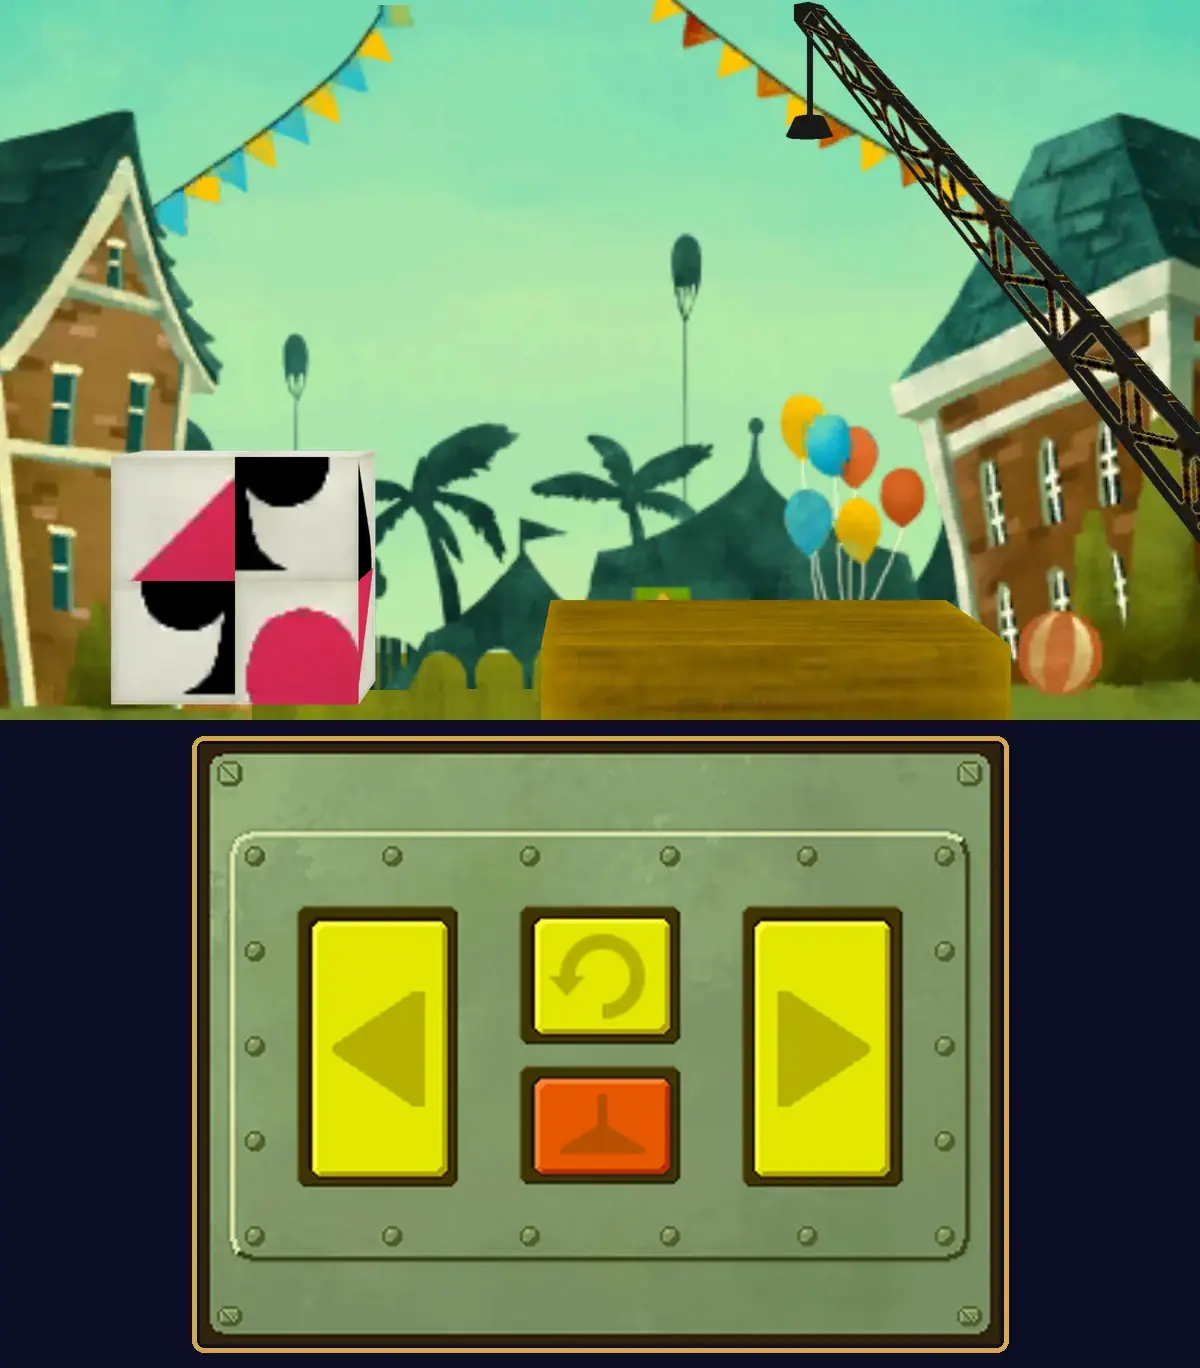
Puzzle 044 is Suit Crates, a 25-picarat Arrange puzzle in Dromedary Plaza in Monte d'Or, in Chapter 3. Yukkles, a circus clown with a bad back, asks Layton to help him with it. Four large crates sit on the left of the scene, each painted with parts of black and red shapes. Using a crane, you have to move all four onto the dais on the right and turn them so that together they make one of the four card-suit symbols: spade, heart, diamond or club. It's probably not mandatory.
This page covers story Puzzle 044 in Professor Layton and the Miracle Mask on Nintendo 3DS. The crates, the crane and the answer are the same in the US and UK English versions; the UK wording differs slightly. Quotes use the North American text. If you're after Daily Puzzle 044 or Puzzle 44 from another Layton game, see Wrong Puzzle 044? below.
What Puzzle 044 is
| Name | Suit Crates (US and UK) |
|---|---|
| Type | Arrange (move and turn the crates with a crane) |
| Picarats | 25 |
| Location | Dromedary Plaza, Monte d'Or |
| Chapter | Chapter 3 |
| Given by | Yukkles, a circus clown |
| Previous puzzle number | Puzzle 043, Evenly Matched (City Hall Steps) |
| Next puzzle number | Puzzle 045, From Left to Right (Montsarton Gallery) |
The question reads: "Four large, painted crates are sitting here. When stacked in a certain way, these crates combine to create one of the four symbols of a card suit: either spade, heart, diamond, or club. Use the crane to move the four crates and place them on the dais on the right so that they form this card-suit symbol. You can rotate the crates horizontally in midair." The objective bar sums it up as "Form a card suit!"
How the crane works
You control the crane with the four buttons on the touch screen. The crates start in two stacks of two on the left. This page calls them the top-left, bottom-left, top-right and bottom-right crates, by where they sit at the start, which is also how the game's hints name them.
- Left and right arrows move the crane one spot at a time. There are four spots: the two stacks on the left, and the left and right halves of the dais. The crane starts over the right half of the dais.
- The orange button lowers the hook. With nothing on the hook, it picks up the top crate under the crane. With a crate on the hook, it sets the crate down: on the ground or the dais if that spot is empty, or on top of the crate already there. A spot holds at most two crates, so you can't set a third one down there.
- The yellow turning button turns the crate on the hook a quarter turn. It only works while you're holding a crate, and it always turns the same way, so four presses bring a crate back to where it started.
- You only see one side. Each crate has a different picture on each of its four sides, and the side facing you is the one that counts.
- No answer button. The game checks the crates each time you lower one, and the puzzle ends by itself once all four are in place and turned the right way.
You can set crates back down on the left side as often as you like, so you can't get stuck. If you lose track, the game can reset the puzzle and put every crate back where it started.
Puzzle names
| Version | Puzzle name |
|---|---|
| North America | Suit Crates |
| UK | Suit Crates |
| Japanese | トランプマーク (Toranpu Māku, roughly "playing-card mark") |
The UK question and hints probably differ only in small details of wording and punctuation, such as "Have a close look" instead of "Take a close look" and "mid-air" instead of "midair". The crates and the answer are the same in the US and UK English versions.
Wrong Puzzle 044?
- Daily Puzzle 044 in Miracle Mask is a different puzzle: Zoo 04, from the Pen Pals set. There are no crates in it.
- Puzzle 102, Dice Crates, is a later crate puzzle that Yukkles gives you at the One-Ring Circus in Chapter 7. If your crates have dice on them, that's the one.
- Puzzle 043, Evenly Matched, is the chessboard puzzle on City Hall Steps, and Puzzle 045, From Left to Right, is at Montsarton Gallery.
- Puzzle 44 in another Layton game is a different puzzle. If yours doesn't have four painted crates and a crane, you're in the wrong game.
Where you find it
In Chapter 3, after the task force's briefing at City Hall, your objective is first "Resume the Investigation!" and then "Go to Montsarton Gallery!" From then on, Yukkles is in Dromedary Plaza, in front of the big hotel, near the foot of the tall sign. He calls out, "Hey! The guy with the hat. Remember me?" Layton replies, "Of course. How could I forget? I'm glad to see you're doing well." Yukkles explains that he hurt his back and the circus put him on 30-minute medical leave, and adds, "Now I'm just working on this puzzle here. Can you help me out?"
He stays there while your objective is "Go to Montsarton Gallery!", "Go to Madame Lapushka's!", "Head to the One-Ring Circus!", "Listen to the Tiger's Tale!" and "Leave the Circus Tent!", and he's gone after that.
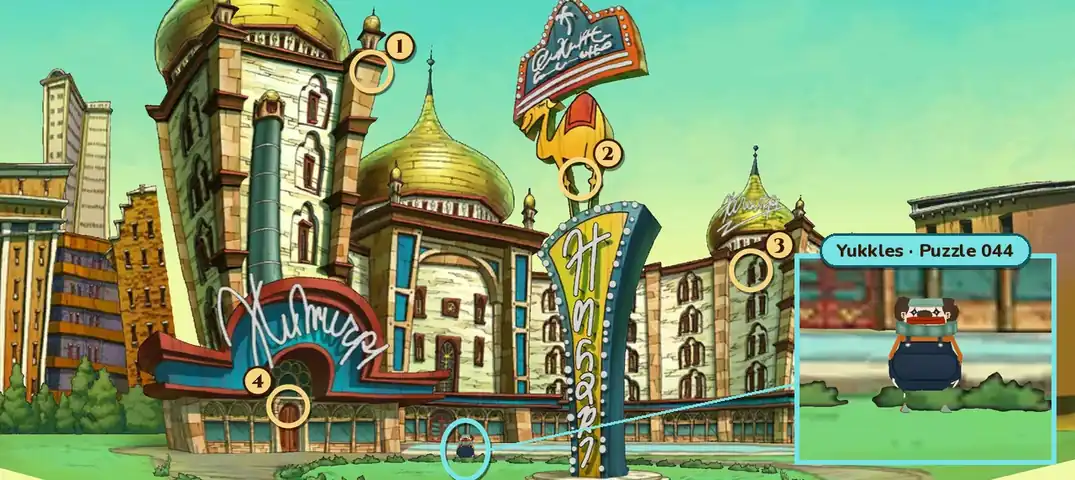
Dromedary Plaza has four hint coins, all in the normal view of the plaza. They appear to be at the top of the tower on the left (1), on the camel at the top of the tall sign (2), on the upper-right roof, near the small dome (3) and above the arched hotel entrance on the left (4). Each coin can be collected only once.
If you leave it unsolved, it probably goes to Nanna Grams (known as Elizabeth in the UK version) at the start of Chapter 5.
When you're stuck
- The crane won't set a crate down. That spot already has two crates. Move to another spot first.
- The turning button does nothing. It only turns a crate that's hanging from the hook. Pick one up first.
- The crates are on the dais but nothing happens. At least one crate is in the wrong spot or facing the wrong way. The puzzle ends by itself when everything is right, so keep adjusting.
- You've lost track of which crate is which. Reset the puzzle to put every crate back where it started.
- You can't find the puzzle. Talk to Yukkles in front of the hotel in Dromedary Plaza once your objective is "Go to Montsarton Gallery!".
Hints, one at a time
These are the game's own hints, word for word from the North American version and in the same order. Open only the next one you need. In the game, Hints 1 to 3 cost one hint coin each and the Super Hint costs two.
Hint 1: the top-left crate
Take a close look at the pattern painted on the sides of each crate. Start with the crate on the top left. It has on its four sides what seems to be the top-left corners of a diamond and of a club, and the top-right corners of a diamond and of a heart. Clearly this must be one of the two top crates! This also shows that you can rule out the spade altogether.
Hint 2: the top-right crate
Next, let's take the top-right crate. One of its sides has the top-right corner of a spade, but you already know you can't make a spade, so you can discount that. All three other sides have a bottom corner. Now picture what each quarter of a card-suit symbol would look like. Some parts might be the same for spades and clubs, or for hearts and diamonds.
Hint 3: the bottom two crates
Now take the bottom-left crate. It has the bottom left of a black suit, the top right of a club, the top left of a spade, and the bottom left of a red suit. The bottom-right crate has the top left of a heart, the bottom right of two red suits, and the bottom right of a black suit. The lack of usable diamond top corners narrows it down to either a heart or a club.
Super Hint: red or black?
You know that the only suit symbol you can make is either a heart or a club. Can we assume it's a heart? Well, you've got the top-left part on that last crate mentioned in Hint 3, but none of the other crates have the bottom-right corner of a red suit. So the symbol must be a club! The only thing left is to put it together.
Answer and full solution
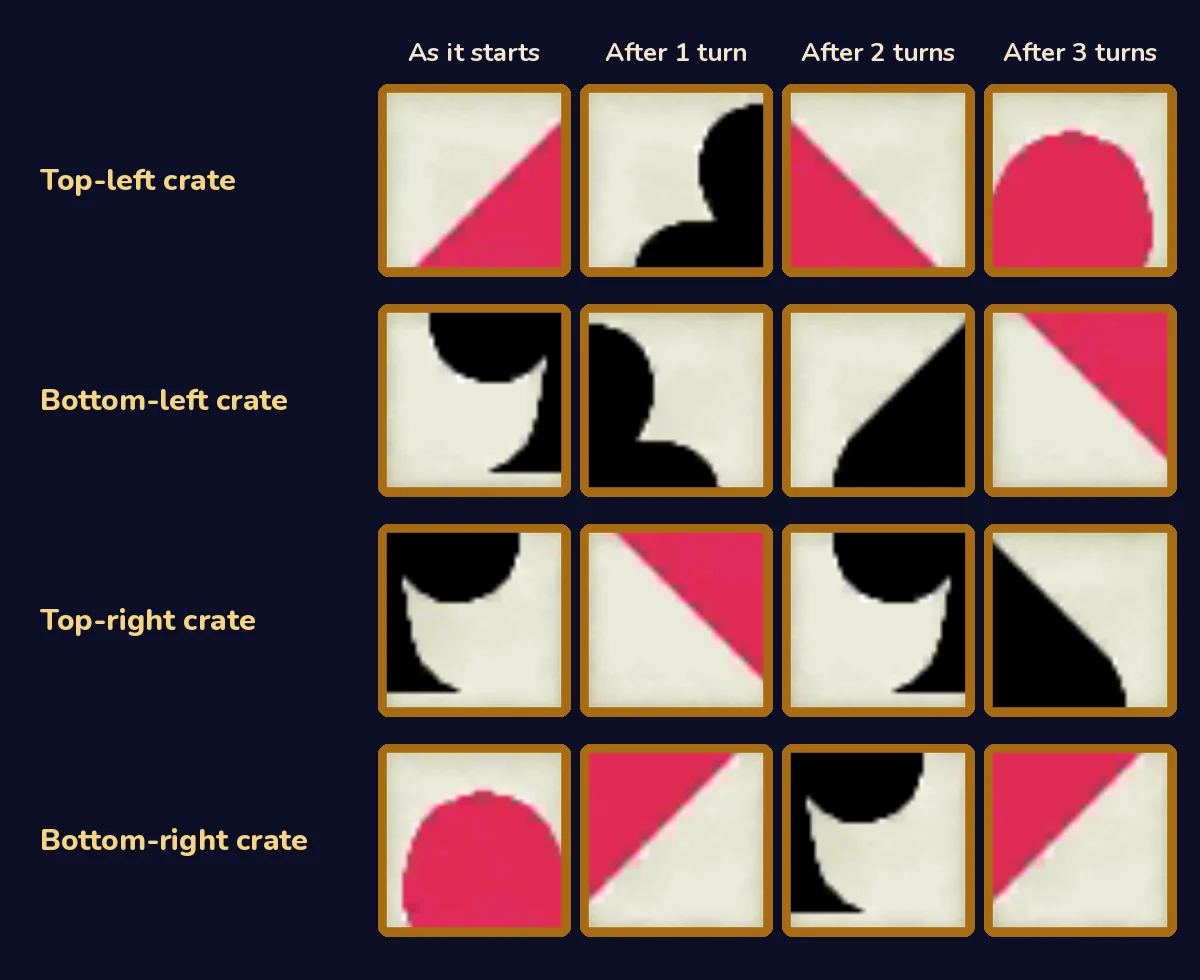
The answer below covers every move, with a chart of every side of every crate, the four moves in pictures and a picture of the solved puzzle. Open it when you're ready.
Show the answer
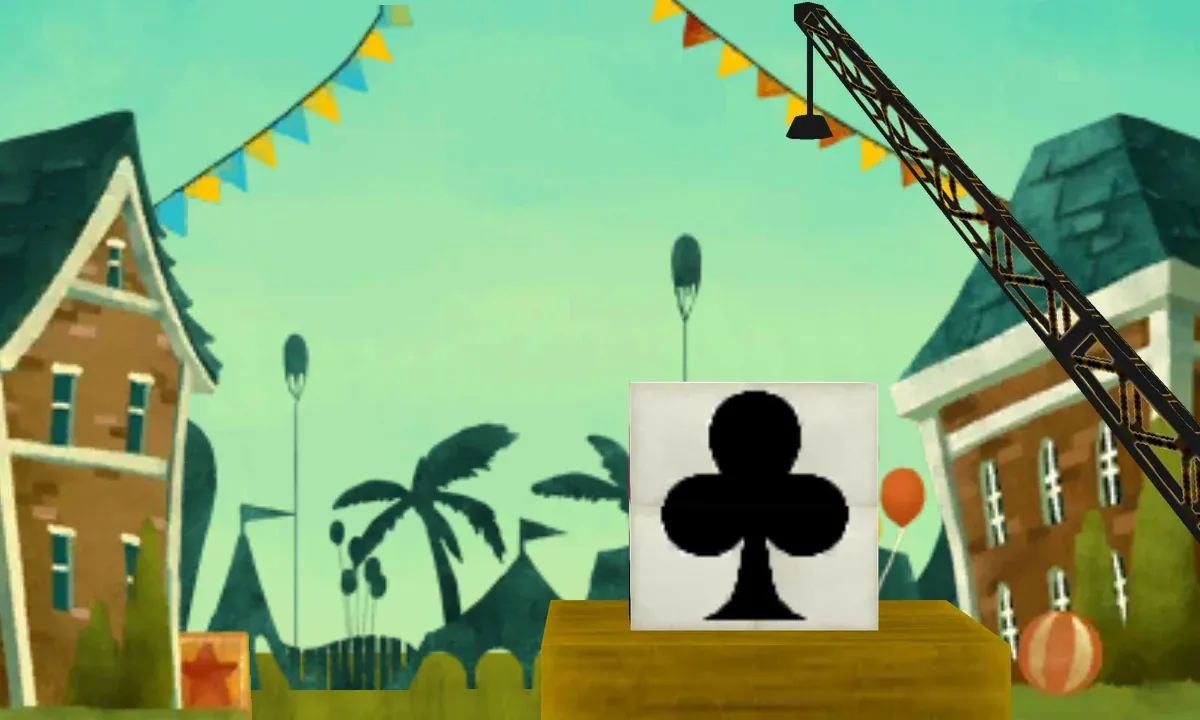
Answer: build a club. Move the crates in this order: the top-right crate turned twice to the left half of the dais, the bottom-right crate turned twice to the right half, the top-left crate turned once onto the left pile, and the bottom-left crate turned once onto the right pile.
| Move | Crate | Presses of the turning button | Where it goes | Part of the club |
|---|---|---|---|---|
| 1 | Top-right | 2 | Left half of the dais, on the dais | Bottom left |
| 2 | Bottom-right | 2 | Right half of the dais, on the dais | Bottom right |
| 3 | Top-left | 1 | Left half of the dais, on top | Top left |
| 4 | Bottom-left | 1 | Right half of the dais, on top | Top right |
Step by step:
- Top-right crate. The crane starts over the right half of the dais. Press the left arrow twice to reach the right-hand stack, press the orange button to pick up the top crate, press the turning button twice, press the right arrow once and press the orange button to set it on the left half of the dais.
- Bottom-right crate. Press the left arrow once, pick up the crate, turn it twice, press the right arrow twice and set it on the right half of the dais.
- Top-left crate. Press the left arrow three times to reach the left-hand stack, pick up the top crate, turn it once, press the right arrow twice and set it on top of the crate on the left half of the dais.
- Bottom-left crate. Press the left arrow twice, pick up the last crate, turn it once, press the right arrow three times and set it on top of the right-hand pile.
The two bottom crates have to go on the dais first, and this order frees each crate just before you need it, so there are no extra moves.
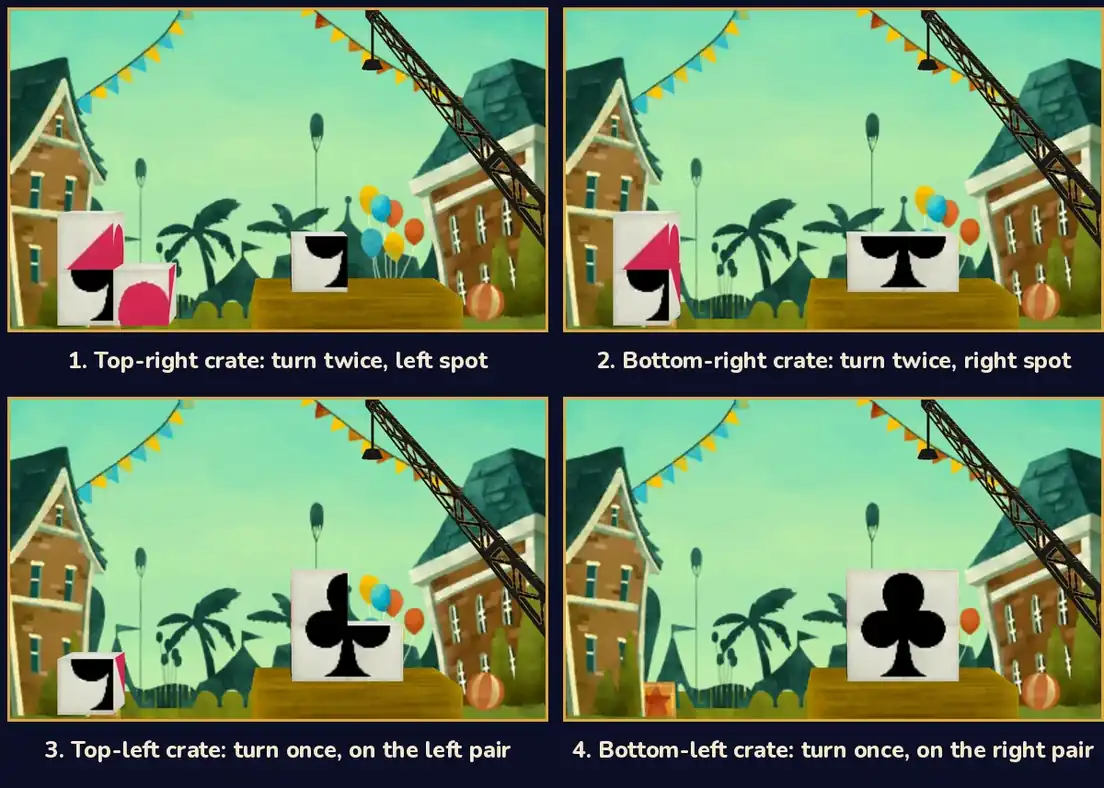
The game confirms it: "Well done! The crates were meant to form a suit of clubs!"
If it still doesn't finish:
- A crate is turned the wrong way. Pick it up and keep pressing the turning button until its side matches the chart above. Four presses bring it back to the start.
- The two halves are swapped. The crates from the right-hand stack form the bottom of the club, and the crates from the left-hand stack form the top.
- A bottom crate is on top. Lift the top crate off, set it down on the left, and rebuild the pile in the right order.
Picarats, hints and hint coins
Suit Crates shows 25 picarats when it starts. Its three picarat values are all 25. If you quit, Yukkles says, "Oh, you'll never solve it!" When you come back to try again, he says, "Take it from me—clear your mind and take it one step at a time."
Hints cost hint coins, not picarats. The costs are one coin each for the first three hints and two for the Super Hint, five in total. Dromedary Plaza's four coins cover Hints 1 to 3 but not the Super Hint, so you need one more coin from elsewhere, or you can use the free hints on this page.
Does it unlock anything?
It doesn't appear to. You get the picarats, and the puzzle counts toward your total.
Versions
- Nintendo 3DS family: this page covers the 3DS game. You press the crane buttons on the touch screen and watch the crates on the top screen.
- US and UK English versions: the crates and the answer are the same, and so is the name. The UK question and hints probably differ only in small details of wording and punctuation.
The scene around the puzzle
Yukkles remembers the group: "Yeah, if it wasn't for you, I might be a statue. Which might be an improvement." When Layton asks, "Is everything all right?", he answers, "Oh, I hurt my back, so the circus put me on 30-minute medical leave!" and complains, "An injured clown is useless! I can't even bend down to reach my rubber chicken!"
When it's solved, Yukkles says, "Thanks for the distraction! I almost forgot about my crippling back pain. Almost." and adds, "Stop by the circus sometime and visit our lonely tiger!" Talk to him again and he says, "I guess I should try to get back to work. If the ringmaster catches me here, I'll be on tiger-bathing duty for a week."
FAQ
Where is the answer to Puzzle 044?
It's in the Answer and full solution section above, hidden until you open it. If you only want a push, open the hints one at a time first.
What is Puzzle 044 called?
Suit Crates, in both the North American and the UK version. The official Japanese title is トランプマーク.
Where is Puzzle 044?
In Dromedary Plaza in Monte d'Or, in Chapter 3. Talk to Yukkles the clown in front of the hotel once your objective is "Go to Montsarton Gallery!".
How do I turn a crate?
Pick it up with the orange button first, then press the yellow turning button. Each press turns the crate on the hook a quarter turn, always the same way.
I missed Puzzle 044. Can I still get it?
Probably. A missed copy probably goes to Nanna Grams at the start of Chapter 5.
How many picarats is Puzzle 044 worth?
It shows 25 picarats when it starts. Its three picarat values are all 25.
Is Daily Puzzle 044 the same as Puzzle 044?
No. Daily Puzzle 044 is Zoo 04, from the Pen Pals set. Story Puzzle 044 is the crate puzzle in Dromedary Plaza.
More Miracle Mask puzzles
- Puzzle 043: Evenly Matched
- Puzzle 045: From Left to Right
- Puzzle 042: Couple at the Café
- Puzzle 036: Going Dough-Nuts!
- Puzzle 037: Spin Shenanigans
- Puzzle 038: Pattern Pending
- Puzzle 039: A Hat of Tiles
- Puzzle 040: Crossed Connections
- Puzzle 041: From the Sidelines
- Puzzle 001: Stumble's Balloons
- Puzzle 002: Where's Mother?
- Puzzle 003: Stumble's Banners
- Puzzle 004: Bumper Perspective
- Puzzle 005: Robot Factory
- Puzzle 006: Bunny-Hop Swap
- Puzzle 007: A Toasty Toast
- Puzzle 008: Carnival Colors
- Puzzle 009: Stamp Stumper
- Puzzle 010: The Place to Be!
- Puzzle 011: Backstage Blunder
- Puzzle 012: Sharing the Burden
- Puzzle 013: Ancient Arti-facts
- Puzzle 014: Bite of Bygone Days
- Puzzle 015: Fix the Fossil
- Puzzle 016: Wandering Watches
- Puzzle 017: Busted Umbrella
- Puzzle 018: That's Juicy!
- Puzzle 019: Spinning Maize
- Puzzle 020: Nine Red Bricks
- Puzzle 021: A Lick of Paint
- Puzzle 022: Poke 'Em Totems
- Puzzle 023: Fairway Fibber
- Puzzle 024: Patterned Apron
- Puzzle 025: Brave the Caves
- Puzzle 026: Mangled Math
- Puzzle 027: That Rings a Bell
- Puzzle 028: Bunny-Hop Swap 2
- Puzzle 029: Tenth-Round Ace
- Puzzle 030: Big Cake, Little Cake
- Puzzle 031: Emperor's Throne
- Puzzle 032: Target Practice
- Puzzle 033: Chained Circle
- Puzzle 034: The Cat's Trophy
- Puzzle 035: Guess Stars
- Puzzle 60: Dangerous Holes
- Puzzle 100: Gate to the Ruins!
- Puzzle 113: Chip Champions
- Puzzle 118: Evenly Matched 3
- Puzzle 122: Kitty Solitaire 3
For the rest of the game's puzzles, see the Miracle Mask puzzle index.