
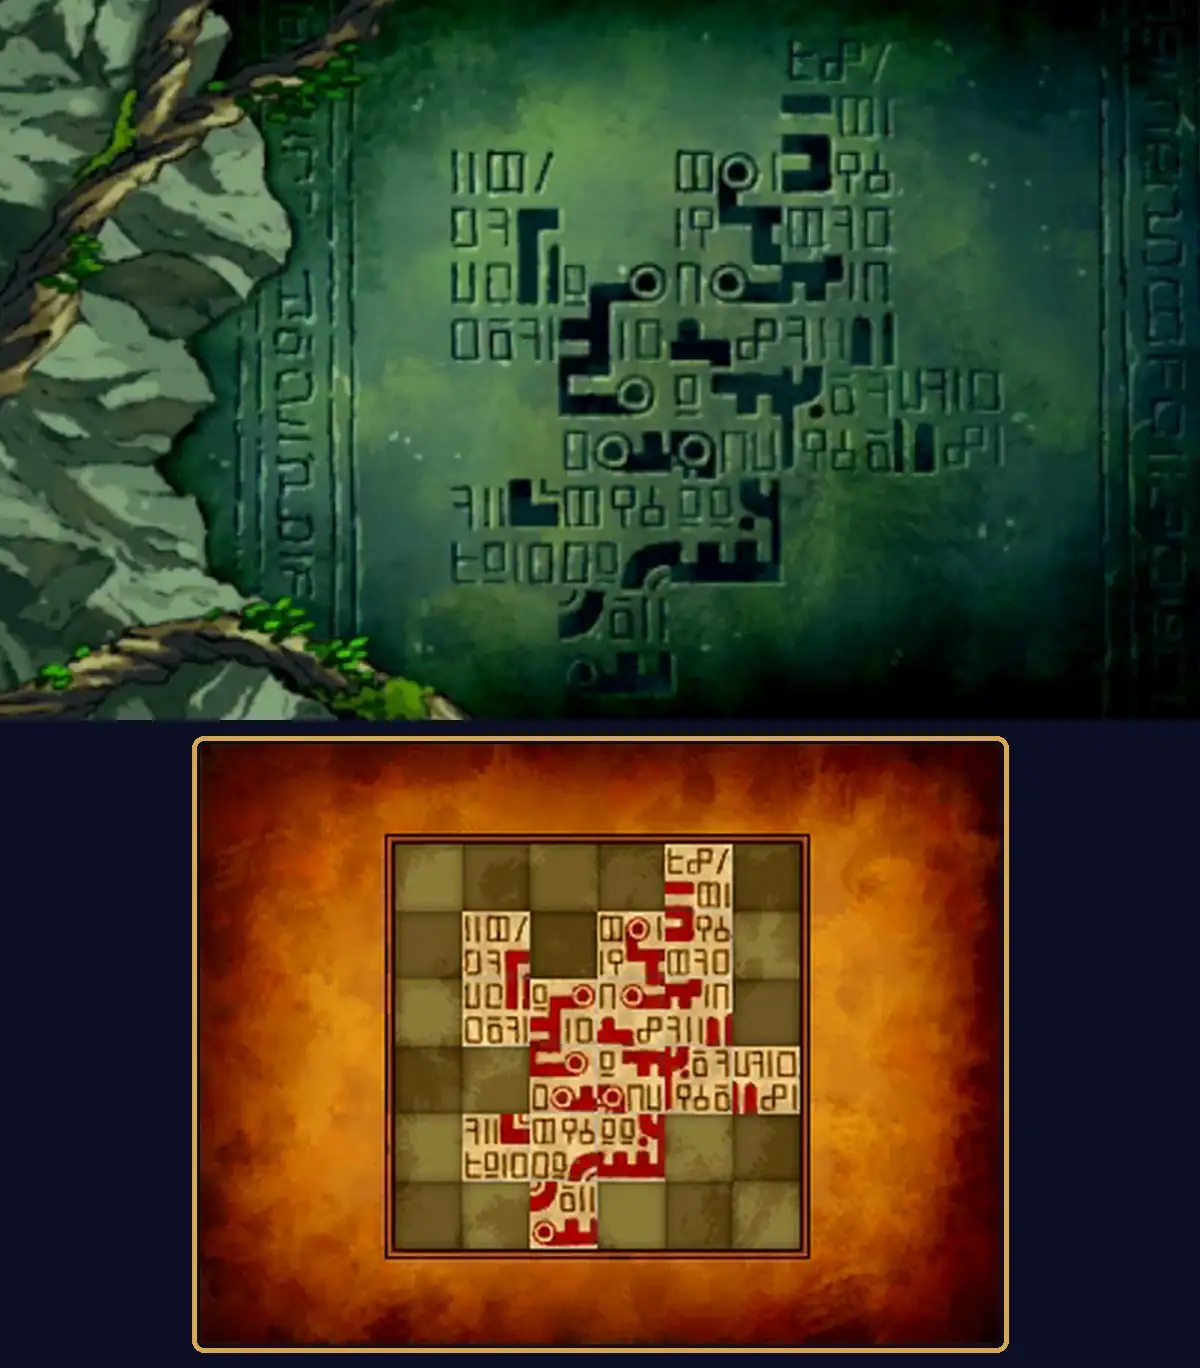
Puzzle 064 is Norwell's Secret, a 40-picarat Arrange puzzle at Norwell, during the Chapter 4 flashback to Hershel Layton's school days. Randall has copied the symbols carved on the ancient wall at Norwell onto paper and cut the copy into 16 squares, which lie scattered over a 6 x 6 grid. You slide the pieces along the rows and columns, four at a time, until they form the inscription as a 4 x 4 square in the middle of the grid. You have to solve it to carry on with the story.
This page covers story Puzzle 064 in Professor Layton and the Miracle Mask on Nintendo 3DS. The pieces, the moves and the answer are the same in the US and UK English versions; the UK wording differs. Quotes use the North American text. If you're after Daily Puzzle 064, Fix the Fossil or Puzzle 64 from another Layton game, see Wrong Puzzle 064? below.
What Puzzle 064 is
| Name | Norwell's Secret (US and UK) |
|---|---|
| Type | Arrange (slide lines of four pieces) |
| Picarats | 40 |
| Location | Norwell, in the forest outside Stansbury |
| Chapter | Chapter 4 |
| Given by | Randall, with his copy of the carved wall |
| Previous puzzle number | Puzzle 063, A Muddy Mess (Winding Road) |
| Next puzzle number | Puzzle 065, Kitty Solitaire 2 (Big Top) |
The question reads: "Here's a copy of the characters inscribed on the wall, divided up into 16 squares. Arrange the design to complete the inscription within a 4 x 4 square. You can only move the pieces horizontally and vertically in sets of four squares. Rearrange the pieces of paper by aligning the symbols to complete the carving. Put the inscription in the center when you're done." The objective bar sums it up as "Rearrange the inscription!"
How the pieces move
The touch screen shows a 6 x 6 grid with 16 paper pieces on it. Each piece carries a few of the small symbols and part of the thick red lines. The top screen shows the carved wall, jumbled in the same way as the pieces.
- Four at a time. The game only lets you move pieces in sets of four: a line of four pieces sitting side by side in a row or a column, slid along that row or column. A piece on its own can't be moved.
- One square at a time. The game's hints, and the answer on this page, move each line of four by one square.
- The target is the middle. The finished inscription is a 4 x 4 square, and it has to sit in the middle of the grid, with an empty border of squares all the way around it.
- No answer button. The game checks the pieces after each slide, and the puzzle ends by itself once the inscription is complete in the middle.
Every slide you make outside the solution makes the board harder to fix. If you get lost, it's quicker to restart the puzzle, which puts every piece back where it started, than to try to slide your way back.
Column and row numbers used on this page
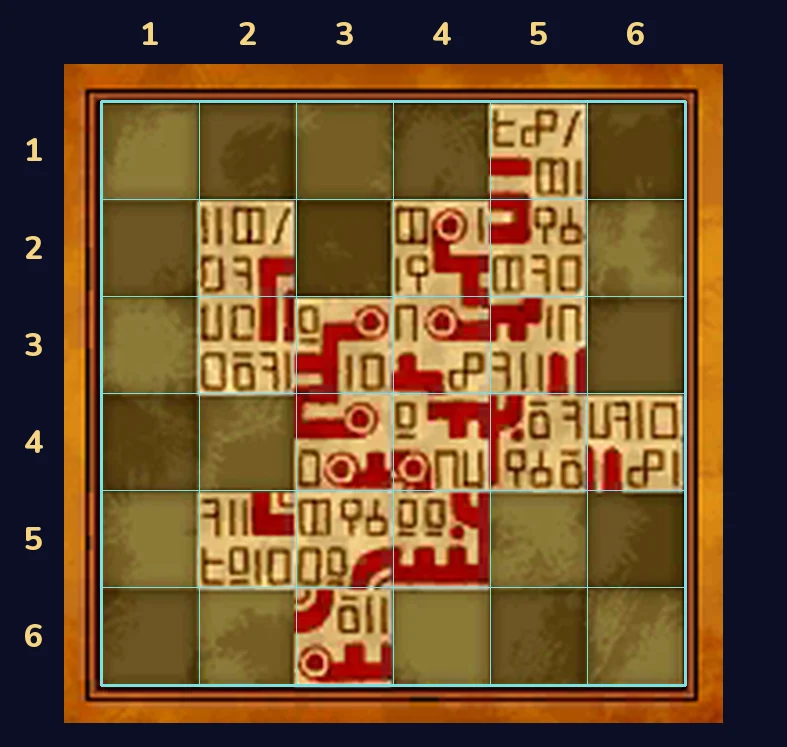
The game's hints count across the full 6 x 6 grid, not just the 4 x 4 target, and so does this page. Columns go 1 to 6 from the left and rows go 1 to 6 from the top, so "the third column from the left" is column 3 and "the second column from the right" is column 5.
Puzzle names
| Version | Puzzle name |
|---|---|
| North America | Norwell's Secret |
| UK | Norwell's Secret |
| Japanese | 遺跡の秘密 (Iseki no Himitsu, roughly "secret of the ruins") |
The UK question is probably worded differently, for example "Move the pieces of paper so that they form a 4 x 4 square", and the UK Hint 1 warns about what happens "if you come a cropper". The pieces, the moves and the answer are the same in the US and UK English versions.
Wrong Puzzle 064?
- Daily Puzzle 064 in Miracle Mask is a different puzzle: Sailing 08, from the Perilous Voyage set. There's no inscription in it.
- Puzzle 015, Fix the Fossil, is the same kind of sliding puzzle in Chapter 2, with nine fossil pieces on a 5 x 5 grid, moved three at a time. Puzzle 141, Fix the Fossil 2, is a bigger one with 25 pieces moved five at a time. The moves on this page don't work in either.
- Puzzle 063, A Muddy Mess, is the puzzle before this one, on the Winding Road, and Puzzle 065, Kitty Solitaire 2, is the next one, at the Big Top.
- Puzzle 64 in another Layton game is a different puzzle. If yours doesn't have 16 paper pieces on a 6 x 6 grid, you're in the wrong game.
Where you find it
In the Chapter 4 flashback, your objective after the gate at the Edge of Town is "Head to Norwell!" Solving Puzzle 063, A Muddy Mess, on the Winding Road opens the way to Norwell. Once you reach Norwell, your objective changes to "Investigate Norwell!" Tap the big carved wall in the middle of the scene, behind the roots, to start the puzzle. If you try to leave first, Randall stops you: "Where are you going? You haven't even looked at the wall!"
Before the puzzle, Randall shows Hershel his copy: "It's a transcription of these symbols." Hershel recognizes the idea: "The fossil we reconstructed for Mr. Collins! It's the same thing, isn't it?!" Randall replies, "Yes! It's the same basic principle: cut your image into squares, mix them up, and voilà!"
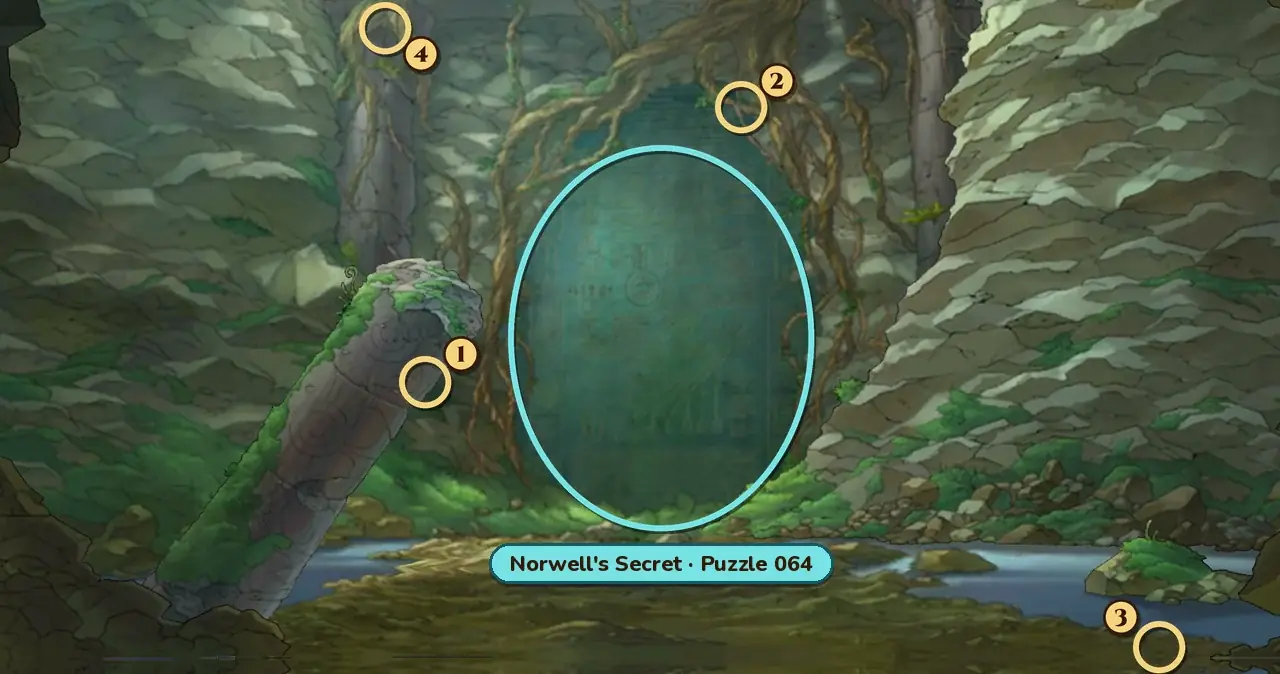
Norwell has four hint coins, all in the normal view. They're near the top end of the leaning broken pillar on the left (1), in the roots above the upper right of the wall (2), on the ground at the bottom right, below the mossy rock in the stream (3) and in the roots at the top of the standing pillar on the upper left (4). Each coin can be collected only once.
You can't miss it. The story doesn't continue until the wall is solved.
When you're stuck
- A piece won't move. Pieces only move in sets of four. Look for a row or column where four pieces sit side by side, and slide that line along its own direction.
- The red lines don't join up. The thick red lines run from piece to piece in the finished inscription. Use them, not the small symbols, to see which pieces belong next to each other.
- You've slid a few lines and it's getting worse. Restart the puzzle. The answer only needs a handful of slides from the starting layout.
- The inscription looks complete but nothing happens. It has to sit in the middle of the grid, with one empty square all the way around it.
- You can't find the puzzle. Tap the carved wall at Norwell once your objective is "Investigate Norwell!".
Hints, one at a time
These are the game's own hints, word for word from the North American version and in the same order. Open only the next one you need. In the game, Hints 1 to 3 cost one hint coin each and the Super Hint costs two.
Hint 1
You can solve this puzzle in three moves.
The puzzle will just get harder if you make mistakes, so it's best to simply restart if you get too lost.
Hint 2
The ancient script here must make it quite hard to work out how you're supposed to rearrange the pieces.
Pay close attention to the red lines. It's not clear what they're supposed to represent, but it looks as if connecting the lines is the key.
Hint 3
For your first move, shift the four pieces in the third column from the left up one row.
That should help you start connecting the red lines. Any idea what they mean?
Super Hint
Continuing from Hint 3, move the four pieces in the second column from the right down a row.
Can you work out the last move you need to make to solve the puzzle?
Answer and full solution
The answer below covers every move, with the slides in pictures and a picture of the solved puzzle. Open it when you're ready.
Show the answer
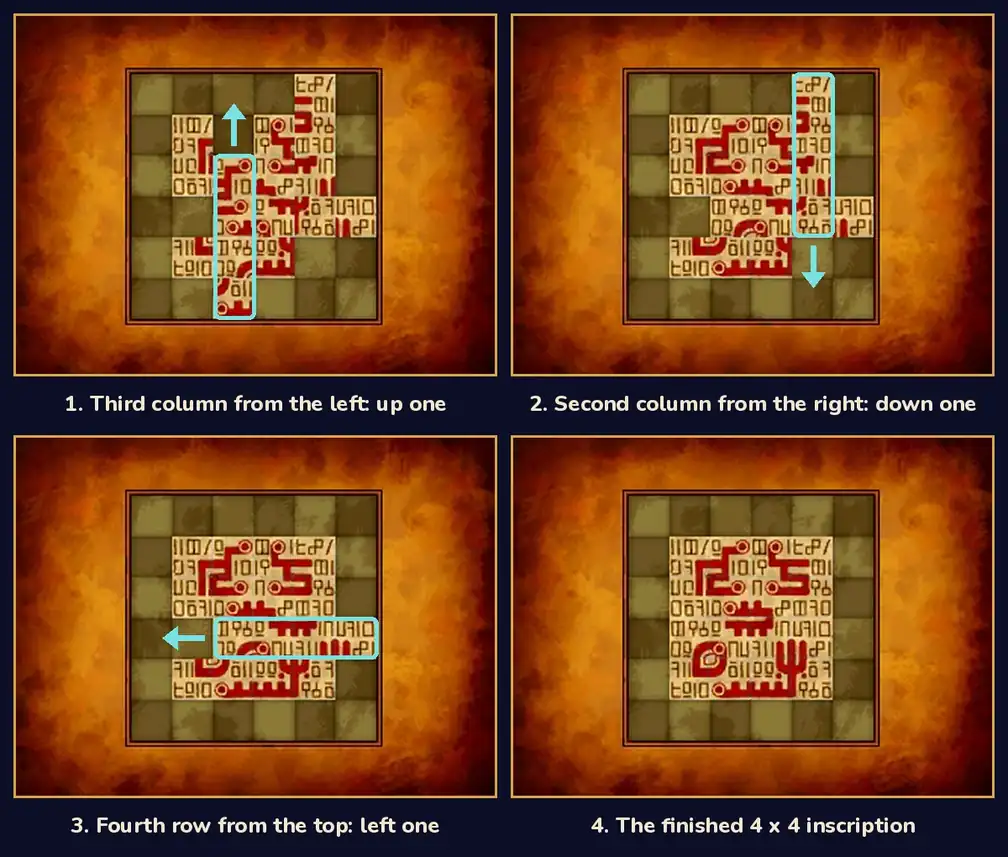
Answer: three slides. Slide column 3 (the third column from the left) up one square, then column 5 (the second column from the right) down one square, then row 4 (the fourth row from the top) one square to the left. The 16 pieces then form the inscription as a 4 x 4 square in columns 2 to 5 and rows 2 to 5.
| Slide | Line | Direction | Where the four pieces go |
|---|---|---|---|
| 1 | Column 3 (third from the left) | Up one square | From rows 3 to 6 into rows 2 to 5 |
| 2 | Column 5 (second from the right) | Down one square | From rows 1 to 4 into rows 2 to 5 |
| 3 | Row 4 (fourth from the top) | Left one square | From columns 3 to 6 into columns 2 to 5 |
Step by step:
- Column 3 up. At the start, column 3 holds four pieces in rows 3 to 6. Slide them up one square so they sit in rows 2 to 5. This is Hint 3's move.
- Column 5 down. Column 5 holds four pieces in rows 1 to 4. Slide them down one square into rows 2 to 5. This is the Super Hint's move.
- Row 4 left. Row 4 now holds four pieces in columns 3 to 6. Slide them one square to the left, into columns 2 to 5. The red lines join up, and the inscription is complete in the middle of the grid.
Row 4 already has four pieces side by side at the start, but sliding it first doesn't help. The two column slides have to come before it; the game's hints do column 3 first and then column 5.
The game confirms it: "Correct!" and explains, "The lines of the ancient inscription seem to create some kind of map. Superimposed on the map is a diagram in the shape of the Big Dipper, the seven brightest stars of Ursa Major." It adds, "The Big Dipper is commonly used to find Polaris, the North Star... Does it also point to something else here?" The UK version probably says "the Plough" instead of the Big Dipper.
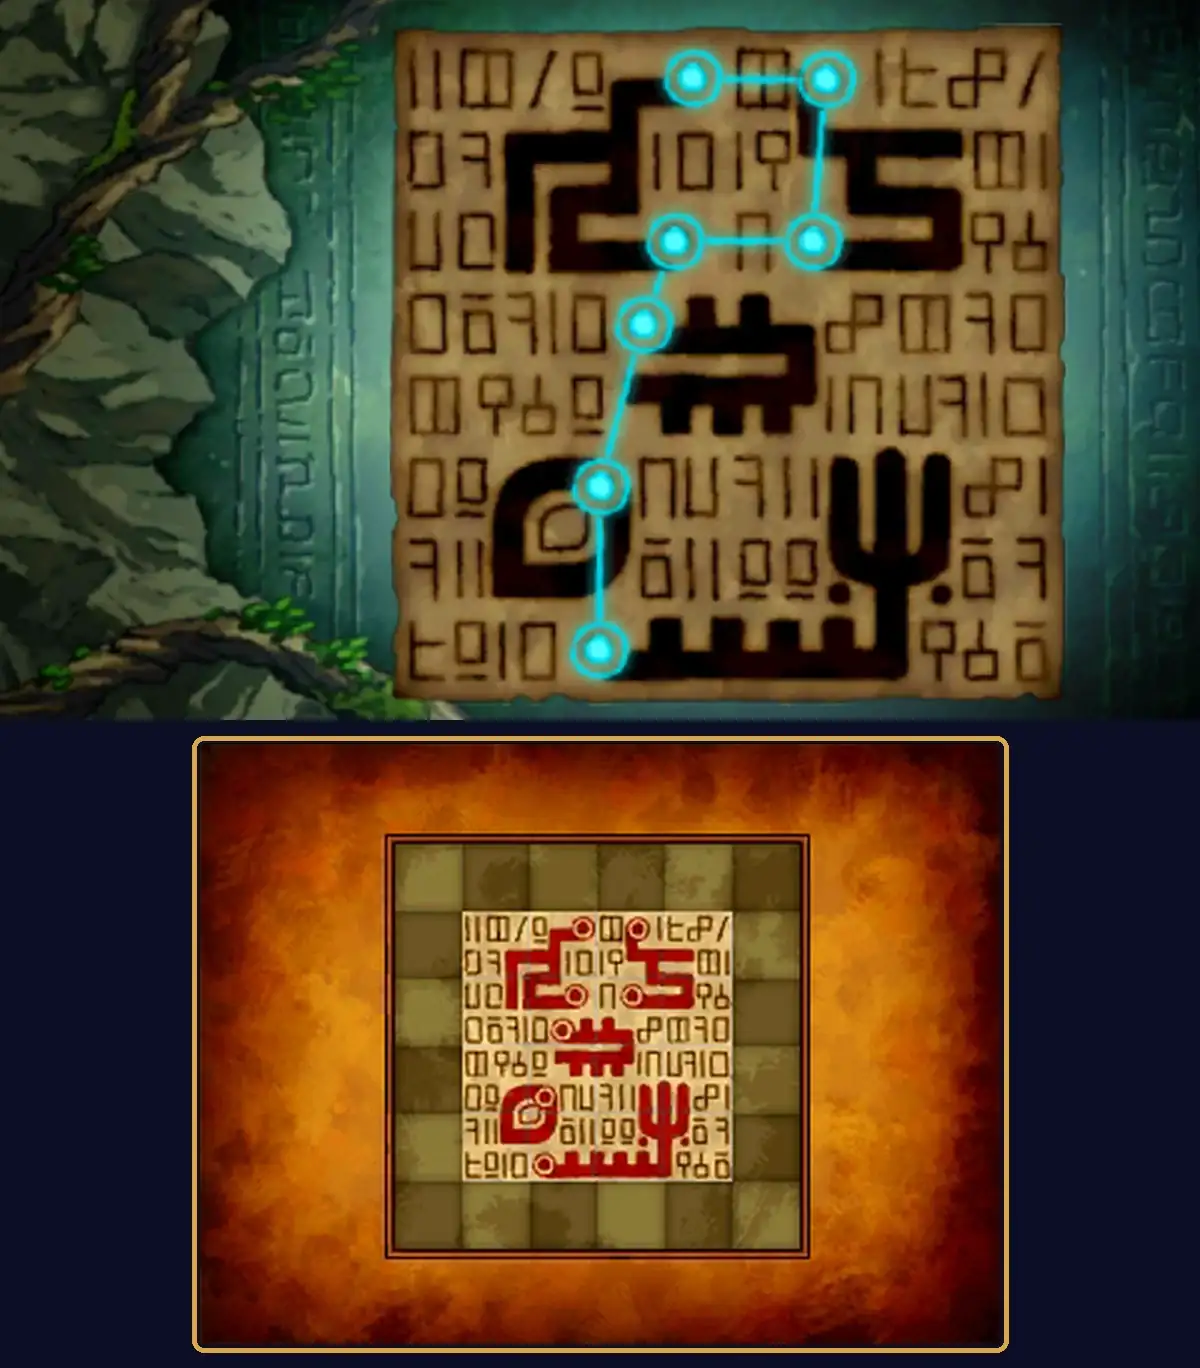
After the puzzle, Randall says, "As you can see, this whole wall is a giant map pointing to a very particular spot!" Hershel answers, "It doesn't look detailed enough to be that useful as a map." Randall replies, "Take another look. The shapes beneath the star chart match the terrain beyond the hills, where all the ruins are."
If it still doesn't finish:
- You slid row 4 first. Restart and begin with column 3, as above.
- A line moved two squares. Every slide in the answer moves its four pieces by just one square. Restart and slide again.
- The last slide went the wrong way. Row 4 moves to the left, toward column 2, not to the right.
Picarats, hints and hint coins
Norwell's Secret shows 40 picarats when it starts. Its three picarat values are all 40. If you quit, Hershel says, "Wait. I can't do this. This puzzle has stumped archaeologists for years!" When you come back to try again, Hershel says, "Quit babbling! Just focus and think!"
Hints cost hint coins, not picarats. The costs are one coin each for the first three hints and two for the Super Hint, five in total. Norwell's four coins cover Hints 1 to 3 but not the Super Hint, so you need one more coin from elsewhere, or you can use the free hints on this page.
Does it unlock anything?
Nothing beyond the story. There doesn't seem to be a reward. Solving it moves the story on: right afterwards, Angela runs off, and your objective becomes "Find Angela!" You also get the picarats, and the puzzle counts toward your total.
Versions
- Nintendo 3DS family: this page covers the 3DS game. You slide the pieces on the touch screen, and the top screen shows the carved wall.
- US and UK English versions: the pieces, the moves and the answer are the same, and so is the name. The UK question, hints and closing text are probably worded differently.
The scene around the puzzle
At the wall, Hershel tells Randall, "Randall, if you're right about this, then you've truly made a major step in the field of archaeology." Randall answers, "That's what I've been saying! The pattern isn't clear, but it's there, all right! Take a look at this." He adds, "The so-called experts overlooked such a simple solution!" Hershel says, "Incredible... Just incredible, Randall." Randall replies, "You haven't seen anything yet, Hershel. Wait until you solve this puzzle!"
When it's solved, Randall cheers, "Excellent! I knew you could do it, Hershel! I'm so lucky to have a brilliant best friend!"
FAQ
Where is the answer to Puzzle 064?
It's in the Answer and full solution section above, hidden until you open it. If you only want a push, open the hints one at a time first.
What is Puzzle 064 called?
Norwell's Secret, in both the North American and the UK version. The official Japanese title is 遺跡の秘密.
Where is Puzzle 064?
At Norwell in Chapter 4. Tap the carved wall once your objective is "Investigate Norwell!".
Why won't my pieces move?
The game only lets you move pieces in sets of four: a line of four pieces sitting side by side in a row or a column. A piece on its own can't be moved.
Can I miss Puzzle 064?
No. You have to solve it before the story continues.
How many picarats is Puzzle 064 worth?
It shows 40 picarats when it starts. Its three picarat values are all 40.
Is Daily Puzzle 064 the same as Puzzle 064?
No. Daily Puzzle 064 is Sailing 08, from the Perilous Voyage set. Story Puzzle 064 is the inscription puzzle at Norwell.
More Miracle Mask puzzles
- Puzzle 063: A Muddy Mess
- Puzzle 065: Kitty Solitaire 2
- Puzzle 062: Shattered Sign
- Puzzle 066: A Trip to the Hospital
- Puzzle 061: Padlocked Fence
- Puzzle 059: Flowery Footpath
- Puzzle 058: Sorting Blocks
- Puzzle 057: Stitching Squares
- Puzzle 056: Clear-Cut Contrasts
- Puzzle 60: Dangerous Holes
- Puzzle 001: Stumble's Balloons
- Puzzle 002: Where's Mother?
- Puzzle 003: Stumble's Banners
- Puzzle 004: Bumper Perspective
- Puzzle 005: Robot Factory
- Puzzle 006: Bunny-Hop Swap
- Puzzle 007: A Toasty Toast
- Puzzle 008: Carnival Colors
- Puzzle 009: Stamp Stumper
- Puzzle 010: The Place to Be!
- Puzzle 011: Backstage Blunder
- Puzzle 012: Sharing the Burden
- Puzzle 013: Ancient Arti-facts
- Puzzle 014: Bite of Bygone Days
- Puzzle 015: Fix the Fossil
- Puzzle 016: Wandering Watches
- Puzzle 017: Busted Umbrella
- Puzzle 018: That's Juicy!
- Puzzle 019: Spinning Maize
- Puzzle 020: Nine Red Bricks
- Puzzle 021: A Lick of Paint
- Puzzle 022: Poke 'Em Totems
- Puzzle 023: Fairway Fibber
- Puzzle 024: Patterned Apron
- Puzzle 025: Brave the Caves
- Puzzle 026: Mangled Math
- Puzzle 027: That Rings a Bell
- Puzzle 028: Bunny-Hop Swap 2
- Puzzle 029: Tenth-Round Ace
- Puzzle 030: Big Cake, Little Cake
- Puzzle 031: Emperor's Throne
- Puzzle 032: Target Practice
- Puzzle 033: Chained Circle
- Puzzle 034: The Cat's Trophy
- Puzzle 035: Guess Stars
- Puzzle 036: Going Dough-Nuts!
- Puzzle 037: Spin Shenanigans
- Puzzle 038: Pattern Pending
- Puzzle 039: A Hat of Tiles
- Puzzle 040: Crossed Connections
- Puzzle 041: From the Sidelines
- Puzzle 042: Couple at the Café
- Puzzle 043: Evenly Matched
- Puzzle 044: Suit Crates
- Puzzle 045: From Left to Right
- Puzzle 046: Toppings Up!
- Puzzle 047: Trial by Tennis
- Puzzle 048: Lighting Action
- Puzzle 049: Floor Seats
- Puzzle 050: Kitty Solitaire
- Puzzle 051: Dandy Bears
- Puzzle 052: Spectacular Views
- Puzzle 053: Poke 'Em Totems 2
- Puzzle 054: Archaeological Feet
- Puzzle 055: Spinning Maize 2
- Puzzle 100: Gate to the Ruins!
- Puzzle 113: Chip Champions
- Puzzle 118: Evenly Matched 3
- Puzzle 122: Kitty Solitaire 3
For the rest of the game's puzzles, see the Miracle Mask puzzle index.